
1. Introducció
Thank you for choosing the Grundig RRCD 4305 Freaxx 50 CD/MP3 Cassette Radio. This manual provides essential information for the safe and efficient operation of your device. Please read it thoroughly before use and retain it for future reference.
2. Instruccions de seguretat
- Font d'alimentació: Assegureu-vos que la font d'alimentació voltage coincideix amb la classificació indicada a la unitat.
- Ventilació: No bloquegeu les obertures de ventilació. Deixeu prou espai al voltant de la unitat per a un flux d'aire adequat.
- Aigua i humitat: Do not expose the unit to rain, moisture, or dripping/splashing liquids. Keep away from water sources.
- Calor: Eviteu col·locar la unitat a prop de fonts de calor com ara radiadors, registres de calor, estufes o altres aparells que produeixin calor.
- Neteja: Disconnect the unit from the power source before cleaning. Use a soft, dry cloth.
- Manteniment: No intenteu fer el manteniment de la unitat vosaltres mateixos. Envieu totes les tasques de manteniment a personal de servei qualificat.
- Bateries: Follow proper polarity when inserting batteries. Do not mix old and new batteries or different types of batteries. Remove batteries if the unit is not used for extended periods.
3. Producte acabatview
Familiarize yourself with the main components and controls of your Grundig RRCD 4305 Freaxx 50.
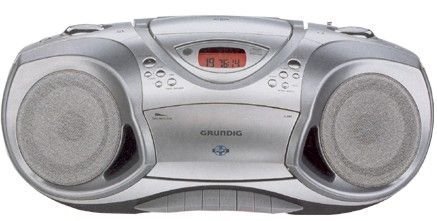
Figura 1: Frontal view of the Grundig RRCD 4305 Freaxx 50, showing the CD compartment, cassette deck, and control buttons.
Controls i indicadors:
- Botó d'encesa: Encén o apaga la unitat.
- Control de volum: Ajusta el nivell de sortida d'àudio.
- Selector de funcions: Switches between CD, Radio, Cassette, and AUX modes.
- Tuning Knob (Radio): Ajusta la freqüència de ràdio.
- Band Selector (Radio): Selects AM/FM radio bands.
- CD/MP3 Controls: Play/Pause, Stop, Skip Forward/Backward, Folder Up/Down.
- Cassette Controls: Play, Stop/Eject, Fast Forward, Rewind, Record.
- Visualització: Mostra el mode actual, el número de pista o la freqüència de ràdio.
4. Configuració
4.1 Desembalatge
- Traieu amb cura la unitat del seu embalatge.
- Check for any damage that may have occurred during transit. If damaged, do not operate the unit and contact your dealer.
- Conserveu els materials d'embalatge per a futurs transports o emmagatzematges.
4.2 Connexió d'alimentació
The unit can be powered by AC mains or batteries.
Alimentació CA:
- Connect the supplied AC power cord to the AC IN socket on the rear of the unit.
- Connecteu l'altre extrem del cable d'alimentació a una presa de corrent estàndard.
Potència de la bateria:
- Obriu la tapa del compartiment de les piles a la part inferior de la unitat.
- Insert the required number of 'C' size batteries (not supplied), ensuring correct polarity (+/-).
- Tanqueu bé la tapa del compartiment de la bateria.
4.3 Antena
- For FM reception, extend the telescopic antenna fully. Adjust its position for optimal signal reception.
- For AM reception, the unit uses a built-in ferrite bar antenna. Rotate the entire unit for best AM reception.
5. Instruccions de funcionament
5.1 Funcionament bàsic
- Premeu el botó PODER botó per encendre la unitat.
- Ajusteu el VOLUM control al nivell d'escolta desitjat.
- Premeu el botó PODER botó de nou per apagar la unitat.
5.2 Funcionament de la ràdio
- Estableix el SELECTOR DE FUNCIONS to 'RADIO'.
- Seleccioneu la banda desitjada (AM o FM) amb els botons SELECTOR DE BANDA interruptor.
- Gira el TUNING knob to find your desired radio station.
- Ajusteu l'antena per a una recepció òptima.
Reproducció de CD/MP3 de 5.3
- Estableix el SELECTOR DE FUNCIONS to 'CD'.
- Open the CD compartment cover by pressing the 'OPEN' button.
- Place a CD or MP3 disc onto the spindle with the label side facing up.
- Tanqueu la tapa del compartiment del CD. La unitat llegirà el disc.
- Premeu el botó REPRODUCCIÓ/PAUSA per iniciar la reproducció.
- Utilitza el ENDAVANT/ENDARRERE botons per navegar entre pistes.
- For MP3 discs, use the FOLDER UP/DOWN buttons to navigate between folders.
- Premeu el botó STOP botó per aturar la reproducció.
5.4 Reproducció i gravació de cassets
Reproducció:
- Estableix el SELECTOR DE FUNCIONS to 'TAPE'.
- Premeu el botó PARAR/EXPULTAR botó per obrir el compartiment del casset.
- Introduïu una cinta de casset amb la vora oberta cap amunt.
- Tanqueu el compartiment del casset.
- Premeu el botó JUGAR per iniciar la reproducció.
- Ús AVANT RÀPID or REBOBINAR botons per moure's ràpidament per la cinta.
- Premeu PARAR/EXPULTAR to stop playback and open the compartment.
Recording (from Radio/CD/AUX):
- Introduïu una cinta de casset verge al compartiment.
- Select the desired source (RADIO, CD, or AUX) using the SELECTOR DE FUNCIONS.
- Start playback on the source (e.g., play a CD, tune a radio station).
- Premeu el botó REGISTRAR button (usually red) and the JUGAR button simultaneously on the cassette deck. Recording will begin.
- Premeu el botó PARAR/EXPULTAR botó per finalitzar l'enregistrament.
5.5 Entrada auxiliar (AUX)
- Connect an external audio device (e.g., smartphone, MP3 player) to the AUX IN jack using a 3.5mm audio cable (not supplied).
- Estableix el SELECTOR DE FUNCIONS to 'AUX'.
- Control playback from your external device. The unit will output the audio.
6. Manteniment
6.1 Neteja de la unitat
- Desconnecteu sempre la unitat de la presa de corrent abans de netejar-la.
- Feu servir un drap suau i sec per netejar les superfícies exteriors.
- No utilitzeu netejadors abrasius, ceres o dissolvents, ja que poden danyar l'acabat.
6.2 Cura de les lents de CD
- No toqueu la lent del CD.
- If the lens is dirty, use a commercially available CD lens cleaner.
6.3 Cassette Deck Care
- Periodically clean the tape heads, capstan, and pinch roller using a cotton swab lightly moistened with isopropyl alcohol.
- Demagnetize the tape heads regularly with a tape head demagnetizer to prevent sound degradation.
6.4 Substitució de la bateria
- When battery power is low, the unit's performance may degrade. Replace all batteries with new ones.
- Refer to section 4.2 for battery insertion instructions.
- Eliminar les bateries usades de manera responsable d'acord amb la normativa local.
7. Solució De Problemes
| Problema | Causa possible | Solució |
|---|---|---|
| Sense poder | Cable de CA no connectat; piles esgotades o inserides incorrectament. | Comproveu la connexió del cable de CA; substituïu les piles, assegurant-vos de la polaritat correcta. |
| Sense so | Volum massa baix; Funció incorrecta seleccionada; Auriculars connectats. | Increase volume; Select correct function (CD/Radio/Tape/AUX); Disconnect headphones. |
| CD/MP3 disc skips or does not play | Disc dirty or scratched; Disc inserted incorrectly; Lens dirty. | Clean or replace disc; Reinsert disc correctly; Clean CD lens. |
| Mala recepció de ràdio | Antenna not extended/adjusted; Weak signal. | Extend and adjust FM antenna; Rotate unit for AM reception; Try moving the unit to a different location. |
| Cassette playback distorted | Tape heads dirty or demagnetized; Worn tape. | Clean and demagnetize tape heads; Try a different tape. |
8. Especificacions
- Font d'alimentació: AC 230V ~ 50Hz or DC 9V (6 x 'C' size batteries)
- Freqüència de ràdio:
- FM: 87.5 - 108 MHz
- AM: 522 - 1620 kHz
- Reproductor de CD: Supports CD-R/RW, MP3 playback
- Plata de cassets: Stereo playback and recording
- Entrada d'àudio: Conector AUX-IN de 3.5 mm
- Potència de sortida: [Specific wattage, if known, otherwise omit or state 'Typical']
- Dimensions (L x A x P): [Specific dimensions, if known, otherwise omit]
- Pes: [Specific weight, if known, otherwise omit]
Specifications are subject to change without notice for continuous product improvement.
9. Garantia i Suport
Grundig products are manufactured to high quality standards and are warranted against manufacturing defects. For detailed warranty information, please refer to the warranty card included with your purchase or visit the official Grundig website. For technical support or service inquiries, please contact your local Grundig service center or authorized dealer.
Podeu trobar més informació i suport a Grundig Brand Store.