
1. Introducció
Thank you for choosing the Saeco TDCM-GL Renaissance 10-Cup Digital Coffee Maker. This appliance is designed to brew delicious coffee with convenience and ease. Please read this manual thoroughly before operating your new coffee maker to ensure safe and efficient use. Keep this manual for future reference.
2. Instruccions de seguretat importants
- Llegiu totes les instruccions abans d'utilitzar.
- No toqueu superfícies calentes. Utilitzeu nanses o poms.
- Per protegir-vos contra incendis, descàrregues elèctriques i lesions personals, no submergiu el cable, els endolls ni l'aparell en aigua ni en altres líquids.
- És necessària una supervisió estreta quan qualsevol aparell és utilitzat per o a prop dels nens.
- Desendolleu la presa de corrent quan no utilitzeu i abans de netejar. Deixeu refredar abans de posar o treure peces i abans de netejar l'aparell.
- No feu funcionar cap aparell amb el cable o l'endoll danyats, o després que l'aparell no funcioni correctament o s'hagi danyat de qualsevol manera. Poseu-vos en contacte amb el servei d'atenció al client per a la seva revisió, reparació o ajust.
- L'ús d'accessoris no recomanats pel fabricant de l'aparell pot provocar incendis, descàrregues elèctriques o lesions a persones.
- No utilitzar a l'aire lliure.
- No deixeu que el cable pengi de la vora de la taula o del taulell, ni toqui superfícies calentes.
- No col·loqueu-lo sobre o prop d'un cremador de gas o elèctric calent, ni en un forn calent.
- Connecteu sempre primer l'endoll a l'aparell i després el cable a la presa de corrent. Per desconnectar-lo, gireu qualsevol control a la posició "off" i, a continuació, retireu l'endoll de la presa de corrent.
- No utilitzeu l'aparell per a un altre ús que el previst.
- La garrafa està dissenyada per utilitzar-la amb aquest aparell. No s'ha d'utilitzar mai a la part superior de la gamma.
- No col·loqueu una garrafa calenta sobre una superfície humida o freda.
- No utilitzeu una garrafa esquerdada o una garrafa amb un mànec solt o debilitat.
- No netegeu la garrafa amb productes de neteja, coixinets de llana d’acer o altres materials abrasius.
3. Identificació de peces
Familiarize yourself with the components of your Saeco TDCM-GL coffee maker:
- Main Unit with Warming Plate
- Gerra de vidre amb nansa
- Top-Filling Water Tank (55-ounce capacity)
- Top Loading Filter Basket
- Removable Internal Filter Basket
- Digital Control Panel with Blue LED Display
- Cable d'alimentació
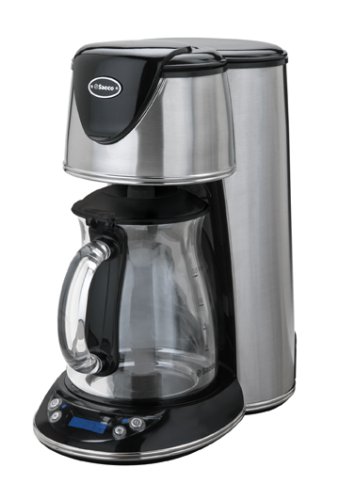
Image of the Saeco TDCM-GL Renaissance 10-Cup Digital Coffee Maker, showing its sleek design, digital display, and glass carafe.
4. Configuració
- Desembalatge: Carefully remove all packaging materials and inspect the coffee maker for any damage. Ensure all parts are present.
- Neteja inicial: Before first use, wash the glass carafe and removable filter basket in warm, soapy water. Rinse thoroughly and dry. Wipe the exterior of the coffee maker with a damp tela.
- Primer cicle d'elaboració (netja): Fill the water tank to the 10-cup mark with fresh, cold water. Do not add coffee grounds. Place the empty filter basket into its holder and close the lid. Place the empty carafe on the warming plate. Plug the coffee maker into a standard electrical outlet. Press the 'Brew' button to run a full cycle of plain water through the machine. Discard the water. This cleans the internal components and removes any manufacturing residue.
- Col·locació: Col·loqueu la cafetera sobre una superfície plana, estable i resistent a la calor, allunyada de la vora del taulell. Assegureu-vos que hi hagi una ventilació adequada al voltant de la unitat.
5. Instruccions de funcionament
5.1 Configuració del rellotge
- Plug in the coffee maker. The digital display will flash '12:00'.
- Press the 'HOUR' button repeatedly to set the current hour. The display will cycle through AM/PM.
- Press the 'MINUTE' button repeatedly to set the current minute.
- El rellotge està configurat.
5.2 Elaboració de cafè
- Omplir el dipòsit d'aigua: Open the top lid and fill the 55-ounce water tank with fresh, cold water to the desired level, corresponding to the number of cups you wish to brew. You can fill it directly or using the glass carafe. Do not exceed the 'MAX' fill line.
- Afegeix el marc de cafè: Place a standard basket-style paper filter (or the reusable filter, if applicable) into the removable internal filter basket. Add the desired amount of ground coffee. A general guideline is one level tablespoon of coffee per cup, but adjust to your personal preference.
- Position Filter Basket: Insert the filled filter basket into the top loading filter basket holder and close the lid securely.
- Col·loca la garrafa: Ensure the empty glass carafe with its lid is correctly positioned on the warming plate.
- Comença a fer cervesa: Press the 'BREW' button. The blue LED display will illuminate, indicating that the brewing process has started.
- Pausa i publicació: During the brewing cycle, you can temporarily remove the carafe to pour a cup of coffee. The flow of coffee will automatically pause. Return the carafe to the warming plate within 20 seconds to prevent overflow.
- Finalització: Once brewing is complete, the coffee maker will beep and the warming plate will keep the coffee hot for two hours before automatically shutting off.
5.3 Programming the Automatic Timer
The automatic timer allows you to set the coffee maker to start brewing at a specific time.
- Prepare the coffee maker for brewing as described in steps 5.2.1 to 5.2.4 (water, coffee, filter, carafe in place).
- Press the 'PROG' button. The display will flash '12:00'.
- Press the 'HOUR' button repeatedly to set the desired brew start hour.
- Press the 'MINUTE' button repeatedly to set the desired brew start minute.
- Press the 'PROG' button again to confirm the setting. The 'PROG' indicator light will illuminate on the display.
- La cafetera començarà a preparar cafè automàticament a l'hora programada.
6. Neteja i Manteniment
Una neteja regular garanteix un rendiment òptim i allarga la vida útil de la teva cafetera.
6.1 Neteja diària
- Desendolleu sempre la cafetera abans de netejar-la i deixeu-la refredar completament.
- Discard used coffee grounds and paper filter. Wash the glass carafe and removable filter basket in warm, soapy water. Rinse thoroughly and dry. These parts are also top-rack dishwasher safe.
- Wipe the exterior of the coffee maker, warming plate, and control panel with a soft, damp tela. No utilitzeu netejadors abrasius ni fregalls.
- No submergeu mai la unitat principal en aigua ni en cap altre líquid.
6.2 Descalcificació (eliminació de dipòsits minerals)
Els dipòsits minerals (calci) es poden acumular a la cafetera amb el temps, cosa que afecta el seu rendiment. Descalcifiqueu la cafetera cada 2-3 mesos o amb més freqüència si teniu aigua dura.
- Fill the water tank with a mixture of white vinegar and cold water. A common ratio is 1 part vinegar to 2 parts water. For a 10-cup coffee maker, use approximately 3 cups of vinegar and 6 cups of water.
- Place an empty paper filter in the filter basket (or use the reusable filter). Place the empty carafe on the warming plate.
- Press the 'BREW' button to start a brewing cycle. Allow half of the solution to brew through, then turn off the coffee maker and let it stand for 15-20 minutes to allow the solution to work.
- Torneu a engegar la cafetera i deixeu que la solució restant s'infusioni.
- Discard the vinegar solution from the carafe.
- Run 2-3 full cycles of fresh, cold water through the coffee maker to rinse thoroughly and remove any residual vinegar taste.
7. Solució De Problemes
| Problema | Causa possible | Solució |
|---|---|---|
| El cafè no es fa infusió. | Coffee maker not plugged in; 'BREW' button not pressed; programmed timer not set correctly. | Ensure power cord is securely plugged in. Press the 'BREW' button. Verify programmed time and 'PROG' indicator. |
| El cafè és massa feble. | Not enough coffee grounds; coffee grounds too coarse; water-to-coffee ratio incorrect. | Increase amount of coffee grounds. Use a finer grind. Adjust water-to-coffee ratio to taste. |
| El cafè vessa del cistell del filtre. | Too much coffee grounds; filter basket not seated correctly; carafe not on warming plate; mineral buildup. | Reduce coffee grounds. Ensure filter basket is properly seated. Confirm carafe is on warming plate. Descale the coffee maker. |
| El cafè té mal gust. | Mòlt de cafè vell; cafetera bruta; mala qualitat de l'aigua. | Use fresh coffee grounds. Clean the coffee maker thoroughly, including descaling. Use filtered water. |
| Fuites d'aigua de la unitat. | Water tank overfilled; loose connections; internal damage. | Do not overfill water tank. Check for visible cracks or loose parts. If problem persists, contact customer support. |
8. Especificacions
- Model: TDCM-GL
- Capacitat: 10 Cups (55 Ounces)
- Material: Got (garrafa)
- Característica especial: Programmable, Auto Shut-off, Pause and Serve
- Tipus de filtre: Reusable (or standard paper filters)
- Potència: [Voltage/Wattagi - (Information not provided in source, typical for coffee makers is 120V, 900-1200W)]
9. Garantia i Suport
This Saeco TDCM-GL Renaissance 10-Cup Digital Coffee Maker comes with a Un any de garantia limitada des de la data de compra. Aquesta garantia cobreix els defectes de fabricació dels materials i la mà d'obra en condicions d'ús normal.
The warranty does not cover damage resulting from misuse, accident, abuse, neglect, commercial use, or unauthorized modification. Please retain your proof of purchase for warranty claims.
For technical support, warranty service, or to order replacement parts, please contact Saeco Customer Service. Refer to the contact information provided with your product packaging or visit the official Saeco weblloc web per obtenir informació sobre el suport actual.