
1. Introducció
Gràcies per la compraasing the Karcher KA 350 Compact Stereo System. This versatile audio system combines modern design with a wide range of playback options, including a 3-disc CD changer, dual cassette deck, turntable, USB port, SD card reader, and an integrated radio. This manual provides essential information for safe operation, setup, and maintenance of your device. Please read it thoroughly before use and retain it for future reference.
2. Instruccions de seguretat importants
- Font d'alimentació: Assegureu-vos que la font d'alimentació voltage coincideix amb l'etiqueta de classificació de la unitat.
- Ventilació: No bloquegeu cap obertura de ventilació. Deixeu prou espai al voltant de la unitat per a un flux d'aire adequat.
- Aigua i humitat: No exposeu la unitat a la pluja, la humitat, les goteges o les esquitxades. No col·loqueu objectes plens de líquids, com ara gerros, sobre l'aparell.
- Calor: Mantingueu la unitat allunyada de fonts de calor com ara radiadors, registres de calor, estufes o altres aparells (inclosos amplificadors) que produeixen calor.
- Neteja: Desendolleu la unitat de la presa de corrent abans de netejar-la. Feu servir només un drap suau i sec.
- Manteniment: No intenteu atendre aquest producte vosaltres mateixos. Consulteu tots els serveis a personal de servei qualificat.
- Nens: Mantingueu la unitat i els seus accessoris fora de l'abast dels nens.
- Seguretat làser: This product uses a laser. Use of controls or adjustments or performance of procedures other than those specified herein may result in hazardous radiation exposure.
3. Contingut del paquet
Si us plau, comproveu que tots els elements siguin presents i en bon estat:
- Karcher KA 350 Compact Stereo System (Main Unit)
- Control remot
- Manual d'instruccions
- Stereo Speakers (2 units)
- Cable d'alimentació
- FM Antenna (wire type)
4. Producte acabatview
4.1 Controls del panell frontal
The front panel provides access to all primary functions and controls for the KA 350 system.

Figura 4.1: Controls del panell frontal
- Botó ON/STANDBY: Encén o apaga la unitat.
- Botó FUNCIÓ: Selects between CD, Tuner (Radio), Phono (Turntable), Tape (Cassette), and USB/SD modes.
- Botó de VOLUM: Ajusta el nivell de volum principal.
- Controls de CD: Play/Pause, Stop, Skip/Search (Forward/Backward), Open/Close CD tray.
- Controls de la platina de casset: Play, Record, Fast Forward, Rewind, Stop/Eject for Deck 1 and Deck 2.
- USB/SD Controls: Play/Pause, Stop, Skip/Search (Forward/Backward).
- Controls del sintonitzador: Band selection (AM/FM), Tuning Up/Down, Memory presets.
- Visualització: Mostra el mode actual, la informació de la pista, la freqüència de ràdio i l'hora.
4.2 Connexions del panell posterior
The rear panel houses all necessary input and output connections for the system.
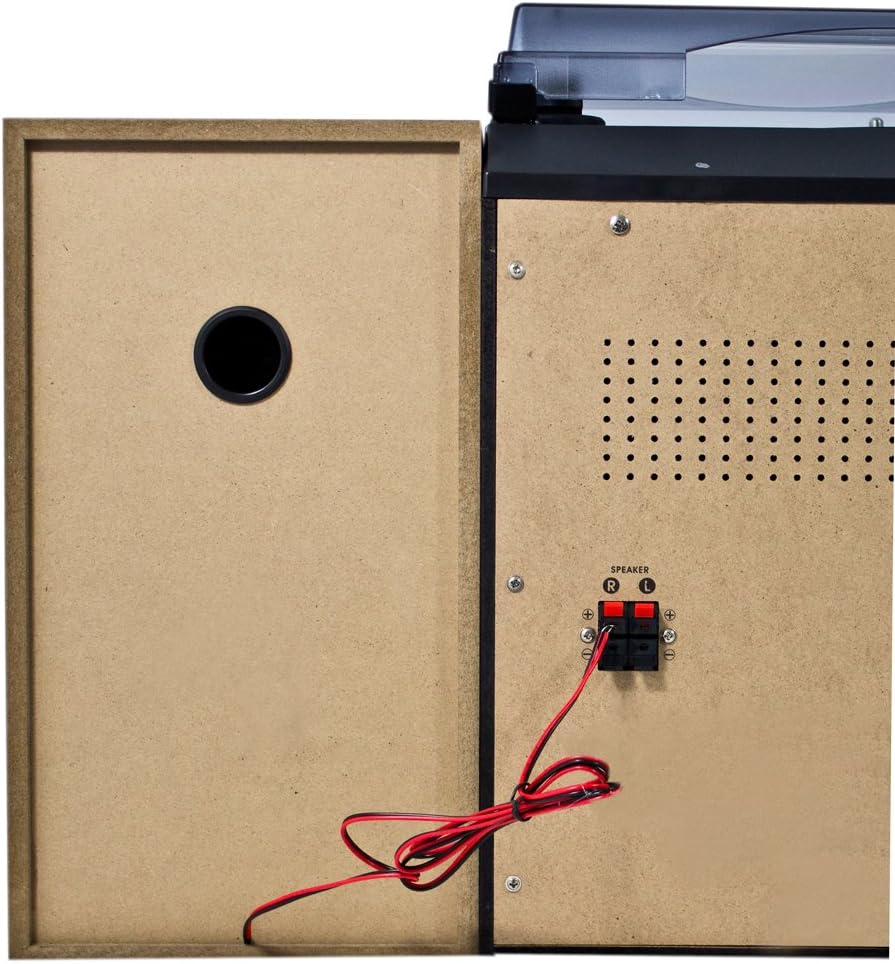
Figura 4.2: Connexions del panell posterior
- Speaker Terminals (R/L): Connect the included stereo speakers. Ensure correct polarity (+ to + and - to -).
- Entrada d'alimentació de CA: Connecteu el cable d'alimentació aquí.
- Terminal d'antena FM: Connect the supplied FM wire antenna for radio reception.
4.3 Components principals

Figure 4.3: Karcher KA 350 Main Components
- Plataforma giratòria: Located on top, for playing vinyl records.
- 3-Disc CD Changer: Front-loading tray for multiple CDs.
- Dual Cassette Deck: Two cassette compartments for playback and recording.
- Port USB: Per connectar unitats flaix USB.
- Ranura per a targeta SD: Per inserir targetes de memòria SD.
- Altaveus estèreo: Two external speakers for audio output.
5. Configuració
5.1 Desembalatge i col·locació
- Traieu amb cura tots els components de l'embalatge.
- Col·loqueu la unitat principal sobre una superfície estable i plana.
- Position the speakers on either side of the main unit, ensuring they are at an equal distance for optimal stereo sound.
- Assegureu-vos que hi hagi una ventilació adequada al voltant de la unitat.
5.2 Connexió dels altaveus
Connect the supplied speakers to the speaker terminals on the rear of the main unit.

Figure 5.1: Speaker Unit
- Identify the speaker wires. Each wire typically has two strands, one marked for positive (+) and one for negative (-).
- Connect the positive (+) terminal of the left speaker to the 'L+' terminal on the main unit's rear panel.
- Connect the negative (-) terminal of the left speaker to the 'L-' terminal on the main unit's rear panel.
- Repeat the process for the right speaker, connecting it to the 'R+' and 'R-' terminals.
- Ensure all connections are secure to prevent sound distortion or damage.
5.3 Connexió de l'antena FM
For optimal radio reception, connect the supplied FM wire antenna.
- Insert the FM antenna plug into the FM antenna jack on the rear panel.
- Extend the wire antenna fully and position it for the best possible reception. You may need to experiment with its placement.
5.4 Connexió d'alimentació
- Plug the AC power cable into the AC power input on the rear of the main unit.
- Plug the other end of the power cable into a standard wall outlet.
6. Instruccions de funcionament
6.1 Encès/Apagat
Premeu el botó EN ESPERA botó del panell frontal o del comandament a distància per encendre o apagar la unitat.
6.2 Selecció del mode
Premeu el botó FUNCIÓ button repeatedly to cycle through the available modes: CD, Tuner (Radio), Phono (Turntable), Tape (Cassette), and USB/SD.
6.3 Funcionament del reproductor de CD

Figure 6.1: CD Changer Tray
- Premeu el botó FUNCIÓ botó per seleccionar el mode CD.
- Premeu el botó OBRIR/TANCAR botó per obrir la safata de CD.
- Place up to three CDs onto the disc trays, label side up.
- Premeu el botó OBRIR/TANCAR botó de nou per tancar la safata.
- Premeu el botó REPRODUCCIÓ/PAUSA per iniciar la reproducció.
- Utilitza el SALTAR/CERCAR buttons to navigate between tracks or fast forward/rewind.
6.4 Funcionament del reproductor/gravador de cassets
- Premeu el botó FUNCIÓ per seleccionar el mode TAPE.
- Premeu el botó PARAR/EXPULTAR button on either Deck 1 or Deck 2 to open the cassette compartment.
- Inseriu una cinta de casset i tanqueu el compartiment.
- Premeu el botó JUGAR per iniciar la reproducció.
- To record, insert a blank tape into Deck 2 (for recording from Deck 1 or other sources) or Deck 1 (for recording from external sources if applicable). Press the REGISTRAR botó.
6.5 Funcionament del tocadiscs
- Premeu el botó FUNCIÓ button to select PHONO mode.
- Obriu la coberta antipols.
- Col·loca un disc de vinil al plat.
- Seleccioneu la velocitat adequada (33, 45 o 78 RPM) amb el selector de velocitat.
- Carefully lift the tone arm and place the stylus onto the desired groove of the record.
- At the end of the record, manually return the tone arm to its rest.
Reproducció USB/SD de 6.6"
- Premeu el botó FUNCIÓ button to select USB/SD mode.
- Inseriu una unitat flaix USB al port USB o una targeta SD a la ranura per a targetes SD.
- La unitat detectarà automàticament i començarà a reproduir àudio compatible files (MP3, WMA, AAC).
- Utilitza el REPRODUCCIÓ/PAUSA i SALTAR/CERCAR botons per controlar la reproducció.
6.7 Funcionament de la ràdio
- Premeu el botó FUNCIÓ button to select TUNER mode.
- Premeu el botó BANDA button to select between FM and AM bands.
- Utilitza el TUNING botons per sintonitzar manualment una emissora o manteniu premuts per a l'escaneig automàtic.
- Per desar una emissora, premeu la tecla MEMÒRIA i, a continuació, utilitzeu el botó SALTAR/CERCAR botons per seleccionar un número preestablert i premeu MEMÒRIA de nou per confirmar.
6.8 Control remot
The included remote control allows convenient operation of all functions from a distance. Ensure batteries are correctly inserted.
7. Manteniment
7.1 Neteja de la unitat
- Desconnecteu sempre la unitat de la presa de corrent abans de netejar-la.
- Feu servir un drap suau i sec per netejar les superfícies exteriors.
- No utilitzeu netejadors abrasius, ceres o dissolvents, ja que poden danyar l'acabat.
7.2 Cura del punter del tocadiscs
- Handle the stylus with extreme care. Only touch the tone arm, not the stylus itself.
- Netegeu el llapis periòdicament amb un raspall suau, raspallant de darrere cap endavant.
- Replace the stylus when it shows signs of wear (e.g., distorted sound, skipping).
7.3 Cassette Deck Care
- Regularly clean the tape heads, capstan, and pinch roller with a cotton swab lightly dampamb alcohol isopropílic.
- Demagnetize the tape heads periodically to maintain sound quality.
8. Solució De Problemes
| Problema | Causa possible | Solució |
|---|---|---|
| Sense poder | Cable d'alimentació no connectat; Presa de corrent no activa | Comproveu la connexió del cable d'alimentació; proveu una presa de corrent diferent |
| Sense so | Volume too low; Speakers not connected correctly; Incorrect function mode selected | Increase volume; Check speaker connections and polarity; Select correct function mode |
| El CD salta o no es reprodueix | CD is dirty or scratched; CD inserted incorrectly | Clean or replace CD; Insert CD label side up |
| Mala recepció de ràdio | Antenna not connected or poorly positioned; Weak signal | Connect and adjust FM antenna; Try repositioning the unit |
| Turntable speed incorrect | S'ha seleccionat una velocitat incorrecta | Adjust the speed selector switch (33/45/78 RPM) |
| Problemes de reproducció amb USB/SD | Incompatible file format; USB/SD card not inserted correctly; Corrupted files | Assegureu-vos files are MP3, WMA, or AAC; Reinsert USB/SD card; Try a different USB/SD card |
9. Especificacions
| Característica | Especificació |
|---|---|
| Marca | Karcher |
| Número de model | KA 350 |
| Tecnologia de connectivitat | FM/MW Tuner, USB, SD |
| Color | Negre |
| Tipus d'altaveu | Stereo (2 speakers included) |
| Dimensions de l'article (L x A x A) | 70.5 x 41 x 37.3 cm |
| Font d'alimentació | Elèctric amb cable |
| Dispositius compatibles | Telèfon intel·ligent, tauleta, reproductor MP3, ordinador personal |
| Pes de l'article | 10.8 quilos |
| Potència de sortida (RMS) | 2 x 5 W (Total 50 W) |
| Supported Media Standards | MP3, CD, Cassette, USB, SD |
| Formats d'àudio compatibles | CD-DA, MP3, WMA, AAC |
| Suport Bluetooth | No |
| Nombre de ponents | 2 |
| Mode de sortida d'àudio | estèreo |
| Configuració de so envoltant | 2.0 |
| Components inclosos | Compact system, Remote control, Instruction manual |
10. Garantia i Suport
Per obtenir informació sobre la garantia i assistència tècnica, consulteu la targeta de garantia inclosa amb el producte o visiteu el lloc web oficial de Karcher. weblloc web. Conserveu el comprovant de compra per a qualsevol reclamació de garantia.
Fabricant: Karcher