Jet J-2500
JET J-2500 15-Inch Floor Drill Press Instruction Manual
Model: J-2500
1. Introducció
This manual provides essential information for the safe operation, assembly, maintenance, and troubleshooting of your JET J-2500 15-Inch Floor Drill Press. The JET J-2500 is designed for precision drilling tasks, offering accuracy, stability, and versatility. It features a 3/4 HP motor, 16 spindle speeds, and a robust cast iron construction.
Si us plau, llegiu aquest manual detingudament abans de fer servir la màquina per garantir-ne un ús correcte i evitar lesions o danys.
2. Informació de seguretat
ADVERTÈNCIA: Si no es segueixen aquestes instruccions de seguretat, es poden produir lesions greus o la mort.
- Always wear appropriate personal protective equipment (PPE), including safety glasses, hearing protection, and dust masks when operating the drill press.
- Assegureu-vos que la zona de treball estigui neta, ben il·luminada i lliure d'obstacles.
- No feu funcionar la màquina en damp o condicions humides.
- Mantingueu els nens i el personal no autoritzat allunyats de la zona d'operació.
- De manera segura clamp all workpieces before drilling to prevent movement.
- Never wear loose clothing, gloves, or jewelry that could become entangled in moving parts.
- Disconnect power before making adjustments, changing bits, or performing maintenance.
- Use the correct drill bit for the material and task.
- Do not force the drill. Allow the machine to work at its intended speed.
- Maintain the machine in good working order. Inspect for damaged parts before each use.
3. Components mésview
The JET J-2500 Floor Drill Press consists of several key components designed for efficient and precise drilling operations.

Figura 3.1: Labeled diagram illustrating the main components of the JET J-2500 Drill Press, including the cast iron head, 3/4 HP motor, 3-1/8 inch stroke, telescoping spindle guard, 11-1/2 inch x 11-1/2 inch work table, and 2-7/8 inch ground steel column.
- Assemblea del cap: Houses the motor, spindle, and speed adjustment mechanism. Constructed from cast iron for durability and stability.
- Motor: A 3/4 HP motor powers the spindle, providing a speed range of 200-3,630 RPM.
- Fus: The rotating shaft that holds the drill chuck. Features a 3-1/8 inch stroke for deep hole applications. The enclosed spindle assembly is supported by four permanently-lubricated ball bearings for precision.
- Telescoping Safety Spindle Guard: Proporciona protecció durant el funcionament.
- Taula de treball: An 11-1/2 inch x 11-1/2 inch tilting table for supporting workpieces.
- Columna: A large, ground steel column (2-7/8 inch diameter) provides maximum support for the head and table.
- Base: A solid cast iron base ensures stability during operation.
- chuck: Holds drill bits up to 13mm (0.51 inches).
4. Muntatge i muntatge
The JET J-2500 Drill Press requires assembly before use. It is recommended to have assistance due to the weight of certain components.
4.1 Desembalatge
- Traieu amb cura tots els components de l'embalatge.
- Verifiqueu que hi hagi totes les peces que figuren a la llista d'embalatge.
- Report any missing or damaged parts to JET customer service immediately.
4.2 Passos de muntatge
- Attach Column to Base: Secure the column to the base using the provided hardware. Ensure it is firmly tightened.
- Install Work Table: Slide the work table assembly onto the column. Adjust its height and secure it with the locking mechanism.
- Mount Head Assembly: With assistance, carefully lift and slide the head assembly onto the top of the column. Secure it in place according to the instructions in the detailed manual.
- Install Chuck: Clean the tapered surfaces of the spindle and chuck. Place the chuck onto the spindle taper and firmly tap it into place with a soft mallet.
- Connectar l'alimentació: Ensure the drill press is connected to a suitable 115V or 230V power supply as indicated on the motor plate.
5. Instruccions de funcionament
5.1 controls de potència

Figura 5.1: The green 'START' button initiates operation, and the red 'STOP' button halts the machine.
- To start the drill press, press the green COMENÇA botó.
- To stop the drill press, press the red STOP botó.
5.2 Adjusting Spindle Speed
The JET J-2500 offers 16 different spindle speeds, adjustable by changing the belt position on the motor and spindle pulleys.
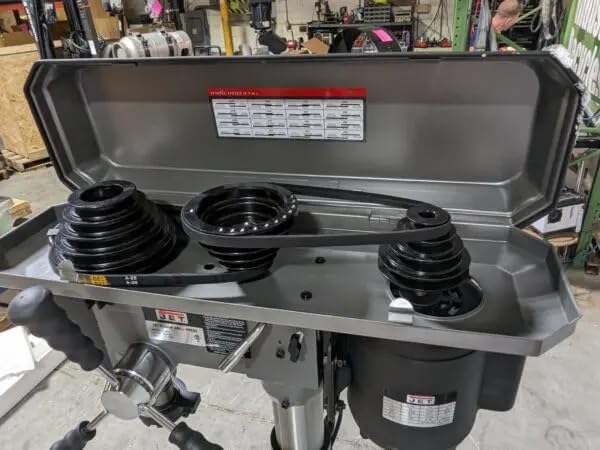
Figura 5.2: View of the belt and pulley system located under the top cover, used to adjust the spindle speed. A speed chart is typically affixed inside the cover.
- Desconnecteu l'alimentació: Always unplug the machine before opening the pulley cover.
- Open Pulley Cover: Lift the top cover of the head assembly.
- Consult Speed Chart: Refer to the speed chart located inside the cover to determine the correct belt configuration for your desired RPM.
- Adjust Belt Tension: Loosen the motor mount bolts to allow the motor to pivot, relieving belt tension.
- Reposition Belts: Move the belts to the appropriate pulley steps for the desired speed.
- Re-tension Belts: Apply tension to the belts by moving the motor, then tighten the motor mount bolts. Belts should be taut but not overly tight.
- Tancar la coberta: Securely close the pulley cover.
5.3 Drilling Operation
- Selecciona el bit: Choose the appropriate drill bit for the material and task. Insert it into the chuck and tighten securely with the chuck key.
- Adjust Table: Position the work table to the desired height and angle. Lock it firmly in place.
- Peça de treball segura: Clamp the workpiece firmly to the work table to prevent rotation or movement during drilling.
- Set Depth Stop: Adjust the depth stop to control the drilling depth.
- Inici de la màquina: Premeu el botó verd START.
- Perforar: Slowly lower the spindle using the feed handle, applying steady pressure. Do not force the drill.
- Retirar: Once drilling is complete, retract the spindle and press the red STOP button.
6. Manteniment
Un manteniment regular garanteix la longevitat i el rendiment òptim del vostre trepant de columna.
- Neteja: Keep the machine clean and free of dust and debris. Use a brush or vacuum to remove chips.
- Lubricació: The spindle assembly features permanently-lubricated ball bearings, requiring no additional lubrication. Other moving parts may require occasional light oiling as specified in the full manual.
- Inspecció del cinturó: Periodically inspect drive belts for wear, cracks, or stretching. Replace as needed.
- Manteniment del mandril: Keep the chuck jaws clean and free of rust. Apply a light coat of oil to prevent corrosion.
- Inspecció elèctrica: Regularly check the power cord and connections for damage.
7. Solució De Problemes
| Problema | Causa possible | Solució |
|---|---|---|
| El motor no arrenca | Sense font d'alimentació Interruptor defectuós Sobrecàrrega del motor | Comproveu la connexió d'alimentació i l'interruptor automàtic Inspect/replace switch Allow motor to cool, reduce load |
| Vibració excessiva | Components solts Unbalanced drill bit Worn belts | Tighten all bolts and fasteners Replace or re-sharpen drill bit Substituïu les corretges de transmissió |
| La broca no talla de manera eficient | Broca apagada Velocitat incorrecta Pressió d'alimentació insuficient | Sharpen or replace drill bit Adjust spindle speed for material Apply steady, appropriate feed pressure |
| Spindle runout | Damaged chuck Fus doblegat | Replace chuck Contacteu amb un tècnic de servei qualificat |
8. Especificacions
| Característica | Especificació |
|---|---|
| Número de model | J-2500 |
| Font d'alimentació | Elèctric amb cable |
| Voltage | 115 Volts |
| Ampedat | 9 Amps |
| Cavalls de força | 0.75 CV |
| Nombre de velocitats | 16 |
| Velocitat de rotació màxima | 3630 RPM |
| Mida màxima del mandril | 13 mil·límetres (0.51 polzades) |
| Capacitat de perforació (fusta/metall) | 0.63 polzades |
| Cursa de l'eix | 3-1/8 polzades |
| Dimensions del producte (L x A x A) | 54" x 20" x 10.5" |
| Pes de l'article | 167 lliures |
| Material | Fundició, acer |
| Components inclosos | Head Assembly, Table, Column, Base, Hardware |
9. Garantia i Suport
9.1 Informació de la garantia

Figura 9.1: The JET 2-Year Warranty emblem.
The JET J-2500 15-Inch Floor Drill Press is backed by an industry-leading Garantia de dos anysAquesta garantia cobreix els defectes de materials i de fabricació en condicions d'ús i manteniment normals.
For specific terms and conditions of the warranty, please refer to the warranty card included with your product or visit the official JET weblloc.
9.2 Atenció al client
If you require assistance with assembly, operation, maintenance, or have questions regarding your JET J-2500 Drill Press, please contact JET customer support. Have your model number (J-2500) and serial number ready when contacting support.
For the most current contact information, please visit the official JET website or refer to the documentation provided with your product.
Ask a question about this manual
Ask about setup, troubleshooting, compatibility, parts, safety, or missing instructions. Manuals+ will review the question and use this page’s manual context to help answer it.