Gymstick POSRW40
Manual d'usuari de la remadora Gymstick Poseidon RW40
Model: POSRW40 | Brand: Gymstick
1. Informació important de seguretat
Please read all instructions carefully before assembling or using the Gymstick Poseidon RW40 Rower. Retain this manual for future reference.
- Consulteu un metge abans de començar qualsevol programa d'exercici.
- Mantingueu els nens i les mascotes lluny de l'equip durant l'ús.
- Place the rower on a flat, stable surface with adequate clearance around it.
- Inspeccioneu l'equip per detectar peces desgastades o soltes abans de cada ús. No l'utilitzeu si està danyat.
- Assegureu-vos que tots els cargols i femelles estiguin ben ajustats abans d'utilitzar-los.
- Porteu roba i calçat esportiu adequats.
- Deixa de fer exercici immediatament si et sents dèbil, marejat o tens dolor.
2. Producte acabatview
The Gymstick Poseidon RW40 Rower is designed for effective cardiovascular and strength training. It features a robust design with a back drive system and an innovative upright rowing arm for versatile workouts.
Característiques principals:
- Back drive Home trainer with rowing arm/handlebar
- Versatile machine with an extra upright rowing arm feature
- LCD 3 inch monitor displaying Time, Distance, Speed, and Pulse
- Poly V belt transmission for smooth operation
- 8-position adjustable magnetic brake system for varied resistance
- 1:10 Transmission ratio
- Rotating mass: 7 kg
- 3-piece bottom bracket with ball bearings
- Pedals with toe clips for secure foot placement
- Integrated transport wheels for easy relocation
Components del producte i Views:
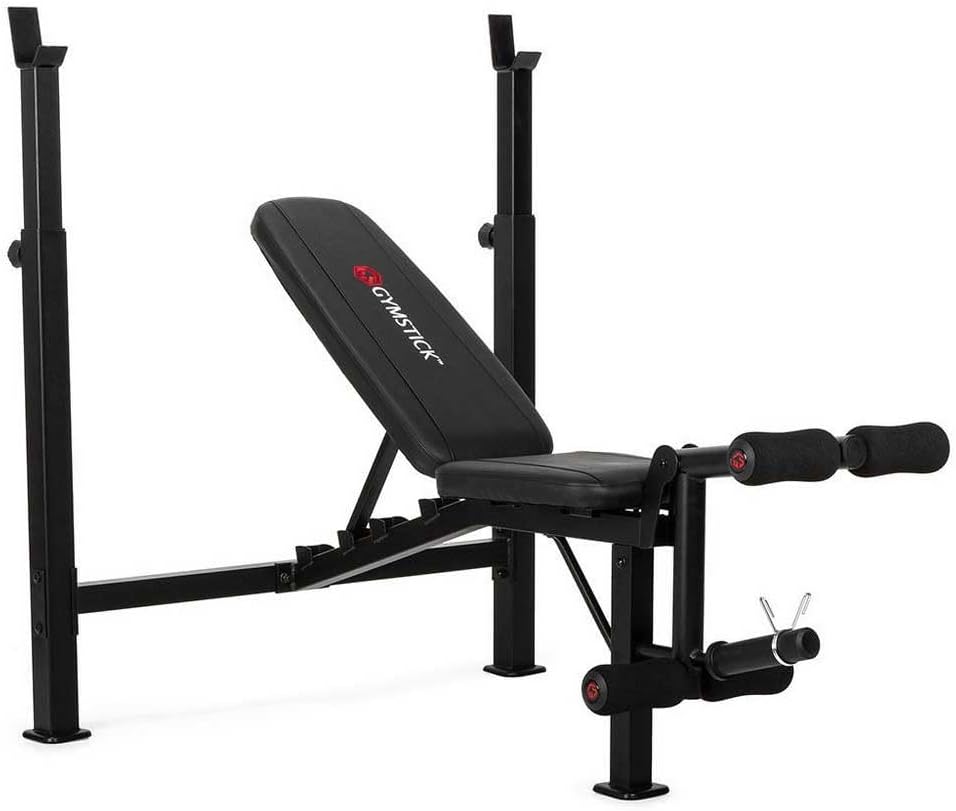
Figura 2.1: En general view of the Gymstick Poseidon RW40 Rower, showcasing its main frame and components.

Figura 2.2: Front perspective of the rower, highlighting the stability and base structure.

Figura 2.3: Close-up of the ergonomically designed seat and the smooth-gliding rail system.

Figura 2.4: Detail of the adjustable footrests equipped with secure toe clips for optimal foot placement during exercise.

Figura 2.5: View of the console area and the mechanism for adjusting the magnetic resistance levels.
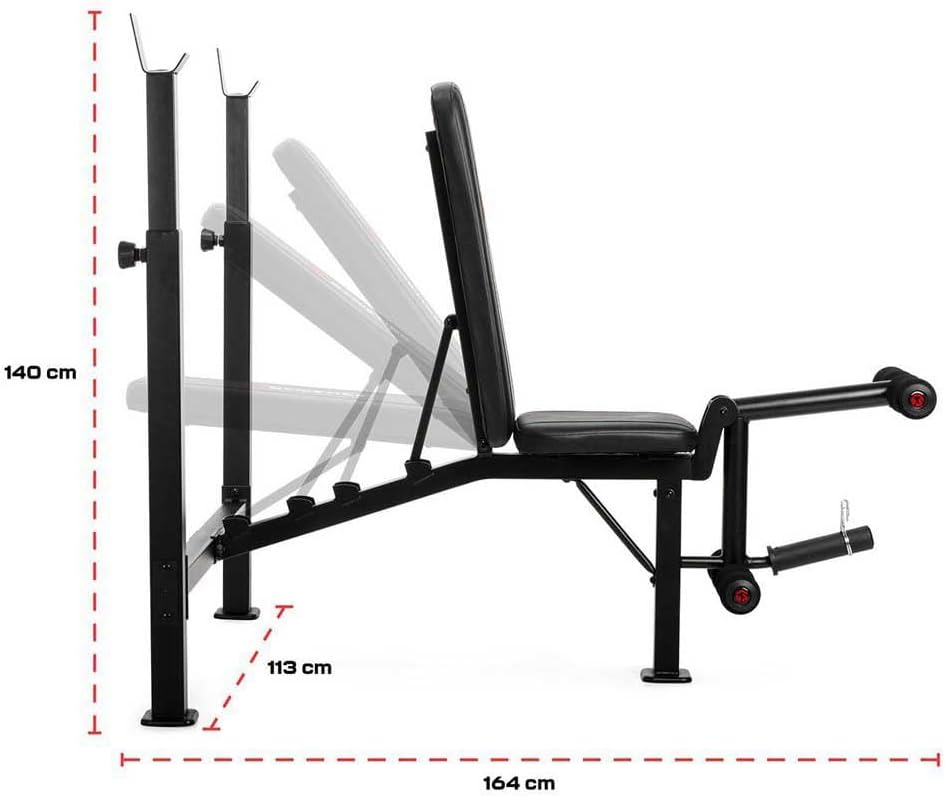
Figura 2.6: Diagram illustrating the overall dimensions of the Gymstick Poseidon RW40 Rower for space planning.
3. Muntatge i muntatge
Assembly of the Gymstick Poseidon RW40 Rower typically involves a few straightforward steps. It is recommended to have another person assist with assembly due to the size and weight of some components.
- Desempaquetar components: Carefully remove all parts from the packaging. Lay them out and compare with the parts list (refer to the included assembly diagram, not provided here). Ensure all components are present and undamaged.
- Connecteu els estabilitzadors: Secure the front and rear stabilizer bars to the main frame using the provided bolts and washers. Ensure they are firmly tightened to provide a stable base.
- Install Seat and Rail: Slide the seat onto the main rail. Attach the rail assembly to the main frame, ensuring the seat glides smoothly along the rail.
- Connect Handlebar/Rowing Arm: Attach the handlebar or rowing arm assembly to the main unit, connecting it to the resistance mechanism. Follow the specific instructions for securing the Poly V belt if required.
- Muntar la consola: Secure the LCD monitor console to its designated bracket. Connect any necessary sensor cables from the main unit to the console.
- Connectar els pedals: Install the footrests/pedals to the main frame. Ensure they are oriented correctly and securely fastened.
- Comprovació final: Before first use, double-check all bolts, nuts, and connections to ensure they are tight and secure. Test the seat movement, handlebar pull, and resistance adjustment.
4. Instruccions de funcionament
Using your Gymstick Poseidon RW40 Rower effectively involves understanding its functions and maintaining proper form.
4.1 Ajust de la resistència
The rower features an 8-position adjustable magnetic brake system. Locate the resistance adjustment knob, typically near the front of the machine. Rotate the knob clockwise to increase resistance and counter-clockwise to decrease it. Start with a lower resistance level and gradually increase as your fitness improves.
4.2 Ús del monitor LCD
The 3-inch LCD monitor displays key workout metrics:
- Hora: Durada del teu entrenament.
- Distància: Total distance rowed.
- Velocitat: Velocitat actual de rem.
- Pols: Your heart rate (requires a compatible heart rate monitor, if applicable, or hand sensors).
Refer to the monitor's specific instructions (not provided here) for details on cycling through displays, resetting values, and setting targets.
4.3 Tècnica de rem
Proper rowing technique is crucial for effectiveness and injury prevention:
- La captura: Seu alt amb els braços estesos cap endavant, els genolls flexionats i les canyelles verticals.
- La unitat: Push off with your legs, then swing your back, and finally pull with your arms. Your core should be engaged throughout.
- L'acabat: Lean back slightly, legs extended, and the handlebar pulled to your lower chest/upper abdomen.
- La recuperació: Extend arms forward, then pivot from the hips, and finally bend your knees to return to the catch position.
The unique upright rowing arm feature allows for additional upper body exercises beyond traditional rowing. Experiment with different grips and movements to target various muscle groups.
5. Manteniment
Regular maintenance will ensure the longevity and optimal performance of your Gymstick Poseidon RW40 Rower.
- Neteja: Wipe down the frame, seat, and rail with a damp drap després de cada ús per eliminar la suor i la pols. Eviteu productes de neteja abrasius.
- Comprovació dels elements de fixació: Reviseu periòdicament tots els cargols, femelles i cargols per assegurar-vos que estiguin ben ajustats. Torneu a apretar-los si cal.
- Neteja de carrils: Mantingueu el riel del seient net i lliure de deixalles per garantir un moviment suau del seient.
- Inspecció del cinturó: Inspect the Poly V belt for any signs of wear, fraying, or damage.
- Emmagatzematge: When not in use, store the rower in a clean, dry environment. Utilize the transport wheels to move it easily.
6. Solució De Problemes
Aquí teniu alguns problemes comuns i les seves possibles solucions:
| Problema | Causa possible | Solució |
|---|---|---|
| El monitor no mostra dades. | Low or dead batteries; loose sensor connection. | Replace batteries; check and secure all sensor cables. |
| La resistència es percep com a inconsistent o massa baixa/alta. | Resistance knob not adjusted correctly; internal mechanism issue. | Adjust the resistance knob; if issue persists, contact customer support. |
| Soroll de grinyol o fregament. | Loose bolts; dirty rail; worn bearings. | Check and tighten all fasteners; clean the seat rail; contact support if noise persists. |
| El seient no llisca suaument. | Dirty rail; damaged wheels on seat. | Clean the seat rail thoroughly; inspect seat wheels for damage. |
7. Especificacions
Detailed technical specifications for the Gymstick Poseidon RW40 Rower:
| Característica | Detall |
|---|---|
| Nom del model | Posidó |
| Número de model | POSRW40 |
| Mecanisme de resistència | Magnetic (8 positions adjustable) |
| Transmissió | Poly V belt |
| Relació de transmissió | 1:10 |
| Rotating Mass | 7 kg |
| Pedalier inferior | 3 piece with ball bearings |
| Tipus de visualització | LCD (3 inch) |
| Displayed Metrics | Time, Distance, Speed, Pulse |
| Dimensions (paquet) | 114 x 57 x 28 cm |
| Pes (paquet) | 32 kg |
| GTIN | 06430016901765 |
8. Garantia i Suport
Gymstick products are manufactured to high-quality standards. For specific warranty terms and conditions, please refer to the warranty card included with your product or visit the official Gymstick weblloc.
If you encounter any issues not covered in this manual or require technical assistance, please contact Gymstick customer support. Have your model number (POSRW40) and purchase information ready when contacting support.
Nota: Els termes de la garantia poden variar segons la regió i el distribuïdor.
Ask a question about this manual
Ask about setup, troubleshooting, compatibility, parts, safety, or missing instructions. Manuals+ will review the question and use this page’s manual context to help answer it.