Introducció
Gràcies per la compraasing the Edifier Tick Tock Retro Multifunctional Alarm Clock. This device combines a retro design with modern functionality, offering an alarm clock, FM radio, and media playback from SD cards, USB drives, and auxiliary input. This manual provides detailed instructions for setup, operation, and maintenance to ensure optimal performance and longevity of your device.
Característiques del producte
- SD card reader and USB input port for media playback.
- LCD display screen for time, date, alarm status, and input mode (SD/USB/FM/AUX).
- Alarm clock function with customizable audio sources: SD card, USB drive, FM radio, or Auxiliary input.
- Auxiliary 3.5mm input jack for connecting external audio devices.
- FM radio function with 24 preset channels for easy access to your favorite stations.
- Two 360° omni-directional full-range speakers for rich, multi-directional sound.
Controls i Ports
Ports del panell posterior
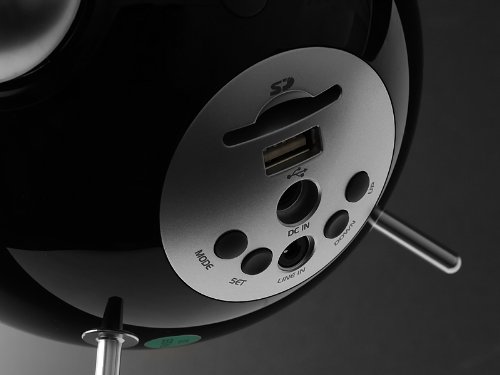
This image displays the rear panel of the Edifier Tick Tock alarm clock. Visible ports and buttons include:
- Ranura per a targeta SD: Insert an SD card for music playback.
- Port USB: Connect a USB flash drive for music playback.
- DC IN: Power input for the included AC adapter.
- ENTRADA DE LÍNIA (AUXILIAR): Entrada d'àudio de 3.5 mm per a dispositius externs.
- Botó MODE: Cycles through input modes (SD, USB, FM, AUX).
- Botó SET: Used for entering settings menus (e.g., time, alarm).
- Botons UP/DOWN: Navigate menus, adjust volume, or change settings.
Controls del tauler superior

This image shows the top panel controls of the Edifier Tick Tock alarm clock. These include:
- Botó Reproduir/Pausa: Inicia o posa en pausa la reproducció multimèdia.
- Botons de pista anterior/següent: Skips to the previous or next track during media playback. Also used for tuning FM radio.
- Botons de pujar / baixar de volum: Ajusta el volum de sortida d'àudio.
- Botó SNOOZE/LLUM: Activa la funció de posposició durant una alarma o ajusta la brillantor de la pantalla.
Configuració
- Desembalatge: Carefully remove the alarm clock and all accessories from the packaging. Ensure all components are present: the alarm clock unit, AC power adapter, and this user manual.
- Connexió d'alimentació: Connect the AC power adapter to the "DC IN" port on the rear of the alarm clock. Plug the adapter into a standard wall outlet. The display should illuminate.
- Encesa inicial: The unit should power on automatically. If not, press the power button (if available, otherwise it's always on when plugged in).
- Antenna (FM Radio): Extend the FM antenna located at the back of the unit for optimal radio reception.
Instruccions de funcionament
Configuració de l'hora i la data
- Manteniu premut el botó SET fins que la pantalla de l'hora comenci a parpellejar.
- Utilitza el UP i ABAIX botons per ajustar l'hora. Premeu SET to confirm and move to minutes.
- Adjust minutes using UP i ABAIX. Premeu SET per confirmar.
- Continue this process to set the year, month, and day. Press SET to exit the time/date setting mode.
Configuració de l'Alarma
- Premeu el botó SET button once (do not hold) to enter alarm setting mode. The alarm time will flash.
- Utilitza el UP i ABAIX botons per ajustar l'hora de l'alarma. Premeu SET to confirm and move to minutes.
- Adjust minutes using UP i ABAIX. Premeu SET per confirmar.
- Next, select the alarm source (FM, SD, USB, AUX). Use UP i ABAIX to cycle through options. Press SET per confirmar.
- If FM is selected, use UP i ABAIX to select a preset FM station (P01-P24).
- If SD or USB is selected, ensure a card/drive with audio is inserted. The alarm will play the first track.
- If AUX is selected, ensure an external device is connected and playing audio.
- Premeu SET de nou per activar l'alarma. Apareixerà una icona d'alarma a la pantalla.
- Per desactivar l'alarma, premeu SET fins que la icona de l'alarma desaparegui.
- Quan soni l'alarma, premeu el botó SNOOZE / LIGHT button to activate snooze (typically 9 minutes). To turn off the alarm completely, press any other button.
Funcionament de la ràdio FM
- Premeu el botó MODE repetidament fins que aparegui "FM" a la pantalla.
- Auto Scan and Preset: Manteniu premut el botó REPRODUCCIÓ/PAUSA button. The radio will automatically scan for available stations and save them to presets (P01-P24).
- Sintonització manual: Utilitza el PISTA ANTERIOR/SEGUENT botons per ajustar la freqüència.
- Seleccionant preajustos: In FM mode, briefly press the PISTA ANTERIOR/SEGUENT buttons to cycle through saved preset stations.
- Ajusteu el volum amb el botó UP i ABAIX buttons on the rear panel.
SD Card / USB Playback
- Insert an SD card into the SD card slot or a USB flash drive into the USB port on the rear panel.
- Premeu el botó MODE button repeatedly until "SD" or "USB" appears on the display. The device will automatically start playing audio files.
- Utilitza el REPRODUCCIÓ/PAUSA botó per aturar o reprendre la reproducció.
- Utilitza el PISTA ANTERIOR/SEGUENT buttons on the top panel to skip tracks.
- Ajusteu el volum amb el botó UP i ABAIX buttons on the rear panel.
Auxiliary Input (LINE IN)
- Connect an external audio device (e.g., smartphone, MP3 player) to the "LINE IN" (3.5mm) port on the rear panel using an audio cable (not included).
- Premeu el botó MODE repetidament fins que aparegui "AUX" a la pantalla.
- Inicia la reproducció al dispositiu extern connectat.
- Ajusteu el volum amb el botó UP i ABAIX buttons on the rear panel, and also control volume from your external device.
Brillantor de la pantalla
Premeu breument SNOOZE / LIGHT button on the top panel to cycle through different display brightness levels.
Manteniment
- Neteja: Use a soft, dry cloth to clean the surface of the alarm clock. Do not use abrasive cleaners, waxes, or solvents.
- Col·locació: Place the unit on a stable, flat surface. Avoid direct sunlight, high temperatures, humidity, or dusty environments.
- Potència: Desconnecteu l'adaptador de corrent de la presa de corrent si no heu d'utilitzar la unitat durant un període prolongat.
Resolució de problemes
| Problema | Possible causa/solució |
|---|---|
| Sense alimentació / Pantalla apagada |
|
| No hi ha so dels altaveus |
|
| Mala recepció de ràdio FM |
|
| Alarm does not sound or plays static |
|
| Display is too bright at night |
|
Especificacions
| Marca | Edificador |
| Número de model | MF240Reto |
| Tipus de visualització | LCD |
| Tecnologia de connectivitat | AUX, USB |
| Característiques especials | Alarm, Radio, SD Card Reader, USB Playback |
| Font d'alimentació | Elèctric amb cable |
| Material | Plàstic |
| Pes de l'article | 0.74 lliures (aprox. 0.34 kg) |
| Fabricant | Edifier USA |
Garantia i Suport
This Edifier product comes with a 2 any de garantia del fabricant. For warranty claims, technical support, or further assistance, please contact Edifier USA customer service. Please retain your proof of purchase for warranty validation.
For the most up-to-date support information, please visit the official Edifier weblloc.