
1. Introducció
Thank you for choosing the Pro'sKit SS-206E Temperature Controlled Soldering Station. This device is designed for precise and efficient soldering tasks, featuring an analog temperature display and an ergonomically designed soldering iron. Please read this manual thoroughly before operation to ensure safe and correct use.
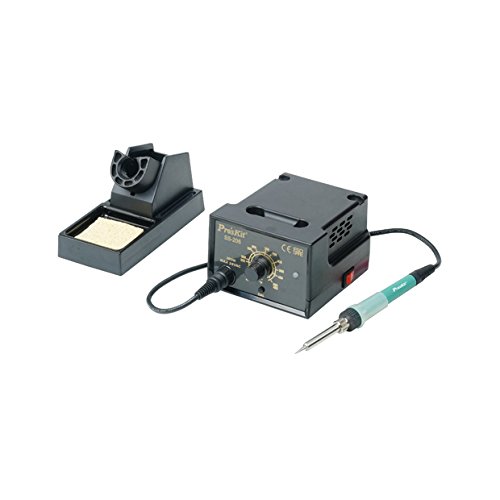
Image 1.1: The Pro'sKit SS-206E Soldering Station, showing the main unit with analog display and the connected soldering iron.
2. Instruccions de seguretat
Observeu sempre les següents precaucions de seguretat per evitar lesions o danys a l'equip:
- Seguretat elèctrica: Assegureu-vos que la font d'alimentació coincideixi amb el voltage requirements of the unit (110V or 220V). Do not operate with wet hands or in damp ambients.
- Risc de calor: The soldering iron tip reaches very high temperatures. Avoid direct contact with skin or flammable materials. Use the provided soldering iron stand.
- Fume Inhalation: Soldering produces fumes. Always work in a well-ventilated area or use a fume extractor.
- Protecció ocular: Wear safety glasses to protect against solder splashes.
- Protecció ESD: This unit is ESD safe. However, take appropriate ESD precautions when working with sensitive electronic components.
- Nens i animals de companyia: Keep the soldering station out of reach of children and pets.
3. Contingut del paquet
Verifiqueu que tots els elements siguin presents al paquet:
- Pro'sKit SS-206E Soldering Station Main Unit
- Soldering Iron with connecting cable
- Suport de soldadura
- Esponja de neteja
- Cable d'alimentació
4. Configuració
- Desembalar: Traieu amb cura tots els components de l'embalatge.
- Connecteu el soldador: Plug the soldering iron's connector into the designated port on the front panel of the soldering station. Ensure a secure connection.
- Posició de suport: Place the soldering iron stand on a stable, heat-resistant surface near your workspace. Insert the soldering iron into the stand when not in use.
- Prepare Sponge: Dampen the cleaning sponge with water (do not soak) and place it in the sponge tray of the soldering iron stand.
- Connexió d'alimentació: Connect the power cord to the back of the soldering station and then plug it into a suitable electrical outlet. Note: This model is available in 110V and 220V versions. Verify your unit's voltage requirement before plugging it in.
5. Instruccions de funcionament
- Encès: Flip the power switch located on the front panel to the 'ON' position. The analog display will illuminate.
- Temperatura establerta: Rotate the temperature control knob to your desired temperature. The analog meter will indicate the set temperature. The unit supports a temperature range of 200°C to 480°C (392°F to 896°F).
- Celsius/Fahrenheit Adjustment: A switch or internal jumper (refer to specific model documentation if available) allows selection between Celsius and Fahrenheit display.
- Preescalfament: Allow the soldering iron to preheat for approximately 2-3 minutes until the tip reaches the set temperature.
- Estanyant la punta: Before first use and periodically during operation, apply a small amount of solder to the hot tip. This 'tins' the tip, preventing oxidation and improving heat transfer.
- Soldadura: Bring the hot, tinned tip into contact with both the component lead and the PCB pad simultaneously. Apply solder to the joint, not directly to the iron tip. Remove the solder, then the iron, allowing the joint to cool naturally.
- Neteja de la punta: Regularly wipe the soldering iron tip on the damp sponge to remove excess solder and flux residue.
- Apagar: After use, turn the temperature control knob to its lowest setting, then flip the power switch to 'OFF'. Allow the iron to cool completely in its stand before storing.
6. Manteniment
- Cura de la punta de soldadura: Always keep the tip tinned. Replace tips when they become pitted or heavily oxidized and cannot be cleaned. Use only compatible replacement tips.
- Manteniment de l'esponja: Mantenir l'esponja damp during operation. Replace the sponge when it becomes worn or heavily soiled.
- Neteja de la unitat: Periodically wipe the exterior of the soldering station with a soft, dry cloth. Do not use abrasive cleaners or solvents.
- Inspecció del cable: Regularly inspect the power cord and soldering iron cable for any signs of damage. Replace immediately if damaged.
7. Solució De Problemes
| Problema | Causa possible | Solució |
|---|---|---|
| El soldador no escalfa | Power switch off; Loose connection; Incorrect voltage; Faulty heating element. | Ensure power is on. Check all cable connections. Verify unit voltage matches outlet. Contact support if heating element is suspected. |
| Males unions de soldadura | Tip not tinned; Incorrect temperature; Dirty tip; Old solder. | Tin the tip. Adjust temperature. Clean or replace tip. Use fresh solder. |
| Analog display not working | Unit not powered; Internal fault. | Check power connection. If power is on and display is off, contact support. |
| La unitat no s'encén | Power cord not connected; Outlet fault; Incorrect voltage. | Assegureu-vos que el cable d'alimentació estigui ben connectat. Proveu la presa de corrent amb un altre dispositiu. Confirm unit voltage (110V or 220V) matches your power supply. |
8. Especificacions
- Model: SS-206E
- Entrada Voltage: AC 110V or 220V (Vol específictage depends on the purchased model. Please verify your unit.)
- Interval de temperatura: 200 °C - 480 °C (392 °F - 896 °F)
- Tipus de visualització: Analògic
- Certificacions: CE, ESD Safe
- Components inclosos: Soldador
9. Garantia i Suport
For warranty information and technical support, please refer to the warranty card included with your product or visit the official Pro'sKit weblloc web. Conserveu el rebut de compra com a comprovant de compra.