
1. Introducció
This manual provides instructions for the proper setup, operation, and maintenance of the Vividia Mini 8mm USB Flexible Inspection Camera, Model VV-Flex-8-MF. This device is designed for detailed visual inspection in hard-to-reach areas by connecting to a personal computer via a USB interface. It features a flexible cable, manual focus, and integrated LED illumination, making it suitable for various inspection tasks.
2. Producte acabatview
2.1. Contingut del paquet
- Vividia Mini USB Flexible Inspection Camera Endoscope
- CD Software (includes User's Manual and application software)
- Mirror Attachments (30°, 45°, 60° for side view)
- Calibrator for Measurement Application
2.2. Característiques clau
- Resolució d'imatge: 640x480 pixels (JPEG format)
- Resolució de vídeo: 640x480 pixels (WMV format, up to 30FPS @ VGA)
- Focus: Manual focus, focal range 0.5cm to infinite
- Ampliació: 1X-150X (adjustable)
- Il·luminació: 4 white LED lights with adjustable brightness
- Cap de càmera: 8mm outer diameter, waterproof
- Cable: 50cm (1.6ft) flexible cable, 7mm diameter, waterproof
- Connectivitat: USB 2.0 interface (147cm / 4.8ft cable length)
- Funcions: Snapshot capture (hardware button or software), video recording, measurement functions (length, arc, angle)
- Compatibilitat: Windows 8/7/Vista/XP, MAC 10.5 or above, Linux
2.3. Identificació de components
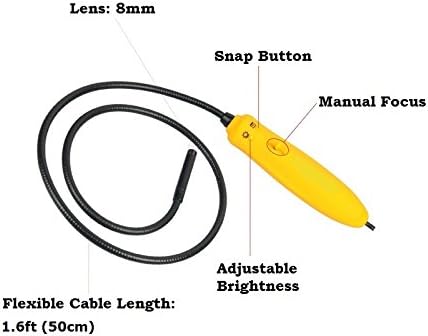
Figura 1: Acabatview of the inspection camera components. Key features include the 8mm lens, flexible cable, manual focus wheel, snap button, and adjustable brightness control.
3. Configuració
3.1. Instal·lació de programari
- Inseriu el CD de programari inclòs a la unitat de CD/DVD de l'ordinador.
- Follow the on-screen instructions to install the inspection camera software.
- For Mac users (OS 10.5 or above), dedicated software is not required. The camera can be used with built-in applications such as Photo Booth or Facetime.
3.2. Connexió de la càmera
Connect the USB plug of the inspection camera to an available USB 2.0 port on your computer. The device is powered via the USB connection, requiring no external batteries.
3.3. Attaching Mirror Accessories
The package includes 30°, 45°, and 60° mirror attachments for side viewing. To attach a mirror:
- Carefully screw the desired mirror attachment onto the threaded end of the camera head.
- Ensure the attachment is securely fastened but do not overtighten.

Figura 2: Mirror attachments for side viewing and their connection point on the camera head.
4. Instruccions de funcionament
4.1. Inici del programari
After installation, launch the inspection camera software from your desktop or Start menu. For Mac users, open Photo Booth or Facetime.
4.2. Selecting the Device Source
In the software, navigate to the 'Setting' menu and select 'Device Source' to ensure the Vividia inspection camera is selected as the active video input device.
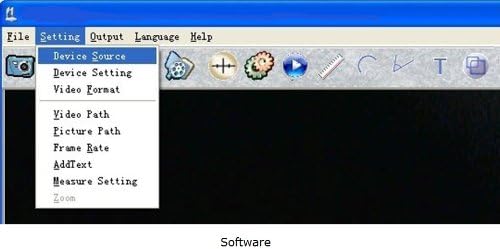
Figura 3: Software interface demonstrating how to select the device source.
4.3. Ajust d'enfocament
The camera features manual focus. Rotate the focus wheel on the handle to achieve a clear image of your inspection target. The focal range is from 0.5cm to infinite.
4.4. Ajust de la brillantor del LED
Use the adjustable brightness control on the camera handle to illuminate the inspection area. There are four white LED lights to provide sufficient lighting in dark environments.

Figura 4: Camera handle controls, including the snap button, manual focus, and adjustable brightness.
4.5. Captura d'imatges i vídeos
- Imatges instantànies: Press the hardware snap button on the camera handle or use the software control to capture still images. Images are saved in JPEG format.
- Vídeos: Use the software to record video footage. Videos are saved in WMV format.
4.6. Using Measurement Functions
The included software provides measurement functions for length, arc, and angle. Refer to the software's user manual (available on the CD) for detailed instructions on using these features with the calibrator.
4.7. Examples aplicacions

Figura 5: Examples of detailed inspections possible with the camera, including electronic components, text, and surfaces.

Figura 6: Detallada view of a Printed Circuit Board (PCB) showing the camera's magnification capabilities.
5. Manteniment
5.1. Cleaning the Camera Head
The camera head is waterproof. To clean, gently wipe the lens and surrounding area with a soft, damp tela. Eviteu utilitzar netejadors abrasius o dissolvents.
5.2. Emmagatzematge
Store the inspection camera in a clean, dry place away from extreme temperatures and direct sunlight. Ensure the flexible cable is not sharply bent or kinked during storage.
5.3. Resistència a l'aigua
The camera head and flexible cable are waterproof. However, the handle and USB connection are no waterproof. Do not submerge the handle or expose it to liquids.
6. Solució De Problemes
- Càmera no detectada: Ensure the USB cable is securely connected to both the camera and the computer. Try a different USB port. Restart your computer.
- Sense imatge o pantalla negra: Verify that the correct 'Device Source' is selected in the software. Check if the LED lights are on and adjusted for brightness.
- Imatge borrosa: Adjust the manual focus wheel on the camera handle until the image is clear. Ensure the camera lens is clean.
- Software issues on Mac: If the dedicated software does not function, use Photo Booth or Facetime as alternative applications.
- Poca qualitat d'imatge: Ensure adequate lighting using the built-in LEDs. Adjust focus carefully.
7. Especificacions
| Característica | Especificació |
|---|---|
| Número de model | VV-Flex-8-MF |
| Resolució d'imatge | 640x480 pixels (JPEG) |
| Resolució de vídeo | 640x480 pixels (WMV, up to 30FPS @ VGA) |
| Focus | Enfocament manual |
| Interval focal | 0.5cm – infinite |
| Ampliació | 1X-150X (adjustable) |
| Il·luminació | 4 white LED lights with adjustable brightness |
| Camera Head Outer Diameter | 8 mm (0.31 polzades) |
| Longitud de cable flexible | 50 cm (1.6 peus) |
| Flexible Cable Diameter | 7 mm (0.28 polzades) |
| Longitud del cable USB | 147 cm (4.8 peus) |
| Tecnologia de connectivitat | USB 2.0 |
| Nivell de resistència a l'aigua | Waterproof (camera head & cable only) |
| Dispositius compatibles | Personal Computer (Windows 8/7/Vista/XP, MAC 10.5+, Linux) |
| Pes de l'article | 168 grams |
| UPC | 858499002636 |
8. Informació de la garantia
The Vividia Mini 8mm USB Flexible Inspection Camera comes with a Garantia del fabricant de 1 anys from the date of purchase. This warranty covers defects in materials and workmanship under normal use. Please retain your proof of purchase for warranty claims. The warranty does not cover damage caused by misuse, accident, unauthorized modification, or improper handling.
9. Suport
For technical assistance, troubleshooting beyond this manual, or warranty inquiries, please refer to the contact information provided with your product packaging or visit the official VIVIDIA website. Ensure you have your product model number (VV-Flex-8-MF) and proof of purchase available when contacting support.