
1. Introducció
This manual provides essential information for the safe and efficient use of your respekta KB 150 ESWMIC Mini Kitchen Block. Please read these instructions carefully before assembly, installation, and operation. Keep this manual for future reference.
2. Instruccions de seguretat
Seguiu sempre les precaucions de seguretat bàsiques quan utilitzeu aparells elèctrics per reduir el risc d'incendi, descàrrega elèctrica i lesions a les persones.
- Ensure the kitchen block is installed on a stable, level surface.
- All electrical connections must be performed by a qualified electrician in accordance with local regulations.
- No feu funcionar l'aparell amb un cable d'alimentació o endoll danyats.
- Mantenir els nens allunyats de l'aparell durant el funcionament.
- Do not store flammable materials near the hob or microwave.
- Desconnecteu sempre l'aparell abans de netejar-lo o fer-ne el manteniment.
- Ensure adequate ventilation around the refrigerator and microwave.
3. Producte acabatview
The respekta KB 150 ESWMIC Mini Kitchen Block is a compact and functional kitchen solution, featuring a refrigerator, ceramic hob, sink, and microwave. It is designed for efficient use of space.
3.1 Components inclosos
- Integrated Refrigerator with decorative frame
- Integrated 2-burner Ceramic Hob
- Integrated Stainless Steel Sink (860 x 435 mm) with drain and overflow
- 150 cm Worktop in rough oak finish (28 mm), without cut-outs
- 50 cm Base Cabinet with drawer
- 50 cm Sink Base Cabinet
- 3 White Wall Cabinets
- Plastic handles with aluminum effect
- Integrated Microwave
3.2 Visual Representation

Figura 1: global view of the respekta KB 150 ESWMIC Mini Kitchen Block. This image shows the complete kitchen unit with base cabinets, wall cabinets, integrated appliances, and worktop.
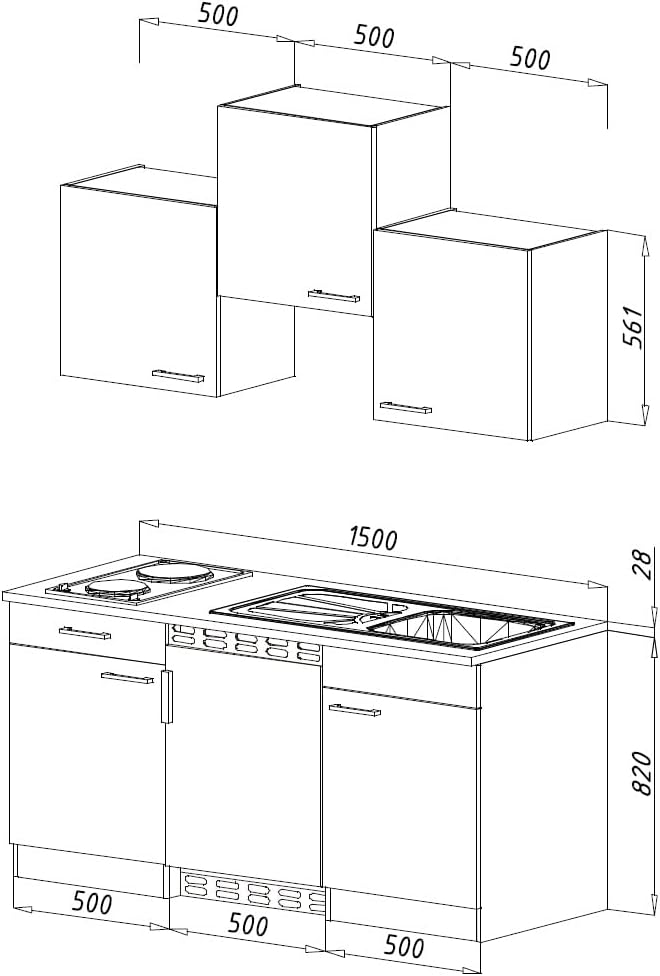
Figure 2: Technical drawing illustrating the dimensions of the respekta KB 150 ESWMIC Mini Kitchen Block, including individual cabinet and appliance measurements.
4. Configuració i instal·lació
The kitchen block is delivered disassembled and requires assembly. It can be configured in various arrangements to suit your space. Professional installation is recommended for electrical and plumbing connections.
4.1 Passos de muntatge
- Desembalatge: Carefully unpack all components and check against the packing list.
- Muntatge del gabinet: Assemble the base cabinets and wall cabinets according to the separate cabinet assembly instructions provided.
- Worktop Preparation: The 150 cm worktop is supplied without cut-outs. Mark and cut openings for the sink and ceramic hob using appropriate tools. Refer to the dimensions provided in Figure 2.
- Appliance Integration: Install the refrigerator, ceramic hob, and microwave into their designated cabinet spaces.
- Instal·lació de la pica: Mount the stainless steel sink into the prepared worktop cut-out. Connect the drain and overflow.
- Connexions elèctriques: Connect the ceramic hob, microwave, and refrigerator to the main power supply. This must be done by a certified electrician.
- Connexions de fontaneria: Connect the sink to the water supply and drainage system.
- Ajustaments finals: Ensure all cabinets are level and secure. Attach handles to doors and drawers.
Nota: The kitchen block is designed for freestanding installation. Ensure sufficient space for ventilation and access for maintenance.
5. Instruccions de funcionament
5.1 Nevera

Figura 3: Interior view of the integrated refrigerator, showing shelves and freezer compartment.
- Capacitat: Refrigerator compartment 68 L, Freezer compartment 17 L.
- Control de temperatura: Adjust the thermostat knob inside the refrigerator to set the desired temperature.
- Descongelació automàtica: The refrigerator features automatic defrosting. Water from defrosting is collected and evaporated.
- Il·luminació interna: The interior light illuminates when the refrigerator door is opened.
- Primer ús: Abans del primer ús, neteja l'interior amb anunciamp cloth. Allow the refrigerator to run for a few hours before storing food.
5.2 Placa vitroceràmica

Figura 4: superior view of the 2-burner ceramic hob with control knobs.
- Cremadors: The hob features two ceramic cooking zones.
- Controls: Use the rotary knobs on the front panel to select the desired heat level for each burner (typically 0-6).
- Llums indicadores: Indicator lights will illuminate when a burner is active.
- Seguretat: Ensure suitable cookware is used. Do not leave cooking unattended. Allow the hob to cool down after use.
5.3 Microones

Figura 5: Frontal view of the integrated microwave with control dials.
- Capacitat: 17 L.
- Potència: Maximum 700 W.
- Controls: Features two analog rotary dials: one for power level (e.g., Low, Med, M.High, High, Defrost) and one for the 30-minute timer.
- Funció de descongelació: Use the defrost setting and timer for thawing frozen foods.
- Seguretat: Do not operate the microwave empty. Use microwave-safe dishes only. Do not heat sealed containers.
5.4 Pica

Figura 6: View of the stainless steel sink with drainer and overflow.
- Material: Acer inoxidable.
- Dimensions: 860 x 435 mm.
- Característiques: Includes drain and overflow for safe water management.
- Ús: Suitable for washing dishes and food preparation.
6. Manteniment
Regular cleaning and maintenance will ensure the longevity and optimal performance of your mini kitchen block.
- Neteja general: Wipe down surfaces with a soft, damp drap i detergent suau. Eviteu els netejadors abrasius.
- Nevera: Clean the interior regularly. Defrost the freezer compartment manually if ice buildup becomes excessive (though the fridge compartment is auto-defrost).
- Ceramic Hob: Clean the ceramic surface after each use once it has cooled down. Use a ceramic hob scraper for stubborn residues.
- Microones: Netegeu l'interior i l'exterior amb anunciamp cloth. Clean the turntable regularly.
- Aigüera: Clean the stainless steel sink with non-abrasive cleaners to prevent scratches and maintain shine.
- Armaris: Wipe cabinet surfaces with a soft, damp tela.
- Segells de portes: Check refrigerator door seals regularly for cleanliness and proper sealing.
7. Solució De Problemes
Abans de contactar amb l'atenció al client, consulteu els següents problemes i solucions habituals:
| Problema | Causa possible | Solució |
|---|---|---|
| La nevera no es refreda | Power supply issue, thermostat setting, door not closed properly. | Check power plug, adjust thermostat, ensure door seals correctly. |
| Hob not heating | No power, incorrect setting, faulty burner. | Check power supply, ensure burner is turned on correctly. If problem persists, contact a qualified technician. |
| Microwave not operating | Door not closed, power issue, timer not set. | Ensure door is securely closed, check power, set timer and power level. |
| Fuga d'aigua de la pica | Connexions de fontaneria soltes, junta danyada. | Check and tighten all plumbing connections. Inspect seals for damage. |
Per a problemes que no figuren aquí o si les solucions no resolen el problema, poseu-vos en contacte amb l'atenció al client.
8. Especificacions
Detailed technical specifications for the respekta KB 150 ESWMIC Mini Kitchen Block:
| Marca | respecta |
| Número de model | KB150ESWMIC |
| Color | Blanc |
| Material | Wood (cabinets), Stainless Steel (sink, handles), Ceramic (hob) |
| Dimensions del producte (P x A x A) | 60 x 150 x 200 cm |
| Pes de l'article | 135.72 kg |
| Capacitat de la nevera | 68 L (refrigerator), 17 L (freezer) |
| Refrigerator Energy Class | F (New EU Energy Label) |
| Annual Energy Consumption (Refrigerator) | 182 kWh / any |
| Capacitat del microones | 17 L |
| Microwave Max Power | 700 W |
| Tipus de placa | 2-burner Ceramic Hob |
| Dimensions del lavabo | 860 x 435 mm |
| Muntatge obligatori | Sí |
| Tipus d'instal·lació | Autònom |

Figure 7: Energy label for the integrated refrigerator. For more details, scan the QR code or visit Base de dades EPREL.

Figure 8: Indication of product origin.
9. Garantia i assistència
For warranty information, please refer to the documentation provided with your purchase or contact the retailer. For technical support or spare parts, please contact respekta customer service. Keep your proof of purchase for warranty claims.