1. Introducció
The Fluke 115 True-RMS Compact Digital Multimeter is designed for field service technicians. It provides accurate True-RMS AC voltage and current readings, along with the ability to measure resistance, continuity, frequency, capacitance, and diode test. Its compact design and bright white LED backlight make it suitable for various electrical and electronic testing applications, even in dimly lit environments.
2. Informació de seguretat
Always follow basic safety precautions when using this product to avoid potential personal injury or damage to the meter or equipment under test. This multimeter is rated CAT III 600 V, Pollution Degree 2, ensuring safe operation within specified limits.
- No utilitzeu el mesurador si està danyat o funciona de manera anormal.
- No apliqueu més del volum nominaltage, tal com està marcat al comptador, entre terminals o entre qualsevol terminal i terra.
- Tingueu precaució amb el voltagper sobre de 30 V CA RMS, 42 V pic o 60 V CC. Aquests voltagsuposen un risc de xoc.
- Always use the correct terminals, function, and range for your measurements.
- Substituïu la bateria tan bon punt aparegui l'indicador de bateria baixa per garantir lectures precises.
3. Producte acabatview

Figure 3.1: Fluke 115 Multimeter with included test leads and soft carrying case. This image shows the complete package, highlighting the meter's compact size and essential accessories for field use.
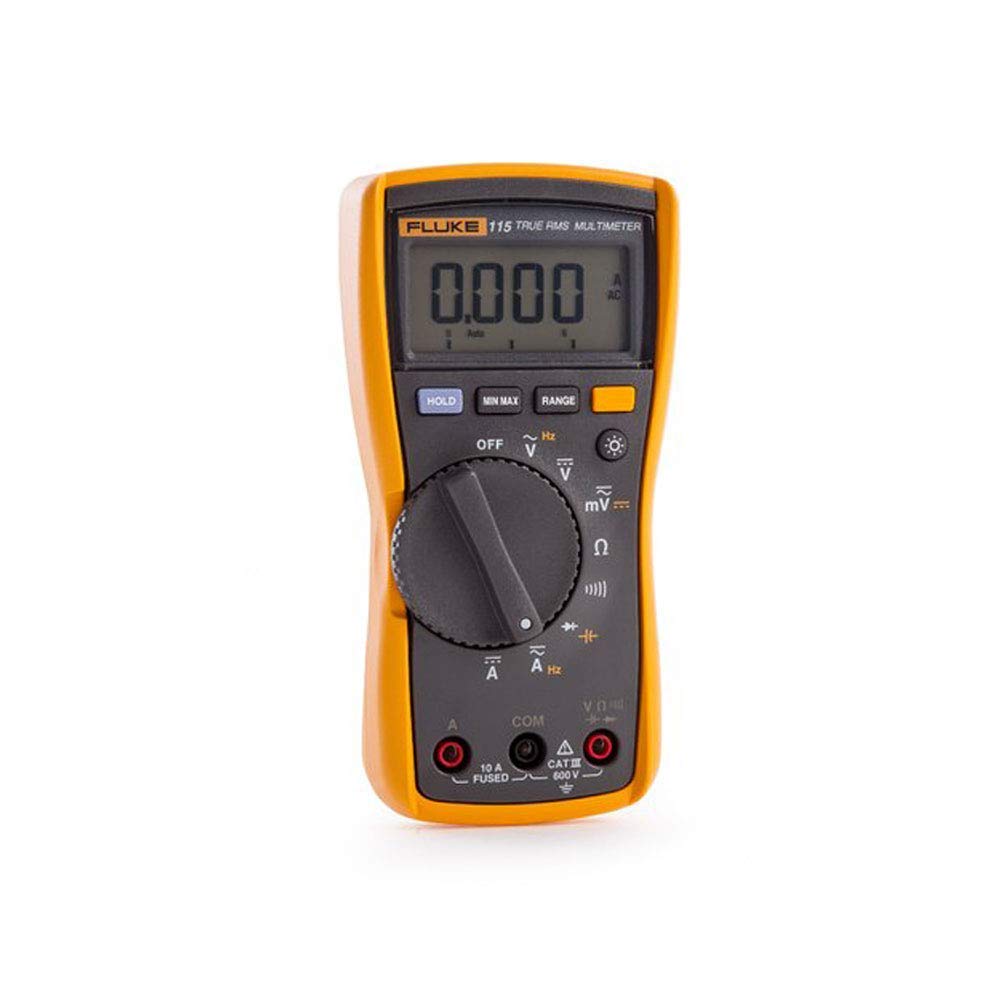
Figura 3.2: Frontal view of the Fluke 115 Multimeter, showcasing its large digital display, rotary function switch, and input jacks. The display shows '0.000' and 'AC' indicating it's ready for an AC voltage mesura.

Figura 3.3: posterior view of the Fluke 115 Multimeter, showing the battery compartment cover and a label detailing power-up options. These options include disabling the beeper, auto power off, and auto backlight off by pressing specific buttons while turning the meter on.
The Fluke 115 features a large, 6000-count digital display with a 33-segment bar graph for quick visual indication of changing signals. It offers a wide range of measurement capabilities, including True-RMS for accurate readings on non-linear loads. The compact and ergonomic design ensures ease of use for one-handed operation.
4. Configuració
4.1 Instal·lació de la bateria
The Fluke 115 Multimeter uses one 9-volt alkaline battery (NEDA 1604A / IEC 6LR61). To install or replace the battery:
- Assegureu-vos que el mesurador estigui apagat i que els cables de prova estiguin desconnectats.
- Localitzeu el compartiment de la bateria a la part posterior del mesurador (vegeu la figura 3.3).
- Feu servir un tornavís per afluixar el cargol que fixa la tapa de la bateria.
- Remove the cover and replace the old battery with a new 9-volt alkaline battery, observing polarity.
- Torneu a col·locar la tapa de la bateria i premeu el cargol.
4.2 Connexió dels cables de prova
Always connect the black test lead to the COM input jack. Connect the red test lead to the appropriate input jack for the desired measurement:
- VΩHz per al voltage, resistance, continuity, diode, capacitance, and frequency measurements.
- 10A FUSIBLE for current measurements up to 10A.
4.3 Power-Up Options
The Fluke 115 offers several power-up options that can be activated by pressing and holding a specific button while turning the rotary switch from OFF to any function:
- Botó HOLD: Disables the beeper.
- MIN MAX button: Disables Auto Power Off.
- Botó RANGE: Disables Auto Backlight Off.
5. Instruccions de funcionament
5.1 Funcionament bàsic
To operate the multimeter:
- Gireu l'interruptor rotatiu a la funció desitjada.
- Connecteu els cables de prova al circuit que es prova.
- Llegiu la mesura a la pantalla.
5.2 Funcions de mesura
The Fluke 115 offers the following measurement capabilities:
- DC millivolts, DC volts
- AC millivolts True RMS, AC Volts True RMS (45 Hz to 500 Hz)
- Continuïtat
- Ohms
- Prova de díode
- Capacitance, Lo-Z Capacitance
- AC Amps True RMS (45 Hz to 500 Hz), DC Amps
- Hz (entrada V o A)
5.3 MIN/MAX/AVG Recording
Premeu el botó MIN MÀX button to activate the recording mode. The meter will capture the minimum, maximum, and average readings over time. Pressing the button repeatedly cycles through MIN, MAX, AVG, and current readings. This feature is useful for capturing intermittent fluctuations in signals.
5.4 Retroil·luminació de la pantalla
Press the backlight button (light bulb icon) to turn the display backlight on or off. The backlight provides clear visibility in low-light conditions. By default, the backlight will automatically turn off after a period of inactivity to conserve battery life, unless disabled via the power-up option.
6. Manteniment
6.1 Neteja
Netegeu el cas amb l'anunciamp cloth and mild detergent. Do not use abrasives or solvents. Clean the terminals periodically with a cotton swab and detergent solution.
6.2 Substitució de la bateria
Refer to Section 4.1 for detailed instructions on battery replacement. Replace the 9-volt alkaline battery when the low battery indicator appears on the display to ensure continued accurate operation.
6.3 Canvi de fusibles
The 10A input jack is protected by an 11 A, 1000 V FAST Fuse. If the meter fails to measure current, the fuse may need replacement. Fuse replacement should only be performed by qualified personnel. Use only specified replacement fuses to maintain safety ratings.
7. Solució De Problemes
If the multimeter is not functioning as expected, review els següents problemes i solucions habituals:
- Sense pantalla o pantalla tènue: Check battery charge. Replace the 9-volt battery if low.
- Lectures incorrectes: Ensure test leads are properly connected to the correct input jacks and the rotary switch is set to the appropriate function and range. Check for damaged test leads.
- Sense mesura de corrent: The fuse for the 10A input may be blown. Refer to Section 6.3 for fuse replacement.
- Meter turns off unexpectedly: Auto Power Off feature might be active. Disable it by holding the MIN MÀX button while turning the meter on.
- Backlight turns off too quickly: Auto Backlight Off feature might be active. Disable it by holding the GAMMA button while turning the meter on.
Si teniu problemes persistents, poseu-vos en contacte amb el servei d'atenció al client de Fluke.
8. Especificacions
8.1 Especificacions generals
| Característica | Especificació |
|---|---|
| Mostra | Digital: 6000 counts, 4 updates/second; Bar Graph: 33 segments, 32 updates/second |
| Volum màximtage entre qualsevol terminal i terra | 600 V |
| Overvoltage Protecció | 6 kV peak per IEC 61010-1 600 V CAT III, Pollution Degree 2 |
| Fusible per a l'entrada A | 11 A, 1000 V FAST Fuse |
| Temperatura de funcionament | -10 °C a +50 °C |
| Temperatura d'emmagatzematge | -40 °C a +60 °C |
| Humitat relativa | Non-condensing when <10 °C; ≤90% from 10 °C to 30 °C; ≤75% between 30 °C and 40 °C; Operating humidity, 40 MΩ range: ≤80% between 10 °C and 30 °C; ≤70% between 30 °C and 40 °C |
| Tipus de bateria | 9-volt alkaline, NEDA 1604A / IEC 6LR61 |
| Durada de la bateria | 400 hours typical, without backlight |
| Dimensions (A x A x P) | 167 x 84 x 46 mm |
| Pes | 550 g |
8.2 Accuracy Specifications

Figure 8.1: Detailed accuracy specifications for the Fluke 115 Multimeter, including measurement ranges, resolutions, and accuracy percentages for DC voltage, vol. ACtage, continuity, ohms, diode test, capacitance, and current measurements.
9. Garantia i Suport
The Fluke 115 Multimeter comes with a 3-year manufacturer's warranty from the date of purchase, covering defects in materials and workmanship. For warranty claims or technical support, please contact Fluke customer service through their official weblloc web o centres de servei autoritzats. Conserveu el comprovant de compra per validar la garantia.