
1. Introducció
The uxcell CN101A Digital Programmable Timer is designed for automatic control of electrical appliances. This device features advanced pre-setting capabilities for daily and weekly programs, offering up to 17 ON/OFF settings. It is suitable for AC/DC 12V applications and includes a manual override function. This manual provides detailed instructions for installation, programming, and troubleshooting to ensure optimal performance and safe operation.
2. Informació de seguretat
- Risc elèctric: Installation and wiring should be performed by a qualified electrician or knowledgeable individual. Ensure power is disconnected before installation or maintenance.
- Voltage Compatibilitat: This timer is rated for AC/DC 12V. Do not connect to higher voltage systems as this will damage the unit and pose a safety risk.
- Capacitat actual: The contact capacity is AC 250V 16A. This product cannot directly control high current loads such as heating elements. For high current applications, an external Solid State Relay (SSR) or AC Contactor must be used in conjunction with the timer.
- Condicions ambientals: Operate the timer within the specified ambient temperature range of -10°C to +40°C and ambient humidity of 35-85%RH. Avoid exposure to direct sunlight, moisture, or corrosive environments.
- Muntatge: Ensure the timer is securely mounted in a suitable enclosure to protect it from physical damage and environmental factors.
3. Producte acabatview
The uxcell CN101A timer features a compact design with an LCD display for easy programming and monitoring. Key components include the display, programming buttons, and terminal block for wiring.
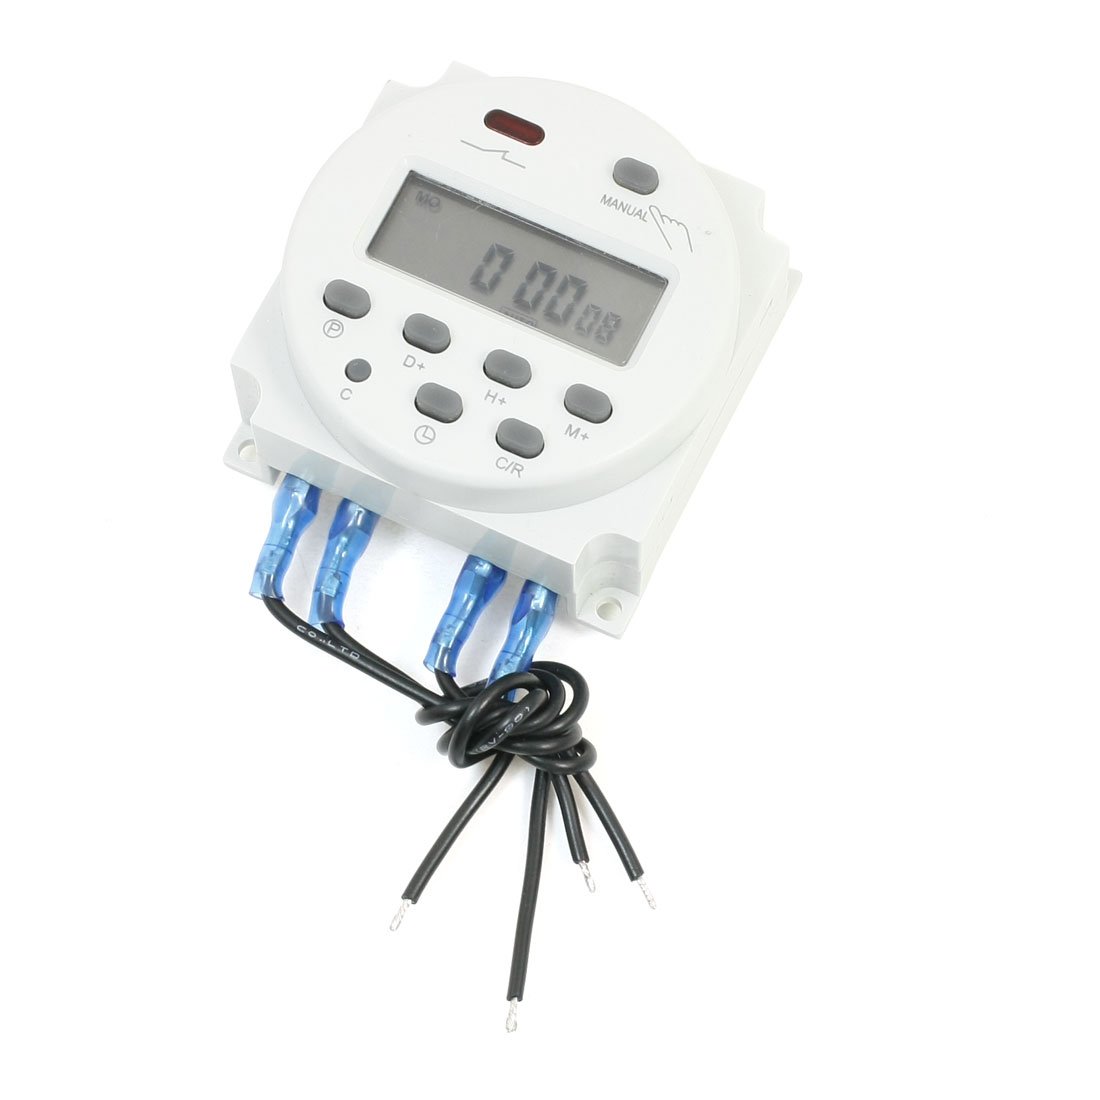
Figura 3.1: Davant view of the uxcell CN101A Digital Programmable Timer, showing the LCD display and control buttons.
3.1. Pantalla i botons
- Pantalla LCD: Shows current time, day of the week, and program status.
- Botó P (Programa): Enters program setting mode.
- Botó D+ (Dia): Adjusts day of the week or selects program day.
- Botó H+ (Hora): Adjusts hour or selects program hour.
- Botó M+ (Minut): Adjusts minute or selects program minute.
- Botó MANUAL: Toggles manual ON/AUTO/OFF modes.
- Botó de reset: Clears all settings and resets the timer to factory defaults. (Often recessed, requires a pointed object to press).
- Clock Button (
 ): Used in conjunction with H+, M+, D+ to set current time.
4. Especificacions
| Característica | Especificació |
|---|---|
| Model núm. | CN101A |
| Control nominal Voltage | AC/DC 12V |
| Capacitat de contacte | CA 250V 16A |
| Funcionament ON / OFF | 17 configuracions d'encesa/apagada |
| Mostra | LCD |
| Interval mínim | 1 minut |
| Contacte de commutació | 1 interruptor de canvi |
| Temperatura ambient | -10 °C a +40 °C |
| Humitat ambiental | 35-85% HR |
| Diàmetre del forat de muntatge | 3.5 mm / 0.14" |
| Overall Size (Approx.) | 60 x 60 x 33mm / 2.4" x 2.4" x 1.3" (L*W*H) |
| Material | Plastic, Electronic Parts |
| Pes net | 103 g |
5. Configuració
5.1. Instruccions de cablejat
ADVERTIMENT: Disconnect all power before attempting any wiring. Incorrect wiring can cause damage to the timer, connected appliances, or personal injury.
The CN101A timer typically has 4 terminals:
- Terminals 1 i 2: Power input for the timer (AC/DC 12V).
- Terminals 3 i 4: Output contacts (normally open/normally closed, depending on the specific model and wiring configuration). These act as a switch for your load.
Typical Wiring Diagram (Conceptual):
Power Source (AC/DC 12V) --> Terminal 1 (Temporitzador)
Power Source (AC/DC 12V) --> Terminal 2 (Temporitzador)
Load (e.g., 12V LED strip) --> Terminal 3 (Temporitzador)
Terminal 4 (Timer) --> Power Source (for Load)
Note: Always refer to the specific wiring diagram printed on the timer unit itself or its packaging for precise terminal identification and connection points. If controlling a high current load, connect the timer's output terminals (3 & 4) to the control input of an appropriate SSR or AC Contactor, which then switches the high current load.
5.2. Engegada inicial i reinici
- After wiring, apply AC/DC 12V power to terminals 1 and 2. The LCD display should illuminate.
- Premeu el botó RESET button (usually a small, recessed button) using a pointed object (e.g., a pen tip). This clears all previous settings and resets the timer to its default state (00:00, Monday, OFF).
6. Instruccions de funcionament
6.1. Configuració de l'hora i el dia actuals
- Manteniu premut el botó (Clock) button.
- Mentre sosteniu el botó, premeu D+ per configurar el dia actual de la setmana.
- Mentre sosteniu el botó, premeu H+ per configurar l'hora actual.
- Mentre sosteniu el botó, premeu M+ per configurar el minut actual.
- Allibera el botó per estalviar temps.
6.2. Programming ON/OFF Cycles (17 Settings)
El temporitzador permet fins a 17 programes d'encesa/apagada. Cada programa consta d'una hora d'encesa i una hora d'apagada.
- Premeu el botó P (Program) button once. The display will show "1 ON" and the time will flash.
- Premeu D+ to select the day(s) for this "ON" program. You can choose a single day, weekdays, weekends, or various combinations. Keep pressing D+ to cycle through options.
- Premeu H+ to set the hour for the "ON" time.
- Premeu M+ to set the minute for the "ON" time.
- Premeu P again. The display will show "1 OFF" and the time will flash.
- Premeu D+ to select the day(s) for this "OFF" program. This should typically match the "ON" program days.
- Premeu H+ to set the hour for the "OFF" time.
- Premeu M+ to set the minute for the "OFF" time.
- Repeat steps 1-8 for additional ON/OFF programs (up to 17). The display will show "2 ON", "2 OFF", and so on.
- Després de configurar tots els programes desitjats, premeu el botó (Clock) button to exit programming mode and return to the current time display.
Per tornarview programs, press P repeatedly. To clear a specific program, navigate to it and press MANUAL until the display shows "----:--" for both ON and OFF times.
6.3. Anul·lació manual
El MANUAL button allows you to temporarily override the programmed settings without deleting them. Pressing this button cycles through the following modes:
- ACTIVITAT: The output is continuously ON, ignoring programs.
- AUTO ON: The output is currently ON, and will follow the next programmed OFF time.
- APAGAT AUTOMÀTIC: The output is currently OFF, and will follow the next programmed ON time.
- DESACTIVAT: The output is continuously OFF, ignoring programs.
Seleccioneu AUTO ON or AUTO DESACTIVAT to resume automatic operation according to your programs.
7. Manteniment
- Neteja: Wipe the timer's exterior with a soft, dry cloth. Do not use abrasive cleaners or solvents.
- Còpia de seguretat de la bateria: El temporitzador té una bateria interna per conservar la configuració durant l'apagadatages. This battery is typically non-replaceable by the user and has a long lifespan. If the display is blank or settings are lost frequently after power interruptions, the internal battery may be depleted, indicating the unit may need replacement.
- Inspecció: Periodically check wiring connections for tightness and signs of wear or corrosion.
8. Solució De Problemes
| Problema | Causa possible | Solució |
|---|---|---|
| La pantalla està en blanc. | No power supply; internal battery depleted. | Check 12V power connection to terminals 1 & 2. If power is present, the internal battery may be at end of life. |
| Timer does not switch load ON/OFF. | Incorrect wiring; timer in manual override mode; programs not set correctly; load exceeds capacity. |
|
| La configuració es perd després d'apagar l'alimentaciótage. | Internal battery depleted. | The internal battery is likely at the end of its life. The unit may need replacement. |
| Time error. | Normal drift; initial setting error. | The timer has a specified error correction of +/- 30 seconds per week. Re-adjust the time as needed. Ensure initial time setting was accurate. |
9. Garantia i Suport
For warranty information and technical support, please refer to the documentation provided with your purchase or contact uxcell customer service through their official website or the retailer where the product was purchased. Please have your model number (CN101A) and purchase details ready when contacting support.
Recursos en línia: For additional support and frequently asked questions, visit the official uxcell weblloc: uxcell Store on Amazon