
1. Introducció
Welcome to the Saeco Odea Giro Plus RI9755 47 espresso machine user manual. This guide provides essential information for the safe and efficient operation, maintenance, and troubleshooting of your new espresso machine. Please read these instructions carefully before using the appliance for the first time and keep them for future reference.
2. Informació de seguretat
- Always ensure the machine is connected to a grounded power outlet.
- No submergiu la màquina, el cable d'alimentació ni l'endoll en aigua ni en altres líquids.
- Keep hands and face away from hot water and steam outlets during operation.
- Desendolleu la màquina abans de netejar-la i quan no la feu servir durant períodes prolongats.
- Do not operate the machine with a damaged cord or plug. Contact authorized service for repairs.
- Aquest aparell només és per a ús domèstic.
3. Producte acabatview
The Saeco Odea Giro Plus RI9755 47 is a super-automatic espresso machine designed for convenience and quality. It features automatic circuit cleaning for consistent hygiene, a quick heat boiler for immediate readiness, and a milk frother for creamy milk foam. The machine is equipped with durable metal grinders and offers adjustable grind settings to customize your coffee experience. The brewing group is easily removable for simple cleaning and maintenance.
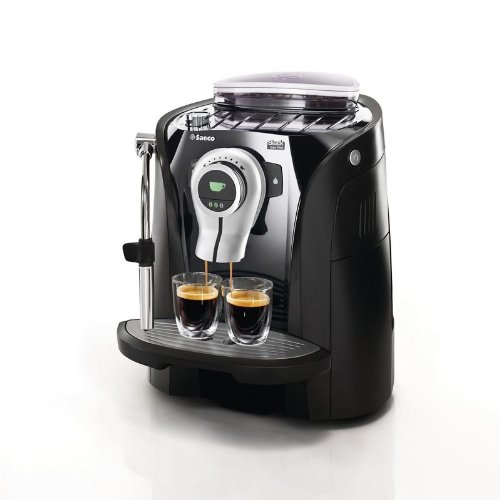
Figura 1: Frontal view of the Saeco Odea Giro Plus RI9755 47 Espresso Machine, showing the control panel, coffee spout, and milk frother.
4. Configuració
4.1 Desembalatge
Carefully remove all packaging materials from the machine. Retain packaging for future transport if needed.
4.2 Neteja inicial
Abans del primer ús, renteu el dipòsit d'aigua, la safata de degoteig i el recipient de cafè mòlt amb aigua tèbia i un detergent suau. Esbandiu-ho bé i eixugueu-ho.
4.3 Omplir el dipòsit d'aigua
Remove the water tank, fill it with fresh, cold tap water up to the MAX level indicator, and reinsert it firmly into the machine.
4.4 Omplir la tolva de grans de cafè
Open the bean hopper lid and pour fresh coffee beans into the hopper. Do not overfill. Ensure no foreign objects are present.
4.5 Connexió d'alimentació
Plug the power cord into a suitable grounded electrical outlet. The machine will perform an initial self-check.
4.6 Primer ús / Imprimació
Follow the on-screen prompts or indicator lights for the initial priming cycle. This process flushes the internal circuits with water and prepares the quick heat boiler for operation. The machine's automatic circuit cleaning will also activate.
5. Instruccions de funcionament
5.1 Elaboració d'espresso
- Col·loqueu una tassa sota el broc de cafè.
- Select your desired coffee strength and length using the control panel. The machine allows you to save your preferred settings.
- Press the espresso button. The machine will grind the beans with its metal grinders and brew your coffee.
5.2 Ús de l'escumador de llet
- Ompliu una gerra amb llet freda.
- Col·loca la vareta de vapor a la llet.
- Activate the steam function. Move the pitcher to create desired milk foam.
- Després de fer escuma, netegeu la vareta de vapor immediatament amb un drap.amp tela.
5.3 Ajust de la configuració de la mòlta
The machine features adjustable grinders with 5 available settings. To adjust, locate the grind adjustment knob inside the bean hopper. Turn the knob while the grinder is operating (e.g., during a brewing cycle) to select a finer or coarser grind. A finer grind produces a stronger espresso, while a coarser grind results in a lighter taste.
6. Manteniment
6.1 Neteja diària
- Buideu i esbandiu la safata de degoteig i el contenidor de cafè mòlt diàriament.
- Netegeu l'exterior de la màquina amb un damp tela.
6.2 Cleaning the Brewing Group
The brewing group is easily removed for cleaning. Open the service door, press the PUSH button, and pull the brewing group out. Rinse it thoroughly under lukewarm running water. Allow it to air dry completely before reinserting. This ensures optimal hygiene and coffee quality.
6.3 Descalcificació
The machine will indicate when descaling is required. Use a Saeco-approved descaling solution and follow the instructions provided with the descaler or in the machine's display. Regular descaling is crucial for the longevity and performance of your espresso machine.
6.4 Automatic Circuit Cleaning
The Saeco Odea Giro Plus RI9755 47 features automatic circuit cleaning, which activates periodically to ensure the internal circuits are clean. Allow this process to complete when prompted by the machine.
7. Solució De Problemes
- No es dispensa cafè: Check water tank level, ensure brewing group is correctly inserted, and check for blockages in the coffee spout.
- Cafè feble: Adjust grind setting to finer, increase coffee strength setting, or check if beans are fresh.
- La màquina no s'escalfa: Ensure the machine is properly plugged in. If the quick heat boiler is not functioning, contact support.
- Fuites d'aigua: Check water tank for proper seating, inspect drip tray, and ensure brewing group is clean and correctly positioned.
- Grinder Noise/No Grinding: Check bean hopper for sufficient beans and ensure no foreign objects are present.
For persistent issues, refer to the full troubleshooting guide or contact customer support.
8. Especificacions
| Característica | Detall |
|---|---|
| Dimensions del producte | 10 x 0.01 x 10 polzades |
| Pes de l'article | 0.16 unces (0.01 lliures) |
| Fabricant | Saeco |
| ASIN | B00HMDJGOO |
| Número de model de l'article | RI9755 47 (as per product title) |
| Data de primera disponibilitat | 31 de desembre de 2013 |
| Marca | Saeco |
9. Garantia i Suport
For warranty information, please refer to the warranty card included with your product or visit the official Saeco website. If you require technical assistance or have questions not covered in this manual, please contact Saeco customer support.
You can visit the official Saeco store for more information: Saeco Store