Datakom DKM-401
Datakom DKM-401 Digital Multimeter Panel User Manual
Model: DKM-401 | Brand: Datakom
1. Introducció
The DKM-401 is a low-cost precision instrument designed to display various AC parameters in a 3-phase distribution panel. The standard unit is designed for 230/400V networks. A different version is available for 120/208V systems. The unit fits into a standard 92x92mm panel opening.

Imatge: Frontal view of the DKM-401 Digital Multimeter, showing the display for L1, L2, L3 currents and frequency/voltage, along with menu buttons.
2. Característiques
- Mesures RMS reals
- Class 0.5 accuracy
- Instal·lació encastada
- Programació del panell frontal
- Reducció de la profunditat del panell
- Ampli rang de temperatures de funcionament
- Panell frontal segellat (IP54)
- Sistema de connexió endollable
- Baix cost
3. Paràmetres mesurats
- Fase a fase voltages: U12-U23-U31
- Vol de fase a neutretages: V1-V2-V3
- Phase currents: I1-I2-I3
- Frequency: F
4. Instal·lació
4.1. Electrical Installation Guidelines
ADVERTIMENT: Do not install the unit close to high electromagnetic noise emitting devices like contactors, high current busbars, switchmode power supplies, and the like.
Although the unit is protected against electromagnetic disturbance, excessive disturbance can affect its operation, measurement precision, and data communication quality.
- Utilitzeu cables del rang de temperatura adequat.
- Use adequate cable section, at least 0.75mm² (AWG18).
- For current transformer inputs, use at least 1.5mm² section (AWG15) cable.
- La longitud del cable del transformador de corrent no ha de superar els 1.5 metres. Si s'utilitza un cable més llarg, augmenta la secció del cable proporcionalment.
- Els transformadors de corrent han de tenir una sortida de 5 A.
PRECAUCIÓ: Current Transformers must be used for current measurement. No direct connection allowed.
4.2. Panel Cutout and Mounting
The DKM-401 is designed for flush mounting into a standard 92x92mm panel opening. Ensure sufficient depth for installation.

Image: Panel cutout dimensions, indicating a 92x92mm square opening.

Imatge: Lateral view illustrating mounting tolerances and the required panel depth of minimum 30mm and 49mm for the unit's body.
The unit is secured using rear retaining brackets. Ensure the panel thickness is within acceptable tolerances for a secure fit.
5. Diagrama de connexió
Refer to the diagram below for proper electrical connections of the DKM-401 Digital Multimeter. Ensure all connections are made securely and according to local electrical codes.

Image: Detailed connection diagram for the DKM-401, illustrating input terminals for voltage (L1, L2, L3, N) and current transformers (1, 2, 3, 4, 11, 12, 13, 14).
- Connect L1, L2, L3, and Neutral (N) to the corresponding terminals.
- Connect current transformers (CTs) to terminals 1-4, 11-14 as indicated. Ensure correct polarity.
- Fuses (6A) are recommended for protection on the voltage input lines.
6. Funcionament
6.1. Pushbutton Functions
The DKM-401 features three buttons on the front panel for configuration and measurement screen navigation.
| Botó | Funció |
|---|---|
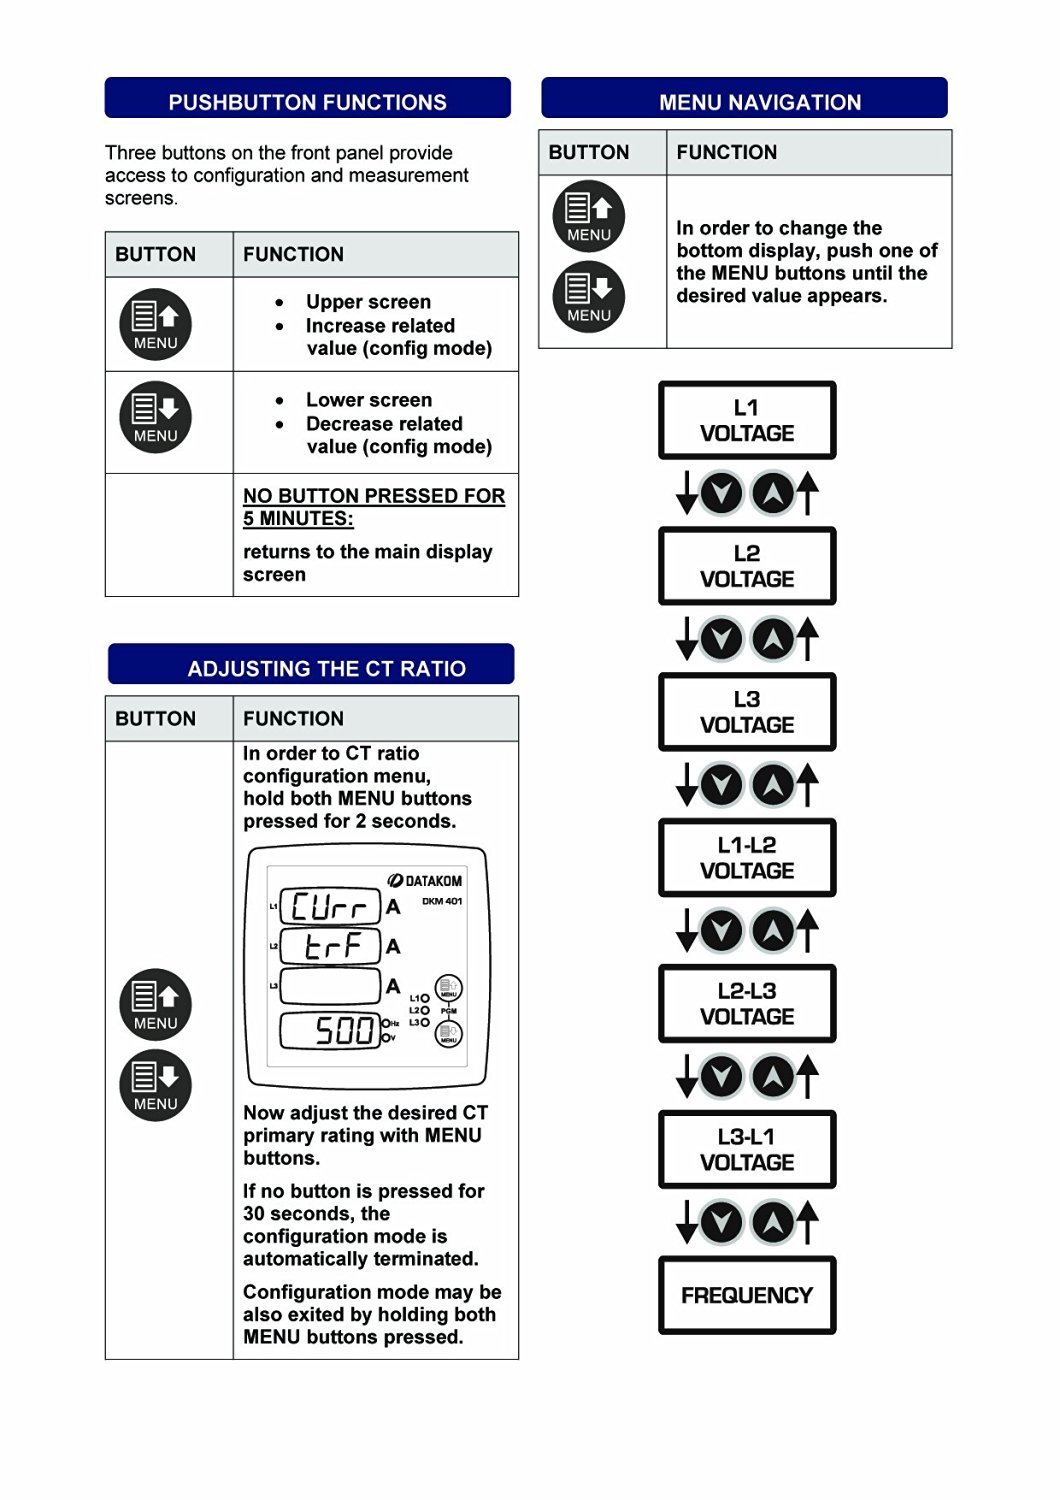 | Upper screen, Increase related value (config mode) |
| Lower screen, Decrease related value (config mode) |
| NO BUTTON PRESSED FOR 5 MINUTES: | Returns to the main display screen |
Image: Table illustrating the functions of the DKM-401's front panel buttons.
6.2. Navegació del menú
To change the bottom display, press one of the MENU buttons until the desired value appears. The sequence of displayed values is as follows:
- L-1 VOLTAGE
- L-2 VOLTAGE
- L-3 VOLTAGE
- L1-L2 VOLTAGE
- L2-L3 VOLTAGE
- L3-L1 VOLTAGE
- FREQÜÈNCIA
Image: Diagram showing the menu navigation flow and the order of parameters displayed on the DKM-401.
6.3. Adjusting the CT Ratio
To enter the CT ratio configuration menu, hold both MENU buttons pressed for 2 seconds. The display will show "Curr" and "ErrA" followed by the current CT ratio (e.g., "500").
Image: DKM-401 display in CT ratio adjustment mode, showing "Curr", "ErrA", and a numerical value.
Use the MENU buttons to adjust the desired CT primary rating. If no button is pressed for 30 seconds, the configuration mode automatically terminates. The configuration mode can also be exited by holding both MENU buttons pressed again.
7. Especificacions tècniques
Entrada d'alimentació:
- 170 - 275VAC, 45 - 66 Hz
- Volum de subministrament de CA diferenttagestà disponible.
Interval d'entrada de mesura:
- Voltage: 10 - 300 V AC (L-N), 20 - 520 V AC (L-L)
- Entrades actuals: 0.2 - 5.5 A AC
- Freqüència: 30 - 100 Hz
Precisió:
- Voltage: 0.5% + 1 dígit
- Actual: 0.5% + 1 dígit
- Freqüència: 0.5% + 1 dígit
Interval de mesura:
- CT ratio: 5/5A to 5000/5A
Consum d'energia:
- < 4 W
Voltage càrrega:
- < 0.1 VA per fase
Càrrega actual:
- < 1 VA per fase
Temperatura de funcionament:
- -20 °C a +80 °C (-4 a +176 °F)
Humitat màxima:
- 95% sense condensació.
Grau de protecció:
- IP 54 (tauler frontal)
- IP 30 (Back Panel)
Tancament:
- Non-flammable, RoHS compliant, ABS/PC (UL94-V0)
Instal·lació:
- Muntatge encastat amb suports de retenció posteriors
Dimensions:
- 102x102x53mm (AxAxP)
Retall del panell:
- 92x92mm
Pes:
- 200 gr
Directives de la UE:
- 2006/95/CE (LVD)
- 2004/108/CE (EMC)
Normes de referència:
- EN 61010 (seguretat)
- EN 61326 (EMC)
Image: Compilation of technical specifications for the DKM-401 Digital Multimeter.
8. Manteniment
The Datakom DKM-401 Digital Multimeter is designed for long-term, reliable operation with minimal maintenance. Follow these general guidelines:
- Neteja: Periodically clean the front panel with a soft, dry cloth. Avoid using abrasive cleaners or solvents that could damage the display or casing.
- Inspecció: Regularly inspect all wiring connections for tightness and signs of wear or damage. Ensure the unit is free from dust and debris, especially around ventilation areas if any.
- Condicions ambientals: Assegureu-vos que l'entorn operatiu es mantingui dins dels rangs de temperatura i humitat especificats per evitar fallades prematures.
- No hi ha peces reparables per l'usuari: The DKM-401 contains no user-serviceable parts. Do not attempt to open the enclosure, as this may void the warranty and expose you to electrical hazards.
9. Solució De Problemes
This section provides solutions to common issues encountered with the DKM-401 Digital Multimeter. If the problem persists, contact technical support.
| Problema | Causa possible | Solució |
|---|---|---|
| No Display / Unit Off | Sense subministrament elèctric, cablejat incorrecte, fusible fundit. | Check power connections (170-275VAC). Verify fuses are intact. Ensure wiring matches the connection diagram. |
| Lectures incorrectes | Incorrect CT ratio setting, faulty wiring, external electromagnetic interference. | Verify the CT ratio setting (Section 6.3). Check all wiring for secure connections and correct polarity. Relocate the unit away from strong electromagnetic fields if possible. |
| Els botons no responen | Temporary software glitch, physical button damage. | Power cycle the unit (turn off and on). If buttons remain unresponsive, contact support. |
| La pantalla es congela | Software error, power instability. | Power cycle the unit. Ensure stable power supply. |
10. Informació sobre envasos
- Peces per paquet: 12 peces
- Mida del paquet: 280 x 170 x 215 mm
- Pes del paquet: 2.6 kg
11. Garantia i Suport
Datakom products are manufactured under strict quality control standards. For warranty information, please refer to the documentation included with your purchase or visit the official Datakom weblloc.
For technical assistance, troubleshooting, or service inquiries, please contact your authorized Datakom dealer or distributor. When contacting support, please have your product model (DKM-401) and serial number available.
Avís legal: Please note that this Datakom item is not sold to USA and Canada. This manual is for informational purposes only and does not constitute a warranty or guarantee.
Ask a question about this manual
Ask about setup, troubleshooting, compatibility, parts, safety, or missing instructions. Manuals+ will review the question and use this page’s manual context to help answer it.