
Evinrude 0391631
Johnson Evinrude OMC Outboard Water Pump Repair Kit
Model: 0391631 | Brand: Evinrude
Introducció
This instruction manual provides essential information for the proper installation and maintenance of the genuine Johnson Evinrude OMC Outboard Water Pump Repair Kit, part number 0391631. This kit is designed to replace worn or damaged components of your outboard motor's water pump, ensuring efficient cooling and optimal engine performance. It is a factory original equipment part, not an aftermarket substitute.
For optimal performance and longevity, it is crucial to follow the installation guidelines carefully. Please verify your own fitment before proceeding with the installation.
Informació de seguretat
Always prioritize safety when working on marine engines. Failure to follow safety precautions can result in serious injury or damage to equipment.
- Ensure the engine is turned off and the battery is disconnected before beginning any work.
- Allow the engine to cool completely before handling components.
- Utilitzeu l'equip de protecció individual (EPI) adequat, incloent-hi guants i protecció ocular.
- Treballar en una zona ben ventilada.
- Keep all tools and parts organized to prevent loss or damage.
- Refer to your specific outboard motor's service manual for detailed disassembly and reassembly procedures.
Contingut del kit
The Johnson Evinrude OMC Outboard Water Pump Repair Kit 0391631 includes the following genuine components:
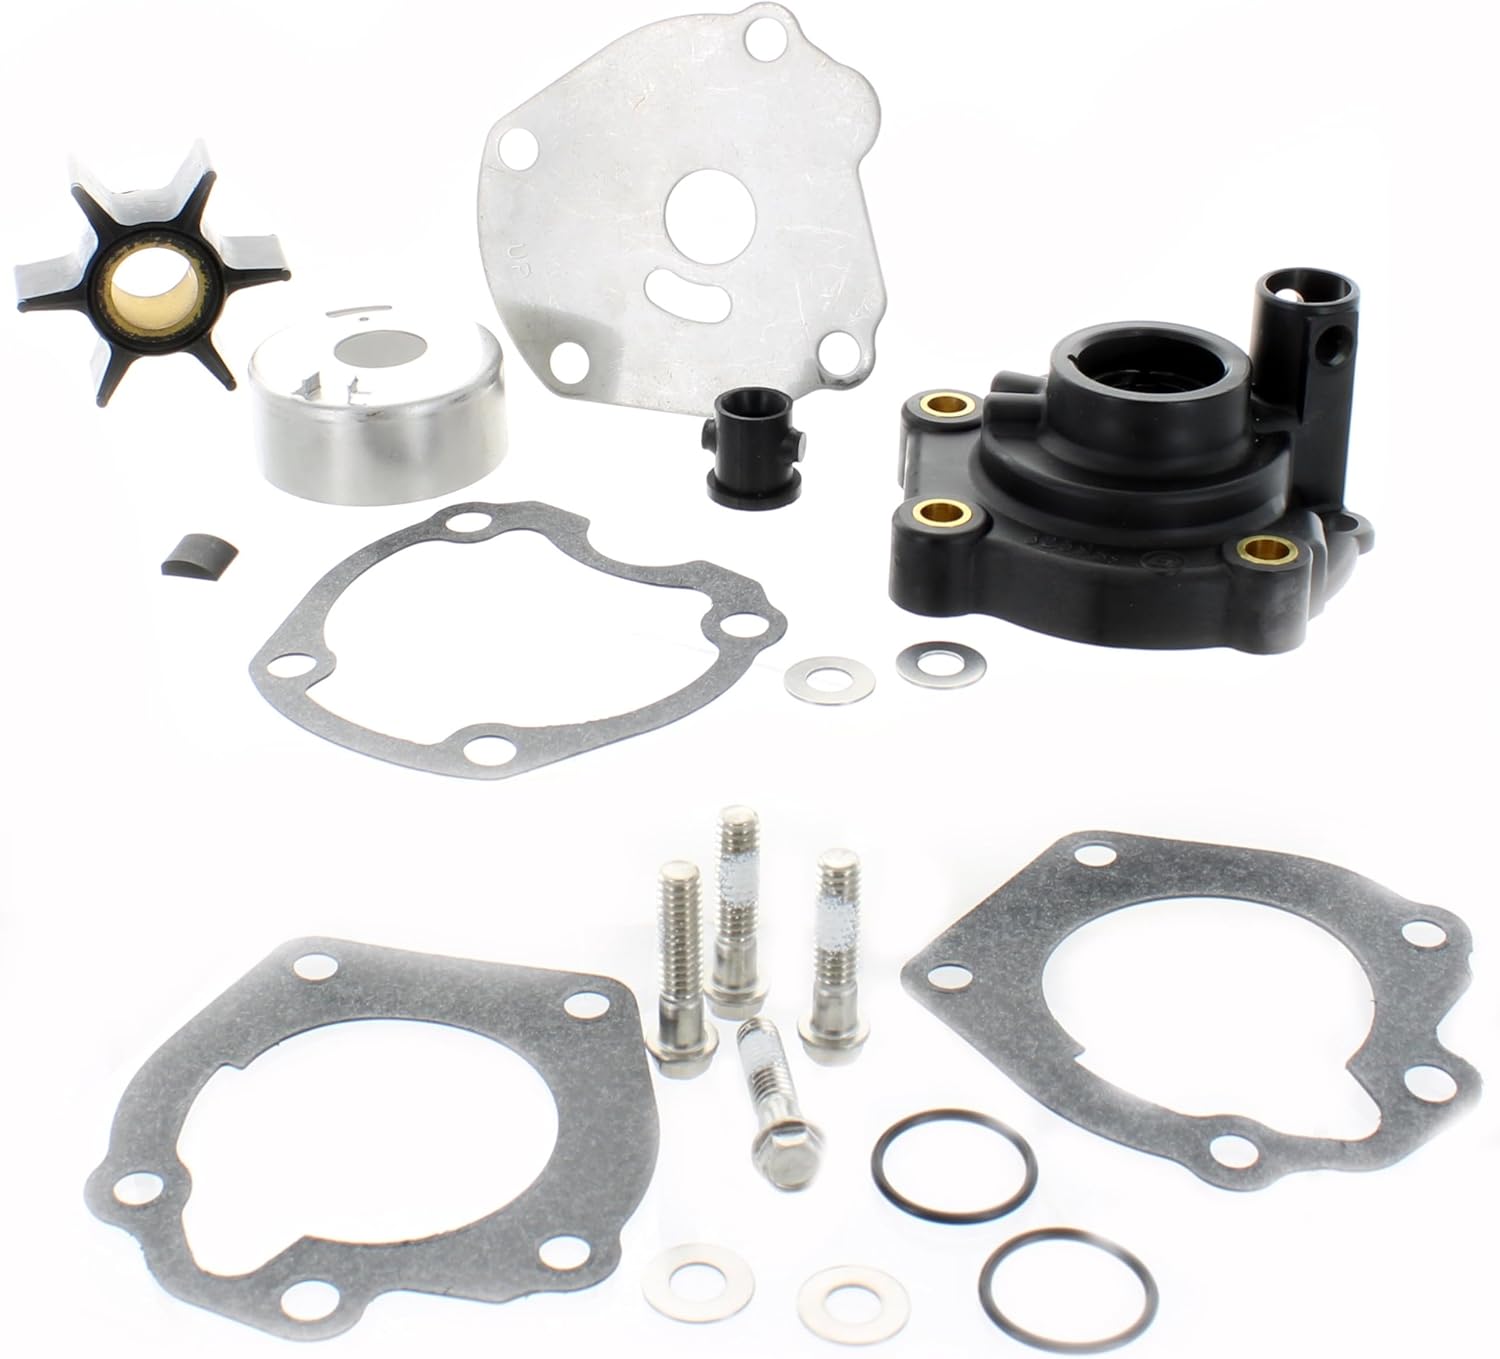
Figura 1: Acabatview of all components included in the water pump repair kit. This includes the impeller, housing, gaskets, O-rings, and mounting hardware.

Figura 2: Detallada view of the new mounting bolts, washers, and O-rings. These components are crucial for a secure and watertight seal.

Figura 3: Assortment of gaskets provided in the kit, designed to ensure proper sealing between water pump components and the engine block.

Figura 4: The new impeller and its corresponding housing, which are the primary components responsible for water circulation.
- Water Pump Impeller (Figure 4)
- Water Pump Housing (Figure 4)
- Gaskets (various shapes and sizes) (Figure 3)
- O-rings (various sizes) (Figure 2)
- Mounting Bolts and Washers (Figure 2)
- Key/Pin for Impeller (if applicable, often included with impeller)
Instal·lació (Configuració)
This section outlines the general procedure for replacing an outboard water pump. Specific steps may vary depending on your outboard model. Always consult your engine's service manual for precise instructions.
Eines i materials necessaris:
- Basic hand tools (wrenches, sockets, screwdrivers)
- Clau dinamométrica
- Marine grease or sealant (as recommended by your engine manufacturer)
- Draps nets
Procediment:
- Preparar el motor: Ensure the outboard motor is securely mounted and in the upright position. Disconnect the battery and ensure the engine is cool.
- Drain Gearcase Oil (if necessary): Some models require draining the gearcase oil before lower unit removal. Consult your service manual.
- Remove Lower Unit: Locate and remove the bolts securing the lower unit to the midsection of the outboard. Carefully lower the unit, ensuring no cables or hoses are damaged.
- Access Water Pump: Once the lower unit is removed, the water pump housing will be visible at the top of the driveshaft. Remove the bolts securing the old water pump housing.
- Eliminar components antics: Carefully remove the old water pump housing, impeller, gaskets, and any other worn components. Note the orientation of the impeller vanes for correct installation of the new one.
- Superfícies de muntatge netes: Thoroughly clean all mating surfaces on the lower unit and driveshaft. Remove any old gasket material or corrosion.
- Instal·leu nous components:
- Place the new base gasket onto the lower unit.
- Install the new water pump housing.
- Lubricate the driveshaft and the inside of the new impeller with marine grease.
- Align the impeller key/pin with the slot in the driveshaft and slide the new impeller into the housing, ensuring the vanes are oriented correctly (usually clockwise when viewed des de dalt).
- Install the remaining gaskets, O-rings, and wear plates as per your engine's service manual.
- Secure the water pump housing with the new mounting bolts and washers provided in the kit. Torque to manufacturer's specifications.
- Reinstall Lower Unit: Carefully lift the lower unit back into position, aligning the driveshaft with the engine crankshaft and the shift rod. Ensure all connections are properly seated.
- Secure Lower Unit: Reinstall and torque the lower unit mounting bolts to manufacturer's specifications.
- Refill Gearcase Oil (if necessary): If drained, refill the gearcase with the recommended oil.
- Torneu a connectar la bateria: Torneu a connectar la bateria.
Operating (Post-Installation Check)
After installing the water pump repair kit, it is crucial to perform a functional check to ensure proper operation and cooling.
- Provide Water Supply: Connect a garden hose to the flushing attachment on your outboard, or submerge the lower unit in a test tank or barrel filled with water. Ensure the water intake grates are fully submerged.
- Arrancar el motor: Engegueu el motor i deixeu-lo girar al ralentí.
- Check for Water Flow: Observe the tell-tale (pilot water discharge) stream. A strong, steady stream of water indicates the water pump is functioning correctly. If there is no stream, a weak stream, or intermittent flow, shut off the engine immediately.
- Monitoritzar la temperatura del motor: Allow the engine to run for a few minutes while monitoring the temperature gauge (if equipped) or warning lights. The engine should maintain a normal operating temperature.
- Inspeccionar si hi ha fuites: Visually inspect the area around the lower unit and water pump for any signs of water or oil leaks.
If any issues are observed during the post-installation check, refer to the Troubleshooting section or consult a qualified marine technician.
Manteniment
Regular maintenance of your outboard's water pump is vital for preventing overheating and ensuring reliable operation. The water pump impeller is a wear item and requires periodic replacement.
- Impeller Replacement Interval: It is generally recommended to replace the water pump impeller every 100 hours of operation or annually, whichever comes first. This interval may be shorter in sandy or silty water conditions.
- Inspecció visual: During routine maintenance, visually inspect the tell-tale stream for consistent flow. Any reduction in flow or intermittent discharge can indicate a failing impeller.
- Overheating Signs: Be alert for signs of engine overheating, such as steam from the engine, a hot engine block, or activation of temperature warning alarms. These are strong indicators of water pump issues.
- Hivernació/emmagatzematge: Ensure the cooling system is properly drained and flushed during winterization to prevent freezing and corrosion.
Resolució de problemes
If you experience issues after installing the water pump repair kit, consider the following common problems and solutions:
| Problema | Causa possible | Solució |
|---|---|---|
| No water from tell-tale / Weak stream |
|
|
| sobreescalfament del motor |
|
|
| Water/Oil Leak from Lower Unit |
|
|
If problems persist after troubleshooting, it is recommended to consult a certified marine technician.
Especificacions
| Atribut | Detall |
|---|---|
| Marca | Evinrude |
| Fabricant | Johnson Evinrude OMC |
| Número de peça OEM | 0391631 (Supersedes 0388891) |
| UPC | 745419210847, 074541921087 |
| Usos recomanats | Repairing outboard motor water pumps |
| Material | Aluminum (for housing components) |
| Pes de l'article | 1.3 lliures |
| Dimensions del producte | 7 x 6 x 6 polzades |
| Engine Type (Applicable) | 4 Stroke (Note: Kit is for water pump, compatible with various engine types) |
| Maximum Horsepower (Applicable) | Up to 75 Horsepower (Note: Kit is for water pump, compatible with various engine sizes) |
Garantia i Suport
As a genuine OEM part, this Johnson Evinrude OMC Water Pump Repair Kit 0391631 is manufactured to high standards. For specific warranty information, please refer to the warranty policy provided by the original manufacturer or the authorized seller at the time of purchase.
For technical support or further assistance with installation and troubleshooting, it is recommended to contact an authorized Evinrude/Johnson service center or a qualified marine mechanic.
You may also refer to the official Evinrude or Johnson Outboards website for service manuals and additional resources.
Documents relacionats0391631

Ask a question about this manual
Ask about setup, troubleshooting, compatibility, parts, safety, or missing instructions. Manuals+ will review the question and use this page’s manual context to help answer it.