
1. Introducció
This manual provides detailed instructions for the installation, operation, and maintenance of your Piko 36250 G Scale Interior and Marker Light Kit. This kit is designed to add functional interior and marker lighting to compatible G Scale model train cars, such as work cabooses, enhancing realism and operational visibility. Please read these instructions carefully before proceeding with installation.
2. Informació de seguretat
- This product is intended for users aged 14 years and older. Adult supervision is recommended for younger users.
- Always disconnect power from your model railway layout before installing or performing maintenance on electrical components.
- Manipuleu els components electrònics amb cura per evitar danys causats per l'electricitat estàtica.
- Ensure all electrical connections are secure and correctly polarized to prevent short circuits or damage to the lighting unit or power supply.
- Do not expose the circuit board or wiring to excessive moisture or extreme temperatures.
3. Contingut del paquet
Verifiqueu que tots els components que s'enumeren a continuació siguin presents al vostre kit:
- 1x Piko 36136 Interior and Marker Light Circuit Board
- 4x Brass Power Contact Strips
- 2x Small Mounting Screws
- 2x Sets of Electrical Wires (one longer, one shorter)
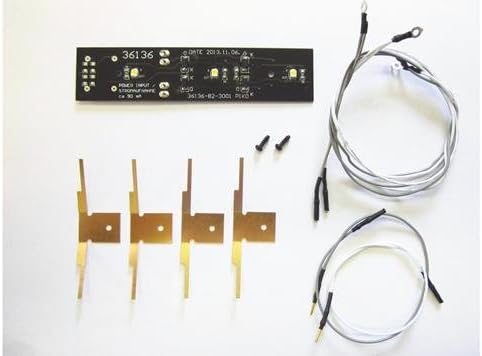
This image displays all components included in the Piko 36250 kit: a black circuit board with LEDs, four brass power contact strips, two small black screws, and two sets of electrical wires.
4. Configuració i instal·lació
The installation process involves integrating the lighting kit into your G Scale model train car. Specific steps may vary slightly depending on the exact model of your train car.
- Prepare the Train Car: Carefully remove the body of your G Scale train car to access the interior. Identify suitable locations for mounting the circuit board and routing the wires.
- Install Power Contact Strips: The four brass contact strips are designed to pick up power from the track via the train car's wheel sets. Secure these strips to the car's bogies or chassis in a manner that ensures reliable contact with the wheel backs or axles. Ensure they do not interfere with wheel rotation or track clearance.
- Mount the Circuit Board: Position the Piko 36136 circuit board inside the train car. Use the provided small screws to secure the board to a flat, stable surface within the car. Ensure the board is mounted in a way that allows the interior LEDs to illuminate the car's interior effectively and the marker lights (if applicable) to be visible.
- Connexions de cable:
- Connect the wires from the brass power contact strips to the designated power input terminals on the circuit board. Observe correct polarity if indicated on the board (e.g., '+' and '-').
- The two sets of electrical wires (one longer, one shorter) are typically used for connecting the main power input from the track contacts to the board, and for connecting marker lights or additional interior lights if your car has provisions for them. Refer to the markings on the circuit board for specific connections (e.g., 'POWER INPUT', 'LIGHT OUTPUT').
- Ensure all wire connections are firm and insulated to prevent short circuits.
- Funcionalitat de prova: Before reassembling the train car, place it on a powered track section to test the lighting. Verify that the interior lights illuminate and any marker lights function as expected.
- Reassemble Train Car: Once functionality is confirmed, carefully reattach the train car body, ensuring no wires are pinched or damaged.
5. Instruccions de funcionament
Once properly installed, the Piko 36250 Interior and Marker Light Kit operates automatically when the train car is placed on a powered G Scale track. The lights will illuminate as long as power is supplied to the track and the car's power pickup system is functioning correctly.
6. Manteniment
- Neteja: Periodically inspect the brass power contact strips and the train car's wheels for dirt or grime. Clean them gently with a soft, dry cloth or a specialized track cleaning fluid to ensure optimal electrical contact.
- Connexions: Occasionally check all wire connections to ensure they remain secure. Loose connections can lead to intermittent lighting or complete failure.
- Emmagatzematge: When not in use, store the train car in a clean, dry environment away from direct sunlight and extreme temperatures.
7. Solució De Problemes
| Problema | Causa possible | Solució |
|---|---|---|
| Els llums no s'il·luminen. | No power to track. Cablejat fluix o incorrecte. Dirty power contact strips/wheels. Polaritat incorrecta. | Ensure track is powered. Check all wire connections for security and correct polarity. Clean power contact strips and train car wheels. Verify '+' and '-' connections are correct. |
| Els llums parpellegen de manera intermitent. | Mal contacte elèctric. Connexions fluixes. | Clean power contact strips and wheels thoroughly. Secure all wire connections. |
| Només funcionen algunes llums. | Damaged LED on circuit board. Partial wiring issue. | Inspect the circuit board for visible damage. Recheck wiring to ensure all light outputs are connected correctly. |
8. Especificacions
- Model: Piko 36250
- Marca: Piko
- Escala: G Scale
- Funció: Interior and Marker Lighting
- Edat recomanada: 14 anys i més
- Components: Circuit board (Piko 36136), brass contact strips, wiring, mounting screws.
9. Garantia i Suport
This Piko product is manufactured to high-quality standards. For information regarding warranty coverage, please refer to the warranty documentation included with your original purchase or visit the official Piko website. For technical support or assistance with installation, please contact Piko customer service directly through their official channels.


