1. Introducció
This manual provides detailed instructions for the installation, operation, maintenance, and troubleshooting of your Gateway SX2865 SFF Desktop Motherboard H61 (Model DB.U7411.001). This motherboard is designed for Small Form Factor (SFF) desktop systems, featuring the Intel H61 Express chipset and supporting LGA 1155/1156 CPUs and DDR3 RAM. Please read this manual thoroughly before proceeding with any installation or configuration to ensure proper functionality and safety.
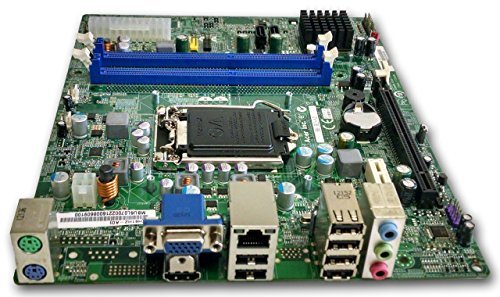
Figura 1: Acabatview of the Gateway SX2865 SFF Desktop Motherboard H61. This image displays the main components and layout of the motherboard, including the CPU socket, RAM slots, and various connectors.
2. Informació de seguretat
Always observe the following safety precautions when handling and installing computer components:
- Desconnecteu el cable d'alimentació de la presa de corrent abans d'instal·lar o treure qualsevol component.
- Porteu una polsera antiestàtica per evitar danys per descàrrega electrostàtica (ESD) als components sensibles.
- Handle the motherboard by its edges to avoid touching sensitive components or circuits.
- Assegureu-vos que hi hagi una ventilació adequada dins de la carcassa de l'ordinador per evitar el sobreescalfament.
- No exposeu la placa base a la humitat ni a temperatures extremes.
- If you are unsure about any installation step, consult a qualified technician.
3. Configuració i instal·lació
Follow these steps to properly install the Gateway SX2865 SFF Desktop Motherboard into your system:
3.1. Preparació del xassís
- Open your computer chassis and ensure it is clean and free of dust.
- Install the I/O shield provided with your chassis or motherboard into the rear panel opening.
- Verify that the standoffs in the chassis align with the mounting holes on the motherboard. Adjust if necessary.
3.2. Instal·lació de la CPU
- Locate the CPU socket (LGA 1155/1156) on the motherboard.
- Gently lift the load lever and open the CPU socket cover.
- Carefully align the CPU with the socket, matching the golden triangle on the CPU with the triangle mark on the socket. Do not force the CPU into the socket.
- Close the socket cover and press down the load lever until it locks into place.
- Apply a thin layer of thermal paste to the CPU surface (if not pre-applied on the cooler).
- Instal·leu el refrigerador de la CPU segons les instruccions del fabricant, assegurant-vos que estigui ben fixat.
3.3. Instal·lació de la memòria RAM
- Localitzeu les ranures DIMM DDR3 a la placa base.
- Obriu els clips dels dos extrems de la ranura DIMM.
- Alineeu l'osca del mòdul RAM amb la clau de la ranura DIMM.
- Premeu fermament els dos extrems del mòdul RAM fins que els clips encaixin al seu lloc.
3.4. Muntatge de la placa base
- Carefully place the motherboard into the chassis, aligning the mounting holes with the standoffs.
- Fixeu la placa base amb cargols, procurant no apretar-los massa.
3.5. Connexió de perifèrics i alimentació
- Connecteu el connector d'alimentació ATX de 24 pins i el connector d'alimentació de la CPU de 4 pins de la font d'alimentació a la placa base.
- Connect SATA data cables from your storage devices (HDD/SSD) to the SATA ports on the motherboard.
- Connect front panel connectors (power button, reset button, USB, audio) to their respective headers on the motherboard. Refer to the motherboard's silkscreen labels for correct orientation.
- Install any expansion cards (e.g., graphics card) into the appropriate PCIe slots and secure them.
- Connect all necessary cables to your power supply.
4. Funcionament i configuració
4.1. Arrencada inicial
- After all components are installed and connected, close the chassis.
- Connecteu el monitor, el teclat i el ratolí.
- Connect the power cord to the power supply and a wall outlet.
- Premeu el botó d'engegada de l'ordinador.
4.2. Configuració de la BIOS/UEFI
The BIOS (Basic Input/Output System) or UEFI (Unified Extensible Firmware Interface) is firmware that initializes hardware during the booting process. To enter the BIOS/UEFI setup utility:
- During the initial boot-up sequence, repeatedly press the designated key (commonly Del, F2, o F10). The exact key may vary; check the on-screen prompts.
- Within the BIOS/UEFI, you can configure settings such as:
- Data i hora del sistema
- Boot Order (to install an operating system from a USB drive or DVD)
- SATA Mode (AHCI, IDE)
- CPU and Memory settings (advanced users)
- Desa els canvis i surt de la BIOS/UEFI per continuar l'arrencada.
4.3. Instal·lació del sistema operatiu i del controlador
After configuring the BIOS/UEFI, proceed with installing your preferred operating system (e.g., Windows, Linux). Once the OS is installed, install the necessary drivers for the motherboard's components (chipset, audio, LAN, etc.). These drivers are typically available on the manufacturer's website (Acer/Gateway) or can be found through the operating system's update features.
5. Manteniment
Regular maintenance helps ensure the longevity and stable performance of your motherboard:
- Eliminació de pols: Periodically clean the inside of your computer case, including the motherboard, CPU cooler, and fan vents, using compressed air. Ensure the system is powered off and unplugged before cleaning.
- Actualitzacions de la BIOS: Comproveu el del fabricant website (Acer/Gateway) for BIOS/UEFI updates. Updates can improve stability, add support for new hardware, or fix bugs. Follow the update instructions carefully to avoid damaging the motherboard.
- Actualitzacions de controladors: Keep your system drivers updated to ensure optimal performance and compatibility.
- Inspecció física: De tant en tant, inspeccioneu la placa base per detectar signes de danys, connexions soltes o condensadors inflats.
6. Solució De Problemes
Si teniu problemes amb la placa base, consulteu els passos habituals següents per a la resolució de problemes:
- Sense energia:
- Ensure the power supply is connected correctly to the motherboard (24-pin ATX and 4-pin CPU).
- Check that the power supply switch is in the 'ON' position.
- Verify the power cord is securely plugged into both the power supply and the wall outlet.
- Confirm the front panel power button connector is correctly attached to the motherboard.
- Sense pantalla:
- Ensure the monitor is powered on and connected to the correct video output (either integrated graphics or a dedicated graphics card).
- Reseat the RAM modules. Try booting with only one RAM module installed.
- Torneu a col·locar la targeta gràfica (si escau).
- Check if the CPU cooler is properly installed and the CPU power connector is secure.
- System Fails to Boot / POST Errors:
- Listen for beep codes from the motherboard's speaker (if installed). Consult the motherboard's documentation for beep code meanings.
- Clear the CMOS (Complementary Metal-Oxide-Semiconductor) by removing the CMOS battery for a few minutes or using the clear CMOS jumper (refer to motherboard layout).
- Ensure all essential components (CPU, RAM, GPU) are correctly installed.
- Problemes del sistema operatiu:
- Verify that all necessary drivers are installed and up to date.
- Check SATA cable connections for storage devices.
- Run diagnostic tools for hard drives/SSDs and RAM.
7. Especificacions
Key technical specifications for the Gateway SX2865 SFF Desktop Motherboard H61 (Model DB.U7411.001):
| Característica | Detall |
|---|---|
| Marca | Porta d'entrada |
| Nom del model | SX2865 |
| Número de model de l'article | DB.U7411.001 |
| Fabricant | Acer |
| Tipus de xipset | Intel H61 Express |
| Socket de CPU | LGA 1155 or LGA 1156 |
| Processadors compatibles | Intel Xeon (and other compatible LGA 1155/1156 CPUs) |
| Tecnologia de memòria RAM | DDR3 |
| Velocitat de rellotge de memòria | 2133 MHz (Max supported, actual speed depends on CPU and RAM) |
| Capacitat d'emmagatzematge de memòria | 16 GB (Maximum supported) |
| Dispositius compatibles | Ordinador personal |
| Plataforma | Linux (and other compatible operating systems) |
| Factor de forma | uATX (Micro-ATX) |
8. Garantia i Suport
For warranty information and technical support regarding your Gateway SX2865 SFF Desktop Motherboard H61 (Model DB.U7411.001), please refer to the documentation provided with your original system or contact the manufacturer directly.
- Fabricant: Acer (as per product specifications)
- Marca: Porta d'entrada
- Visita l'oficial Suport de passarel·la weblloc or Suport Acer weblloc for drivers, FAQs, and contact information.
- Conserveu el vostre comprovant de compra per a reclamacions de garantia.


