
1. Introducció
This manual provides essential instructions for the installation, operation, and maintenance of your HP Compaq 6005 Pro Socket AM3 System Motherboard (P/N 531966-001). This motherboard is designed for use in personal computers and supports AMD Socket AM3 processors. Please read this manual thoroughly before proceeding with installation or operation.
2. Informació de seguretat
Observe the following safety precautions to prevent damage to the motherboard or personal injury:
- Desconnecteu sempre l'alimentació de la presa de corrent abans d'instal·lar o treure qualsevol component.
- Wear an anti-static wrist strap and work on an anti-static mat to prevent electrostatic discharge (ESD) damage to sensitive components.
- Handle the motherboard by its edges, avoiding contact with components and connectors.
- Assegureu-vos que hi hagi una ventilació adequada dins de la carcassa de l'ordinador per evitar el sobreescalfament.
- If you are unsure about any installation step, consult a qualified technician.
3. Motherboard Components Overview
Familiarize yourself with the key components and connectors on your HP Compaq 6005 Pro motherboard.

Figura 3.1: De dalt a baix view of the HP Compaq 6005 Pro motherboard, showing the CPU socket, RAM slots, and various chipsets.
The motherboard features an AMD Socket AM3 for compatible processors, four DDR3 DIMM slots for memory, and various expansion slots for additional cards. The rear I/O panel provides connectivity for peripherals.
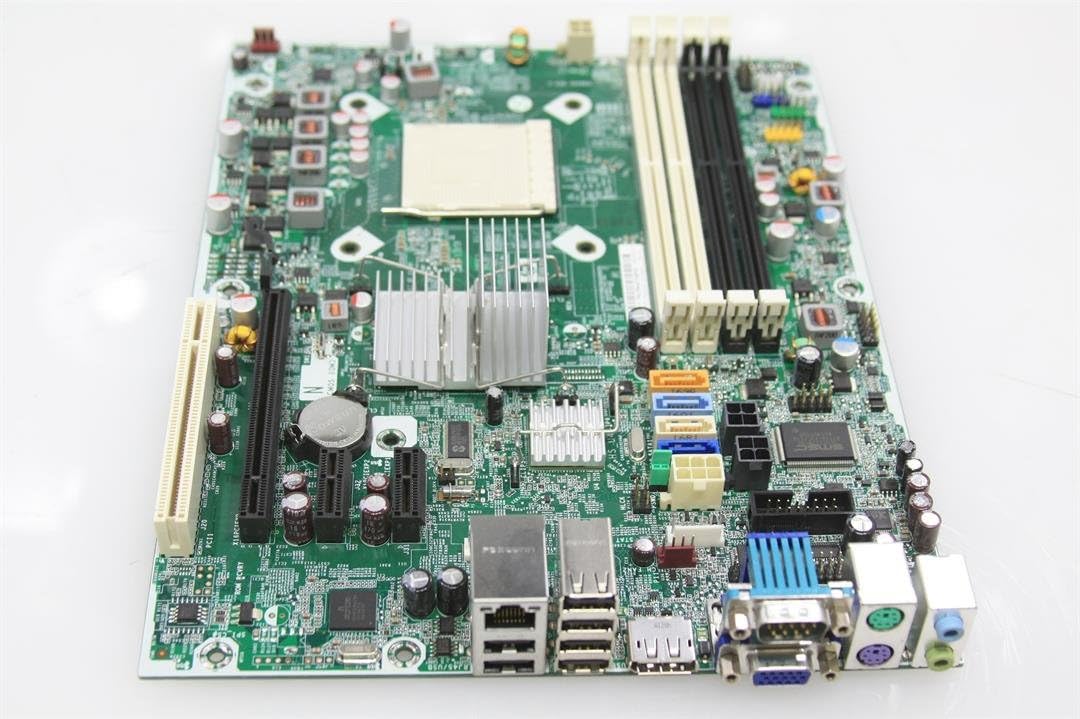
Figura 3.2: Rear I/O panel of the HP Compaq 6005 Pro motherboard, featuring VGA, DisplayPort, DVI, USB ports, Ethernet, and audio jacks.
Key areas include:
- Sòcol de la CPU (AM3): For installing the central processing unit.
- DIMM Slots: For installing DDR3 memory modules.
- Ranures PCIe: Per a targetes gràfiques i altres targetes d'expansió.
- Ports SATA: For connecting storage devices like hard drives and SSDs.
- Connectors d'alimentació: Main 24-pin ATX and 4-pin CPU power connectors.
- Connectors del panell frontal: For case buttons, LEDs, and front USB/audio ports.

Figura 3.3: Another perspective of the HP Compaq 6005 Pro motherboard, highlighting expansion slots and internal connectors.
4. Configuració i instal·lació
Follow these steps to properly install your motherboard and its components.
4.1. Llista de comprovació prèvia a la instal·lació
- Computer case with appropriate standoffs.
- Compatible AMD Socket AM3 processor.
- DDR3 memory modules.
- CPU cooler with thermal paste.
- Unitat d'alimentació (PSU).
- Tornavís i corretja de canell antiestàtica.
4.2. Instal·lació de la placa base
- Install the I/O shield into the computer case's rear opening.
- Carefully place the motherboard into the case, aligning the screw holes with the standoffs.
- Fixeu la placa base amb cargols, assegurant-vos que estigui ben fixada però no massa apretada.
4.3. Instal·lació de la CPU
- Lift the CPU socket lever.
- Alineeu la marca triangular de la CPU amb la marca corresponent del sòcol.
- Col·loca suaument la CPU al sòcol sense forçar-la.
- Lower the socket lever to secure the CPU.
- Apply a thin, even layer of thermal paste to the CPU's surface.
- Install the CPU cooler according to its manufacturer's instructions, ensuring good contact with the CPU.
4.4. Instal·lació de memòria (RAM)
- Obriu els clips dels dos extrems de la ranura DIMM.
- Alineeu l'osca del mòdul de memòria DDR3 amb la clau de la ranura DIMM.
- Premeu fermament els dos extrems del mòdul de memòria fins que els clips encaixin al seu lloc.
4.5. Connexions d'alimentació
- Connect the 24-pin ATX power cable from the PSU to the main power connector on the motherboard.
- Connect the 4-pin CPU power cable from the PSU to the CPU power connector near the CPU socket.
4.6. Storage Devices and Expansion Cards
- Connect SATA data cables from your storage devices (HDD/SSD) to the SATA ports on the motherboard.
- Install any necessary expansion cards (e.g., graphics card) into the appropriate PCIe slots and secure them with screws.
4.7. Panell frontal i connexions perifèriques
- Connect the front panel cables (power button, reset button, HDD LED, power LED, front USB, front audio) to their respective headers on the motherboard. Refer to your case manual for specific pin assignments.
- Connect external peripherals such as keyboard, mouse, monitor, and network cable to the rear I/O ports.
5. Instruccions de funcionament
5.1. Primera arrencada
- After all components are installed and connected, connect the power cord to the PSU and turn on the power switch.
- Premeu el botó d'engegada de la caixa de l'ordinador.
- The system should power on, and you should see a display on your monitor.
5.2. Configuració de la BIOS/UEFI
Per accedir a la utilitat de configuració de la BIOS/UEFI, premeu la tecla designada (normalment F10 or F12 for HP systems) repeatedly during the initial boot sequence. In the BIOS/UEFI, you can configure system settings, boot order, and monitor hardware status.
5.3. Instal·lació del sistema operatiu
Once the system is booting correctly, you can proceed with installing your preferred operating system (e.g., Windows 10) from a bootable USB drive or DVD.
6. Manteniment
6.1. Neteja
Regularly clean dust from the motherboard, CPU cooler, and case fans using compressed air. Ensure the system is powered off and unplugged before cleaning. Avoid using liquid cleaners directly on components.
6.2. Actualitzacions de la BIOS
Consulteu periòdicament el suport oficial d'HP website for BIOS/firmware updates. BIOS updates can improve system stability, compatibility, and performance. Follow HP's instructions carefully when performing a BIOS update to avoid system damage.
7. Solució De Problemes
Si teniu problemes, consulteu els passos habituals següents per a la resolució de problemes:
- Sense energia: Ensure all power cables (24-pin ATX, 4-pin CPU) are securely connected. Check the PSU switch and wall outlet.
- Sense pantalla: Verify the monitor is connected to the correct video output (VGA, DVI, or DisplayPort) and is powered on. Reseat the graphics card (if applicable) and RAM modules.
- Pius del sistema: Listen for beep codes during startup. These codes often indicate specific hardware issues (e.g., memory failure, graphics card issue). Consult the HP support website for a list of beep codes for your model.
- Inestabilitat/Avaries del sistema: Check for overheating (monitor temperatures in BIOS). Ensure all drivers are up to date. Test memory modules individually.
- Component no detectat: Reseat the component (e.g., hard drive, expansion card). Check cable connections. Verify BIOS settings.
8. Especificacions
Detailed technical specifications for the HP Compaq 6005 Pro Motherboard (P/N 531966-001).
| Característica | Especificació |
|---|---|
| Marca | HP |
| Nom del model | HP Compaq 6005 Pro |
| Número de model | 531966-001 |
| Socket de CPU | Socket AMD AM3 |
| Processadors compatibles | AMD Phenom II, Athlon II, AMD FX |
| Tipus de xipset | AMD 760MP |
| Tecnologia de memòria RAM | DDR3 |
| Ranures de memòria disponibles | 4 ranures DIMM |
| Mida màxima de la memòria RAM | 16 GB |
| Velocitat de rellotge de memòria | Up to 2133 MHz (depending on CPU/RAM) |
| Interfície de la targeta gràfica | PCI Express x16 |
| Ranures d'expansió | 1x PCIe x16, 2x PCIe x1, 1x PCI |
| Total SATA Ports | 4x SATA 2.0 |
| Tipus de connector d'alimentació principal | ATX de 24 pins |
| Ports d'E/S posterior | 6x USB 2.0, 1x VGA, 1x DVI-D, 1x DisplayPort, 1x RJ-45 Ethernet, Audio In/Out/Mic, 2x PS/2 |
| Dispositius compatibles | Ordinador personal |
| Plataforma | Windows 10 (i versions anteriors compatibles) |
| Factor de forma | Micro-ATX |
9. Informació de la garantia
For specific warranty terms and conditions related to your HP Compaq 6005 Pro Motherboard, please refer to the original purchase documentation or contact HP customer support directly. Warranty coverage may vary based on region and point of purchase.
10. Suport
For additional assistance, driver downloads, updated documentation, or to contact technical support, please visit the official HP support weblloc:
When contacting support, please have your motherboard model number (531966-001) and any relevant system information ready.