
Memphis Audio SRX750D.1
Memphis Audio SRX750D.1 Street Reference Series Mono Subwoofer AmpManual d'usuari més viu
Model: SRX750D.1
Introducció
This manual provides detailed instructions for the installation, operation, and maintenance of your Memphis Audio SRX750D.1 Street Reference Series Mono Subwoofer Amplificador. Llegiu atentament aquest manual abans d'intentar la instal·lació o el funcionament per garantir un ús correcte i evitar danys a la unitat o al sistema d'àudio del vostre vehicle.
The SRX750D.1 amplifier is designed to deliver reliable performance and powerful bass output for your car audio system. It features a textured aluminum heatsink, high-level inputs, selectable bass boost, remote level control, and a variable crossover network.
Precaucions de seguretat
- Desconnecteu sempre el terminal negatiu de la bateria del vehicle abans de començar qualsevol instal·lació.
- Assegureu-vos que tot el cablejat estigui correctament encaminat i fixat per evitar danys o curtcircuits.
- Use appropriate gauge wiring as recommended in the specifications section.
- Eviteu muntar el amplificador en zones exposades a la llum solar directa, a la calor excessiva, a la humitat o a la pols.
- No opereu el amplificador si està malmès o no funciona correctament. Consulteu la secció de resolució de problemes o poseu-vos en contacte amb el servei d'assistència.
- Es recomana una instal·lació professional per a un rendiment i una seguretat òptims.
Contingut del paquet
Verifiqueu que tots els elements siguin presents al paquet:
- Memphis Audio SRX750D.1 Mono Subwoofer Ampmés viu
- Control remot de baix
- Maquinari de muntatge
- Manual d'usuari (aquest document)
Instal·lació i Configuració
1. Triar una ubicació de muntatge
Select a location that provides adequate ventilation for the amplifier's heatsink. Avoid mounting directly on carpet or in enclosed spaces without airflow. Common locations include under seats, in the trunk, or on a custom ampbastidor lifier.

Figura 1: Angle view of the SRX750D.1 amplifier, highlighting its heatsink design.
2. Cablejat d'alimentació
- Desconnexió de la bateria: Desconnecta el terminal negatiu (-) de la bateria del teu vehicle.
- Cable de corrent: Run a 4-gauge power cable (Recommended Amp Kit: 4GKIT) from the positive (+) terminal of the battery to the amplifier's power input. Install an inline fuse holder within 18 inches (45 cm) of the battery. The fuse rating should match the amplifier's requirements (refer to specifications).
- Cable de terra: Connect a 4-gauge ground cable from the amplifier's ground terminal to a clean, unpainted metal surface on the vehicle's chassis. Ensure a solid, low-resistance connection. The ground cable should be as short as possible, ideally less than 3 feet (1 meter).
- Encès remot: Connecteu un cable d'encesa remota (normalment de calibre 18) des de la sortida remota de la unitat principal fins a ampterminal REM del lificador. Aquest cable indica el amplificador per encendre i apagar amb la unitat principal.
3. Signal Input Wiring
The SRX750D.1 supports both low-level (RCA) and high-level inputs.
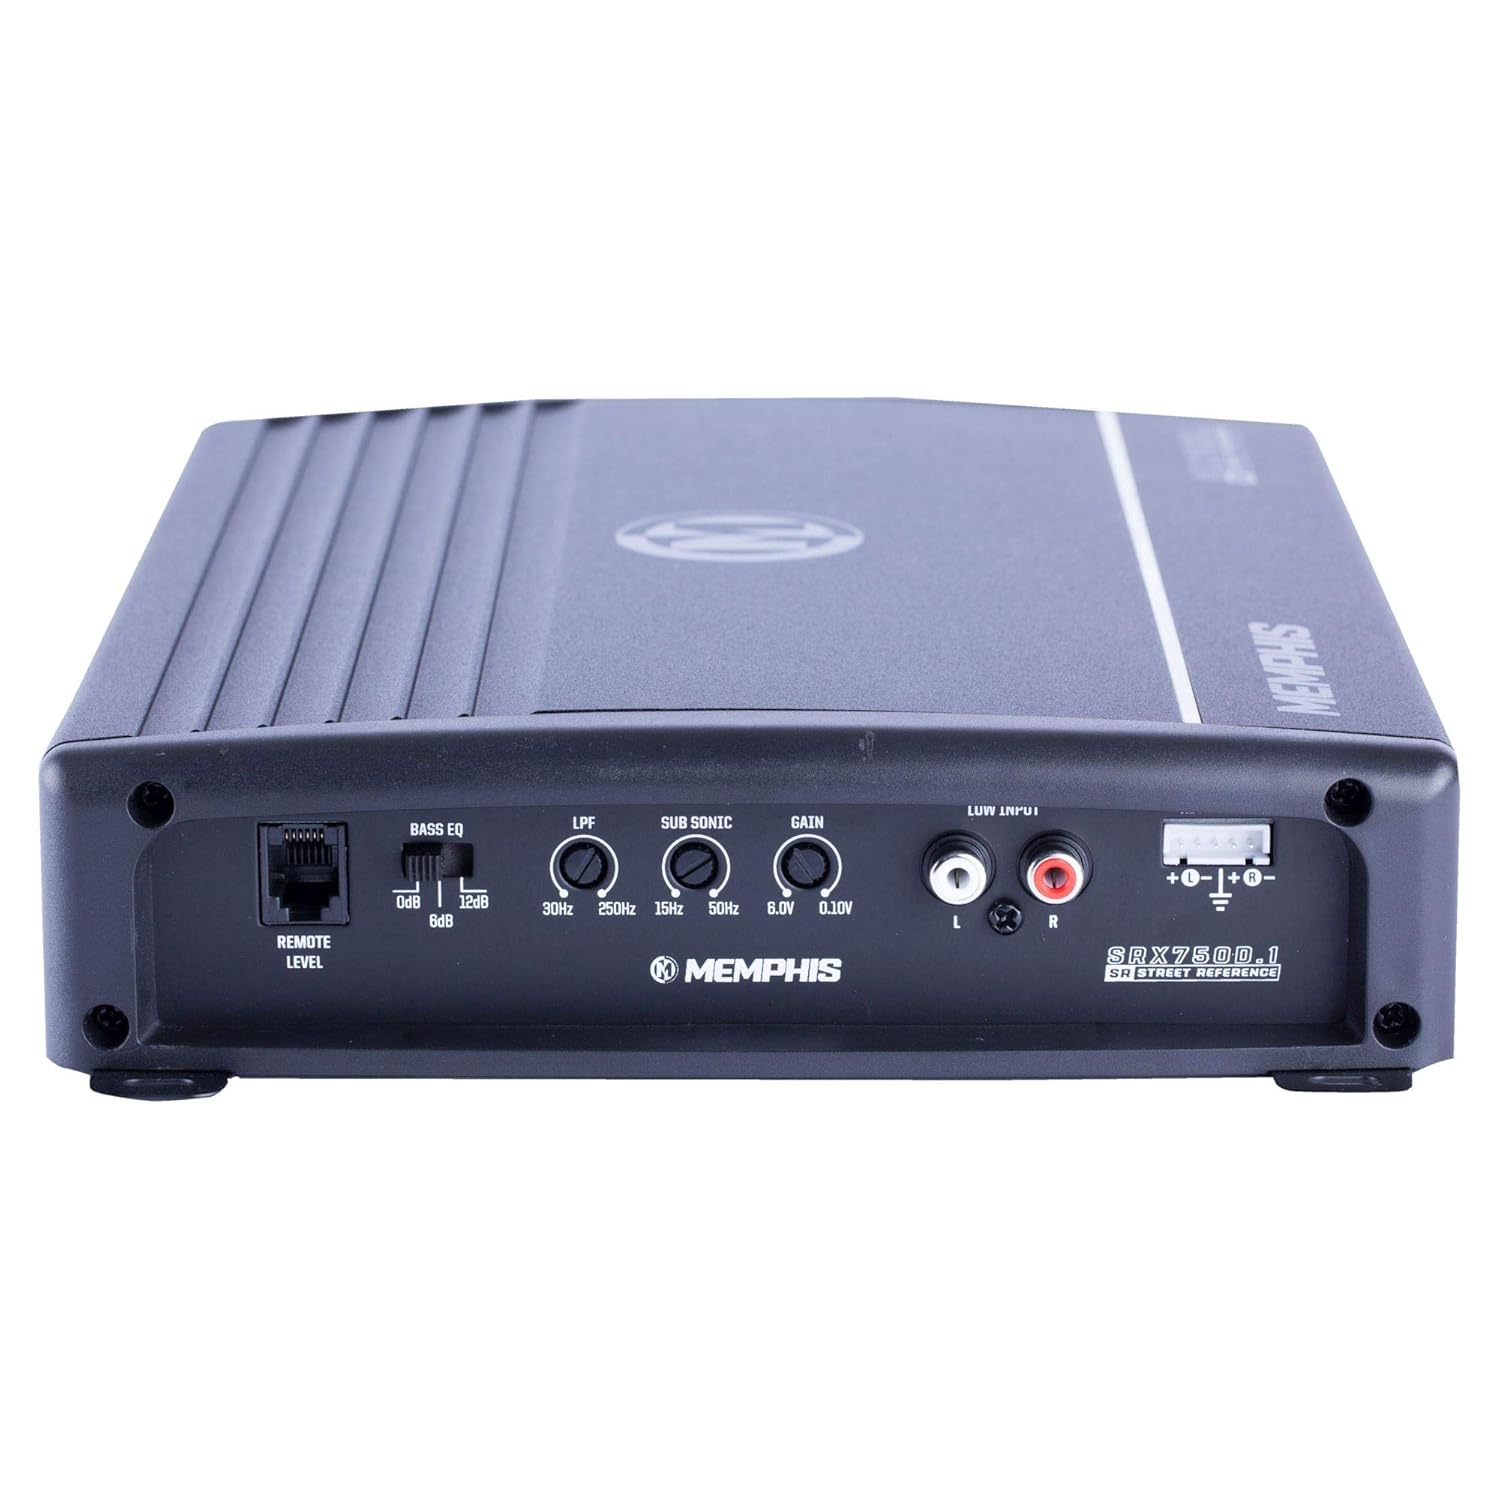
Figure 2: Rear panel of the SRX750D.1 amplifier with input and control connections.
- Entrada de baix nivell (RCA): Connecteu els cables RCA del subwoofer o de les sortides de preamplificació de rang complet de la unitat principal a amplifier's "LOW INPUT" RCA jacks.
- Entrada d'alt nivell: Si la unitat principal no té sortides RCA, feu servir l'entrada d'alt nivell. Connecteu els cables de l'altaveu de la unitat principal directament al amplifier's high-level input terminal. Refer to your head unit's manual for speaker wire polarity.
4. Speaker Output Wiring
Connecteu el(s) subwoofer(s) al amplifier's speaker output terminals. Ensure correct polarity (+ to + and - to -). The SRX750D.1 is a mono amplifier, designed for a single subwoofer or multiple subwoofers wired to a final impedance of 2 ohms or 4 ohms.
Important: Do not wire the amplifier below a 2-ohm load, as this can cause damage and void the warranty.
5. Remote Bass Knob Installation
Connect the included remote bass knob to the "REMOTE LEVEL" port on the amplifier. Mount the knob in a convenient location for easy access while driving. This allows for real-time adjustment of the subwoofer output level.
Instruccions de funcionament
1. Engegada inicial
After all connections are made and verified, reconnect the vehicle's battery negative terminal. Turn on your head unit. The ampEl dispensador s'hauria d'encendre, cosa que s'indica amb un indicador LED (si n'hi ha).
2. Ajust de guany
The "GAIN" control matches the amplifier's input sensitivity to the output level of your head unit. This is not a volume control. To set the gain:
- Gireu el amplifier's gain control to its minimum (counter-clockwise) setting.
- Ajusteu el volum de la unitat principal al 75% aproximadament del seu nivell màxim.
- Play a dynamic piece of music with strong bass.
- Augmenta lentament el amplifier's gain control (clockwise) until you hear distortion, then back it off slightly until the sound is clear.
3. Crossover Settings (LPF)
The "LPF" (Low Pass Filter) control allows only frequencies below the set point to pass through to the subwoofer. This is crucial for blending the subwoofer with your main speakers.
- Adjust the LPF control (30Hz - 250Hz) to a frequency typically between 80Hz and 120Hz, depending on your subwoofer and main speaker capabilities.
- Experiment with different settings to achieve the best sound integration.
4. Sub Sonic Filter
The "SUB SONIC" filter removes extremely low frequencies that your subwoofer cannot reproduce effectively, preventing wasted power and potential damage. Set this filter slightly below your LPF setting, typically around 20Hz-30Hz.
5. Bass EQ / Bass Boost
The "BASS EQ" or "BASS BOOST" control provides an adjustable boost at a specific low frequency (e.g., 0dB to +12dB). Use this sparingly to enhance bass impact. Excessive boost can lead to distortion and damage.
Manteniment
- Neteja: Netegeu periòdicament el ampl'exterior del purificador amb un drap suau i sec. No utilitzeu productes químics agressius ni netejadors abrasius.
- Ventilació: Ensure the heatsink fins remain clear of obstructions to allow for proper cooling. Dust or debris buildup can impair cooling performance.
- Connexions: Occasionally check all power, ground, and signal connections to ensure they are secure and free from corrosion.
- Substitució de fusibles: Si el amplifier's fuse blows, replace it only with a fuse of the exact same type and rating. Using an incorrect fuse can cause severe damage or fire.
Resolució de problemes
| Problema | Causa possible | Solució |
|---|---|---|
| Sense alimentació / Ampel lifier no s'encén |
|
|
| Sense sortida de so |
|
|
| So distorsionat |
|
|
| Amplificador Es sobreescalfa |
|
|
Especificacions
| Característica | Especificació |
|---|---|
| Model | SRX750D.1 |
| Potència RMS @ 4Ω | 400 watts x 1 |
| Potència RMS @ 2Ω | 750 watts x 1 |
| THD% a 4Ω | <1% |
| Resposta de freqüència | 30 Hz - 250 Hz |
| Interval d'entrada | 120mV - 6.1V |
| Dimensions (L x A x A) | 15 x 9.45 x 3.5 polzades |
| Voltage | 6.1 Volts (Input/Supply) |
| Material | Alumini |
| Pes de l'article | 7 lliures |
| Nombre de canals | 1 (mono) |
| Recomanat Amp Kit | 4GKIT (4-Gauge) |
| Característiques | Textured aluminum heatsink, High level inputs, Selectable bass boost, Remote level control/bass knob, Variable crossover network |
Garantia i Suport
Informació de la garantia
The Memphis Audio SRX750D.1 amplifier ve amb a Garantia limitada d'1 any from the date of purchase. This warranty covers defects in materials and workmanship under normal use. It does not cover damage caused by improper installation, accident, misuse, abuse, negligence, or unauthorized modification.
Conserveu el vostre comprovant de compra per a reclamacions de garantia.
Atenció al client
For technical assistance, warranty service, or further inquiries, please contact Memphis Audio customer support. Refer to the official Memphis Audio weblloc web per obtenir la informació de contacte més actualitzada.
Recursos en línia: www.memphiscaraudio.com
Ask a question about this manual
Ask about setup, troubleshooting, compatibility, parts, safety, or missing instructions. Manuals+ will review the question and use this page’s manual context to help answer it.