
1. Introducció
This manual provides essential information for the safe and efficient operation of your KitchenAid 5KMT223GER 2-Slot Automatic Toaster. Please read all instructions carefully before first use and retain for future reference.

Imatge 1.1: Frontal view of the KitchenAid 5KMT223GER 2-Slot Automatic Toaster.
2. Instruccions de seguretat importants
Quan s'utilitzen aparells elèctrics, sempre s'han de seguir les precaucions bàsiques de seguretat, incloses les següents:
- Llegeix totes les instruccions.
- No toqueu superfícies calentes. Utilitzeu nanses o poms.
- Per protegir-vos contra les descàrregues elèctriques, no submergiu el cable, els endolls ni la torradora en aigua ni en altres líquids.
- És necessària una supervisió estreta quan qualsevol aparell és utilitzat per o a prop dels nens.
- Desendolleu la presa de corrent quan no utilitzeu i abans de netejar. Deixeu refredar abans de posar o treure peces.
- No feu funcionar cap aparell amb el cable o l'endoll danyats, o després que l'aparell no funcioni correctament o s'hagi deixat caure o s'hagi fet malbé de qualsevol manera. Torneu l'aparell al centre de servei autoritzat més proper per a la seva revisió, reparació o ajust.
- L'ús d'accessoris no recomanats pel fabricant de l'aparell pot causar lesions.
- No utilitzar a l'aire lliure.
- No deixeu que el cable pengi de la vora de la taula o del taulell, ni toqui superfícies calentes.
- No col·loqueu-lo sobre o prop d'un cremador de gas o elèctric calent, ni en un forn calent.
- Per desconnectar, gireu qualsevol control a la posició "off" i, a continuació, retireu l'endoll de la presa de corrent.
- No utilitzeu l'aparell per a un altre ús que el previst.
- No s'han d'introduir aliments de grans dimensions, paquets de paper metàl·lic ni estris en una torradora, ja que poden comportar un risc d'incendi o descàrrega elèctrica.
- Es pot produir un incendi si les torradores estan cobertes o toquen material inflamable, com ara cortines, cortines, parets i similars, quan estan en funcionament.
- No intenteu treure el menjar quan la torradora estigui endollada.
- No opereu sense vigilància.
- Always remove the crumb tray for cleaning. Do not operate the toaster without the crumb tray in place.
3. Parts i característiques
Familiarize yourself with the components of your KitchenAid 2-Slot Automatic Toaster:
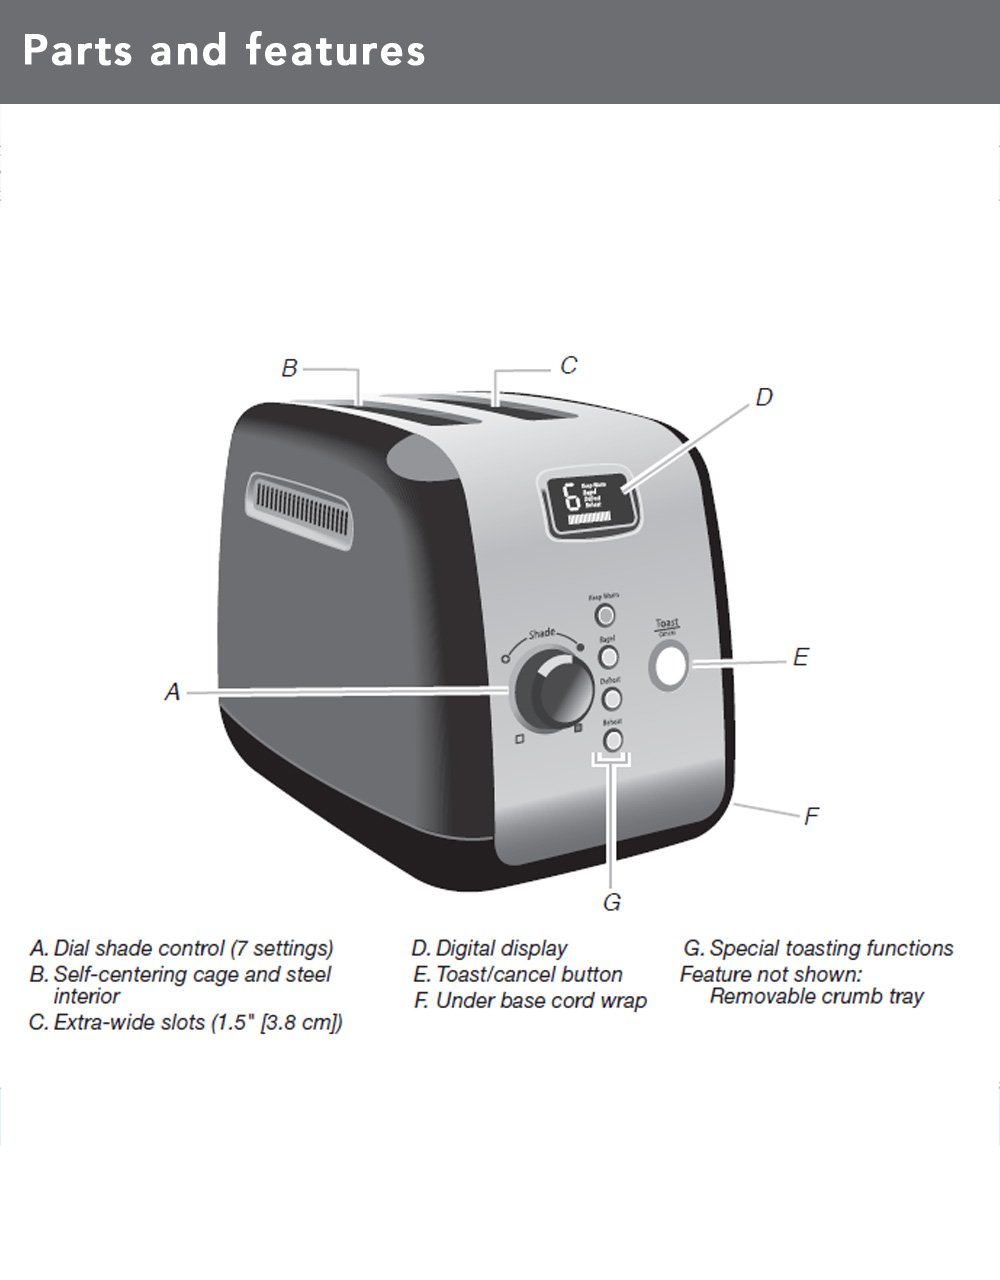
Image 3.1: Diagram illustrating the main parts and features of the toaster.
- Shade Control Dial (A): Adjusts the browning level with 7 settings.
- Self-Centering Bread Racks (B): Centra automàticament el pa per a una torrada uniforme.
- Extra-Wide Slots (C): 3.8 cm (1.5 inches) wide slots accommodate various bread types.
- Digital Display (D): Shows selected shade setting and a countdown timer for toasting progress.
- Toast/Cancel Button (E): Initiates or cancels the toasting cycle. Features motorized lift.
- Under Base Cord Wrap (F): For convenient cord storage.
- Special Toasting Functions (G): Includes Keep Warm, Bagel, Defrost, and Reheat buttons.
- Safata de molles extraïble: Located at the back for easy cleaning (not shown in diagram).
4. Configuració
Before using your toaster for the first time:
- Desembaleu la torradora i traieu tots els materials d'embalatge.
- Netegeu l'exterior de la torradora amb anunciamp drap. Assegureu-vos que estigui completament sec abans d'endollar-lo.
- Place the toaster on a stable, flat, heat-resistant surface, away from flammable materials.
- Ensure the crumb tray is properly inserted at the back of the toaster.
- For the first use, operate the toaster without bread on the highest shade setting (7) to burn off any manufacturing residues. A slight odor or smoke may be present; this is normal. Allow the toaster to cool completely.
5. Instruccions de funcionament
Follow these steps to toast bread and use the special functions:

Image 5.1: Bread slices inserted into the toaster's extra-wide slots.
5.1 Torrada bàsica
- Connecteu la torradora a una presa de corrent amb connexió a terra.
- Place bread slices into the toasting slots. The self-centering racks will automatically adjust.
- Gireu el Dial de control d'ombra to select your desired browning level (1 for lightest, 7 for darkest). The digital display will show the selected shade.
- Premeu el botó Botó Torrar/Cancel·lar. The motorized lift will lower the bread into the slots, and the toasting cycle will begin. The digital display will show a countdown.
- Once the cycle is complete, the toaster will automatically raise the toasted bread.
- Per aturar el cicle de torrada en qualsevol moment, premeu el botó Botó Torrar/Cancel·lar. The bread will be raised.
5.2 Funcions especials
Your toaster includes dedicated buttons for specialized toasting needs:
- MANTENIM CALENT: Press this button after a toasting cycle to keep toasted food warm for up to one minute. The toaster will gently lower and raise the bread after the warming period.
- BAGEL: This function toasts the cut-side of a bagel while gently warming the outer surfaces. Insert bagels with the cut side facing inwards. Select your desired shade, then press the BAGEL botó seguit del botó Botó Torrar/Cancel·lar.
- DESGELACIÓ: Use this function to defrost and toast frozen food. Select your desired shade, then press the DESGELAR botó seguit del botó Botó Torrar/Cancel·lar. The toaster will automatically adjust the toasting time.
- RECALFEM: This function quickly reheats previously toasted food without further browning. Press the RECALFEM botó seguit del botó Botó Torrar/Cancel·lar.
6. Neteja i Manteniment
Una neteja regular garanteix un rendiment òptim i allarga la vida útil de la torradora.
6.1 Safata de molles

Image 6.1: The removable crumb tray for easy cleaning.
- Desendolleu sempre la torradora i deixeu-la refredar completament abans de netejar-la.
- Pull out the removable crumb tray located at the back of the toaster.
- Discard crumbs. The crumb tray can be washed in the top rack of a dishwasher or by hand with warm, soapy water. Rinse thoroughly and dry completely before reinserting.
- Never operate the toaster without the crumb tray properly inserted.
6.2 Exterior
- Netegeu l'exterior de la torradora amb anunciamp drap i assecar bé.
- No utilitzeu netejadors abrasius ni fregalls, ja que poden ratllar la superfície.
- No submergiu mai la torradora en aigua o cap altre líquid.
7. Solució De Problemes
If you experience issues with your toaster, refer to the following table for common problems and solutions:
| Problema | Causa possible | Solució |
|---|---|---|
| La torradora no s'encén. | No connectat; apagadatage; s'ha saltat l'interruptor automàtic. | Assegureu-vos que la torradora estigui ben connectada a una presa de corrent que funcioni. Comproveu l'interruptor de la llar. |
| Bread does not lower or raise. | Toaster not powered; Toast/Cancel button not pressed; food jammed. | Ensure power is on. Press Toast/Cancel button. Unplug toaster and carefully remove any jammed food. |
| Torrada desigual. | Gruix inconsistent del pa; acumulació de molles. | Ensure bread slices are of similar thickness. Clean crumb tray regularly. |
| Fum o olor de cremat. | Food jammed; crumb buildup; high shade setting. | Immediately press Cancel. Unplug and allow to cool. Remove jammed food or clean crumb tray. Reduce shade setting for next use. |
Si el problema persisteix després d'intentar aquestes solucions, poseu-vos en contacte amb el servei d'atenció al client de KitchenAid.
8. Especificacions
| Característica | Detall |
|---|---|
| Número de model | 5KMT223GER |
| Wattage | 1100 watts |
| Voltage | 220 Volts |
| Slot Count | 2 |
| Configuració d'ombra | 7 |
| Funcions especials | Keep Warm, Bagel, Defrost, Reheat, Cancel |
| Material | Metall |
| Dimensions del producte (P x A x A) | 25P x 34A x 25.5H centímetres |
| Pes de l'article | 2200 grams |
| Components inclosos | Pop-up Toaster, Removable Crumb Tray |
9. Garantia i Suport
Your KitchenAid 5KMT223GER 2-Slot Automatic Toaster is covered by a Garantia limitada d'2 any des de la data de compra. Aquesta garantia cobreix els defectes de materials i de fabricació en condicions d'ús domèstic normal.
For warranty service, technical support, or to order replacement parts, please contact KitchenAid customer service. Keep your purchase receipt as proof of purchase for warranty claims.