1. Introducció
Thank you for choosing the YATO 07042 Grease Gun. This manual provides essential information for the safe and effective use, setup, operation, and maintenance of your new grease gun. Please read these instructions carefully before use and keep them for future reference.
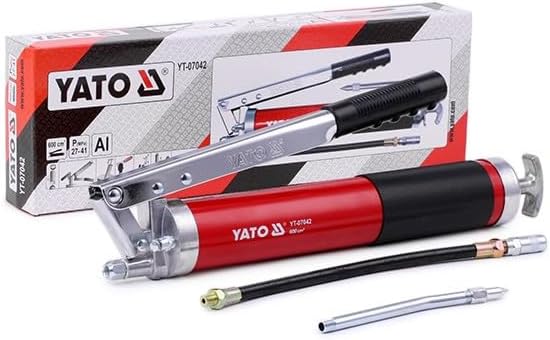
The YATO 07042 grease gun, shown with its flexible hose and rigid pipe attachments, ready for use.
2. Informació de seguretat
Always observe the following safety precautions when operating the grease gun:
- Utilitzeu l'equip de protecció individual (EPI) adequat, including safety glasses or goggles, to protect against grease splashes.
- Llegeix i entén totes les instruccions before operating the grease gun.
- Mantingueu les mans i els dits nets of moving parts, especially the plunger and lever mechanism.
- Use only the recommended type of grease for your application. Mixing incompatible greases can cause damage or malfunction.
- Do not exceed the maximum operating pressure of the grease gun (27-41 MPa).
- Assegureu-vos que les connexions siguin segures before applying pressure to prevent leaks or disconnections.
- Store the grease gun safely when not in use, out of reach of children and in a clean, dry environment.
- Never point the grease gun nozzle at yourself or others. High-pressure grease injection can cause serious injury.
3. Setup and Loading Grease
Proper loading of grease is crucial for efficient operation. The YATO 07042 grease gun can be loaded using a standard grease cartridge or by bulk filling.
3.1 Loading a Grease Cartridge
- Unscrew the barrel from the head of the grease gun.
- Pull the plunger rod all the way back and lock it into place by rotating the T-handle.
- Traieu els taps dels dos extrems d'un cartutx de greix nou de 600 ml.
- Insert the cartridge into the barrel, ensuring it fits snugly.
- Re-attach the barrel to the grease gun head, screwing it on tightly.
- Release the plunger rod by rotating the T-handle. Push the rod slightly to ensure it makes contact with the grease.
3.2 Bulk Filling
- Unscrew the barrel from the head of the grease gun.
- Pull the plunger rod all the way back and lock it into place by rotating the T-handle.
- Using a spatula or similar tool, carefully fill the barrel with bulk grease. Ensure no air pockets are trapped.
- Re-attach the barrel to the grease gun head, screwing it on tightly.
- Release the plunger rod by rotating the T-handle. Push the rod slightly to ensure it makes contact with the grease.
3.3 Preparació de la pistola de greixatge
After loading, it may be necessary to prime the gun to remove any air pockets and ensure a steady flow of grease.
- Point the nozzle into a waste container.
- Operate the lever several times until grease begins to flow consistently.
- If grease does not flow, slightly loosen the barrel from the head to allow trapped air to escape, then re-tighten and try again.

This diagram provides a visual guide for loading grease, including inserting a cartridge, filling manually, and priming the gun.
4. Funcionament
Once the grease gun is loaded and primed, it is ready for operation.
- Attach the appropriate fitting: Select either the flexible hose or the rigid pipe and securely screw it onto the grease gun head.
- Connect to the grease nipple: Firmly press the coupler end of the hose or pipe onto the grease nipple of the component to be lubricated. Ensure a tight seal.
- Operate the lever: Squeeze the operating lever repeatedly to pump grease into the component. Continue until the desired amount of grease has been dispensed or resistance is felt.
- Desconnectar: To remove the coupler from the grease nipple, tilt it slightly and pull it off. Some resistance is normal due to the pressure.

This image highlights the threaded connections for both the flexible hose and the rigid pipe, demonstrating how they attach to the grease gun.

Un detallat view of the grease gun's head, showing the connection point for the hose or rigid pipe, and the robust construction.
5. Manteniment
Regular maintenance ensures the longevity and reliable performance of your grease gun.
- Neteja: After each use, wipe down the exterior of the grease gun to remove any excess grease or dirt. Keep the nozzle and coupler clean to prevent contamination of grease points.
- Emmagatzematge: Store the grease gun in a clean, dry place, away from extreme temperatures and direct sunlight.
- Comproveu si hi ha fuites: Periodically inspect the grease gun for any signs of grease leakage, especially around connections and seals. Tighten connections as needed.
- Coupler Maintenance: If the coupler becomes difficult to attach or remove from grease nipples, it may need cleaning or replacement.
6. Solució De Problemes
Aquests són alguns problemes comuns i les seves solucions:
| Problema | Causa possible | Solució |
|---|---|---|
| Sense flux de greix | Air pocket in the gun | Prime the grease gun (see Section 3.3). Slightly loosen the barrel to release air, then re-tighten. |
| Sense flux de greix | Empty grease cartridge/barrel | Reload grease (see Section 3.1 or 3.2). |
| Grease leaks from connections | Loose connections or worn seals | Tighten all connections. Inspect and replace worn seals if necessary. |
| Coupler difficult to attach/remove | Dirty coupler or worn jaws | Clean the coupler. If worn, replace the coupler. |
| Grease gun plunger does not advance | Plunger rod locked or stuck | Ensure the plunger rod is unlocked. Check for obstructions in the barrel. |
7. Especificacions
Key technical specifications for the YATO 07042 Grease Gun:
- Número de model: YT-07042
- Fabricant: Yato
- Capacitat: 600 ml
- Pressió de funcionament: 27-41 MPa
- Dimensions del producte (L x A x A): 25 x 8 x 4 cm
- Pes: 1.69 quilos
- Quantitat d'articles: 1
- Battery(ies) / Cell(s) included: No
- Battery(ies) / Cell(s) required: No
8. Garantia i Suport
For warranty information, please refer to the documentation provided at the time of purchase or contact your retailer. YATO is committed to providing quality tools and support.
Spare parts availability: Information regarding spare parts for this specific model is currently unavailable. Please contact your supplier for further assistance.
For technical support or inquiries, please visit the official YATO weblloc o poseu-vos en contacte amb el seu departament d'atenció al client.