1. Introducció
Thank you for choosing the YATO YT-83060 Battery Charger and Jump Starter. This device is designed for charging 12V and 24V lead-acid batteries and for jump-starting vehicles with discharged batteries. Please read this manual carefully before operation to ensure safe and efficient use of the product.
2. Instruccions de seguretat importants
ADVERTÈNCIA: llegiu totes les instruccions i advertències de seguretat. El no seguir les advertències i instruccions pot provocar descàrregues elèctriques, incendis i/o lesions greus.
- Utilitzeu sempre protecció ocular i roba protectora quan treballeu amb bateries.
- Assegureu-vos que hi hagi una ventilació adequada durant la càrrega de bateries per evitar l'acumulació de gasos explosius.
- Never smoke or allow sparks or flames in the vicinity of the battery or charger.
- Connecteu i desconnecteu la sortida DC clamps only after setting the charger switch to the "OFF" position and unplugging the AC cord from the electrical outlet.
- No exposeu el carregador a la pluja o a la humitat.
- No feu servir el carregador si ha rebut un cop fort, s'ha caigut o s'ha fet malbé d'alguna altra manera.
- Mantenir fora de l'abast dels nens.
- Ensure the vehicle's ignition is off before connecting the charger.
3. Producte acabatview
The YATO YT-83060 is a robust battery charger and jump starter designed for versatility and performance. Familiarize yourself with its components before use.
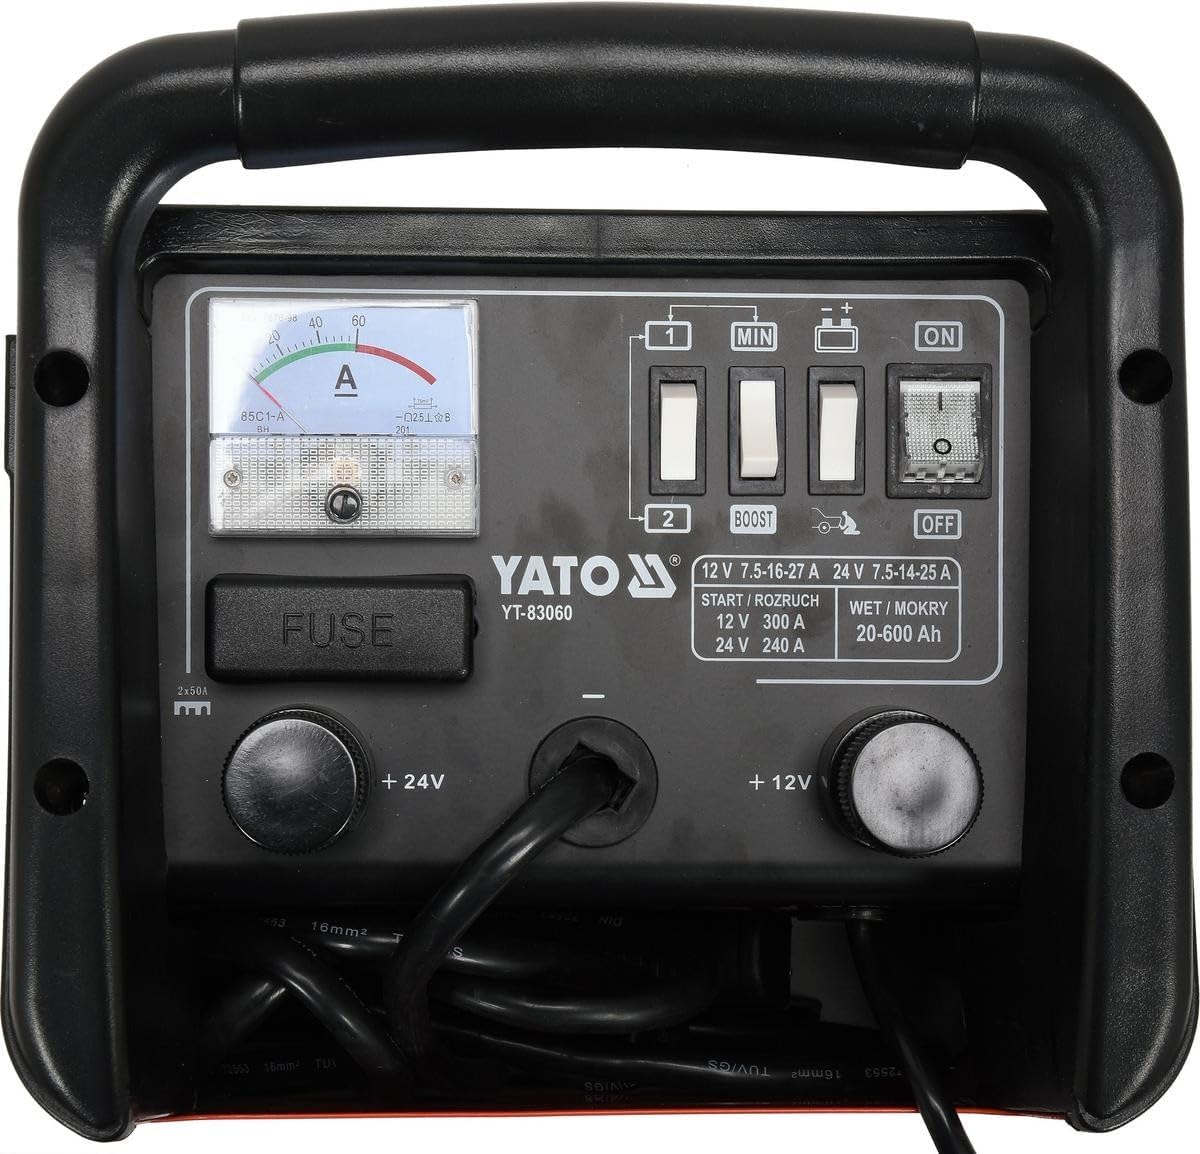
Imatge 3.1: Front panel of the YATO YT-83060 Battery Charger and Jump Starter. This image displays the control panel with an analog ammeter, voltage selection switches (12V/24V), operation mode switches (BOOST/OFF), power switch (ON/OFF), and the fuse compartment. The positive (+12V, +24V) and negative terminals are also visible, along with the power cord connection.
Components clau:
- Amperímetre: Displays the charging current.
- Voltage Interruptor selector: Allows selection between 12V and 24V operation.
- Interruptor selector de mode: Selects between normal charging and BOOST (jump start) functions.
- Interruptor d'alimentació: Encén o apaga la unitat.
- Compartiment de fusibles: Houses the protective fuses.
- Positive (+) and Negative (-) Terminals: For connecting to the battery.
- Cable d'alimentació: For connecting to the AC mains supply.
4. Configuració
4.1 Desembalatge i inspecció inicial
- Traieu amb cura el carregador del seu embalatge.
- Inspeccioneu la unitat per detectar qualsevol signe de danys durant el transport. No la feu funcionar si està danyada.
- Ensure all components, including the power cord and battery clamps, són presents i en bon estat.
4.2 Connexió a la bateria
Before connecting, ensure the charger's power switch is in the "OFF" position and it is unplugged from the mains supply.
- Identify the positive (+) and negative (-) terminals on the battery. The positive terminal is usually marked with a plus sign (+) and is larger than the negative terminal.
- Connecteu el cl positiu VERMELL (+)amp from the charger to the positive (+) terminal of the battery.
- Connecteu el cl negatiu (-) NEGREamp from the charger to the negative (-) terminal of the battery. For vehicles, if connecting to the chassis, connect to a heavy, unpainted metal part of the vehicle frame, away from the battery and fuel line.
- Assegureu-vos que les connexions siguin segures i no presentin corrosió.
5. Instruccions de funcionament
5.1 Càrrega d'una bateria
- Ensure the charger is disconnected from the mains supply and the power switch is "OFF".
- Connect the charger to the battery as described in Section 4.2.
- Seleccioneu el vol correctetage (12V or 24V) using the Voltage Selector Switch on the charger, matching your battery's voltage.
- Set the Mode Selector Switch to the normal charging position (usually indicated as "OFF" for BOOST, or a specific charging symbol).
- Plug the charger's power cord into a grounded 230V AC electrical outlet.
- Turn the Power Switch to "ON". The ammeter will show the charging current.
- Monitor the ammeter. As the battery charges, the current will gradually decrease.
- Once the ammeter reads near zero or a very low stable current, the battery is fully charged.
- To disconnect, first turn the Power Switch to "OFF", then unplug from the mains, and finally disconnect the battery clamps (negative first, then positive).
5.2 Arrencada amb salt d'un vehicle
CAUTION: Do not attempt to jump start a frozen battery. Always ensure the vehicle's ignition is off before connecting.
- Ensure the charger is disconnected from the mains supply and the power switch is "OFF".
- Connect the charger to the vehicle's battery as described in Section 4.2.
- Seleccioneu el vol correctetage (12V or 24V) using the Voltage Selector Switch, matching the vehicle's battery voltage.
- Set the Mode Selector Switch to "BOOST" or the jump start position.
- Plug the charger's power cord into a grounded 230V AC electrical outlet.
- Turn the Power Switch to "ON".
- Wait approximately 60-120 seconds for the battery to receive a preliminary charge.
- Attempt to start the vehicle. If it does not start within 5 seconds, wait at least 3 minutes before trying again to prevent overheating.
- Once the vehicle starts, immediately turn the Power Switch to "OFF", unplug from the mains, and then disconnect the battery clamps (negative first, then positive).
6. Manteniment
6.1 Neteja
- Always disconnect the charger from the power supply before cleaning.
- Netegeu l'exterior del carregador amb un drap suau i sec.amp tela. No utilitzeu productes químics aggressivs ni netejadors abrasius.
- Mantingueu les obertures de ventilació netes de pols i deixalles.
- Clean battery clamps after each use to remove any battery acid or corrosion.
6.2 Canvi de fusibles
If the charger stops working, check the fuse located in the fuse compartment (refer to Image 3.1). Always replace with a fuse of the same type and rating (e.g., 2x50A as indicated on the unit).
6.3 Emmagatzematge
Store the charger in a dry, cool, and well-ventilated area when not in use. Keep it away from direct sunlight, moisture, and corrosive materials. Coil the cables neatly to prevent damage.
7. Solució De Problemes
| Problema | Causa possible | Solució |
|---|---|---|
| Charger does not turn ON. | No power from outlet; Power switch OFF; Blown fuse. | Check outlet with another appliance; Ensure Power switch is ON; Replace fuse (see Section 6.2). |
| Ammeter shows no current during charging. | Poor connection to battery; Battery fully charged; Incorrect voltage selected; Severely discharged battery. | Comproveu clamp connections; This is normal if battery is full; Verify 12V/24V selection; Allow more time for very flat batteries. |
| El vehicle no arrenca amb ajuda d'un cable. | Poor connection; Incorrect voltage; Battery too deeply discharged; Vehicle issue. | Comproveu clamp connections; Verify 12V/24V selection; Allow more pre-charge time; Consult vehicle mechanic if issue persists. |
| Charger gets hot. | Normal during heavy use; Blocked ventilation. | Ensure adequate ventilation; This is normal for high current operation. If excessively hot, disconnect and allow to cool. |
8. Especificacions tècniques

Imatge 8.1: Pictorial representation of key specifications for the YATO YT-83060. This image shows icons and text indicating 12V 27A charge / 300A start, 24V 25A charge / 240A start, 20-600Ah battery capacity, 230V 50Hz input, and suitability for WET (MOKRY) batteries.
| Característica | Especificació |
|---|---|
| Número de model | YT-83060 |
| Entrada Voltage | 230V CA, 50Hz |
| Vol. De sortidatage | 12V / 24V CC |
| Potència Nominal | 1250 W |
| Charging Current (12V) | 27 A |
| Charging Current (24V) | 25 A |
| Jump Start Current (12V) | 300 A |
| Jump Start Current (24V) | 240 A |
| Rang de capacitat de la bateria | 20 - 600 Ah |
| Pes | 15.13 kg |
| Tipus de bateries aplicables | Lead-acid (WET) |
9. Garantia i Suport
Specific warranty information for the YATO YT-83060 is not provided in this manual. Please refer to the warranty card included with your product or contact your retailer for details regarding warranty coverage and terms.
For technical support or service inquiries, please contact your authorized YATO dealer or the point of purchase.