
1. Introducció
The COTEC SP-4000-148 is a high-frequency pure sine wave inverter designed to convert 48VDC battery power into 120VAC household electricity. This inverter delivers a continuous output of 4000W, making it suitable for various applications requiring stable and clean AC power. Its robust design and advanced features ensure reliable performance and protection for your connected devices.
Característiques principals:
- Sortida d'ona sinusoidal pura per a electrònica sensible.
- Capacitat d'encesa/apagada amb comandament a distància (terminal verd).
- Entrada i sortida totalment aïllades per a una major seguretat.
- Temperature & load controlled cooling fan.
- Interfície fàcil d'utilitzar amb indicadors d'estat LED de 3 colors.
- Output frequency (50/60 Hz) selectable via DIP switch.
- Volum de sortidatage selectable via DIP switch.
- Power saving mode adjustable via variable resistor.
- Comprehensive input protections: Reverse Polarity (Fuse), Under Voltage, Over Voltage.
- Extensive output protections: Short Circuit, Overload, Over Temperature.
- Tancament d'alumini interior tipus 1.
- E13 / UL / CE / FCC approved.
2. Informació de seguretat
Read all instructions and warnings carefully before installing or operating the inverter. Failure to follow these instructions may result in electric shock, fire, serious injury, or death.
Precaucions generals de seguretat:
- Risc elèctric: Aquest inversor produeix un alt volumtage AC power. Treat the output terminals with the same respect as any utility AC outlet.
- Personal qualificat: La instal·lació i el manteniment només els ha de dur a terme personal qualificat.
- Ventilació: Ensure adequate ventilation around the inverter. Do not block ventilation openings. Overheating can cause damage or fire.
- Medi ambient: Do not expose the inverter to rain, snow, spray, or any liquids. Do not operate in areas with flammable fumes or gases.
- Posada a terra: The inverter must be properly grounded. Refer to the installation section for grounding instructions.
- Seguretat de la bateria: Work near lead-acid batteries is dangerous. Batteries can generate explosive gases. Ensure proper ventilation and wear eye protection.
- Entrada de corrent continu: Connect the DC input cables with correct polarity. Reverse polarity will blow the internal fuse and void the warranty.
- Sobrecàrrega: Do not exceed the inverter's rated output power. Overloading can damage the inverter and connected appliances.
- Manteniment: Before performing any maintenance or cleaning, disconnect all power sources (DC and AC).
3. Producte acabatview
The COTEC SP-4000-148 inverter features a robust aluminum enclosure and clearly labeled connection points for ease of installation and operation. Familiarize yourself with the components before proceeding with installation.

Figura 3.1: global view of the COTEC SP-4000-148 Pure Sine Wave Inverter. This image shows the blue aluminum casing and the grey end caps with ventilation slots.
Front Panel (AC Output Side):
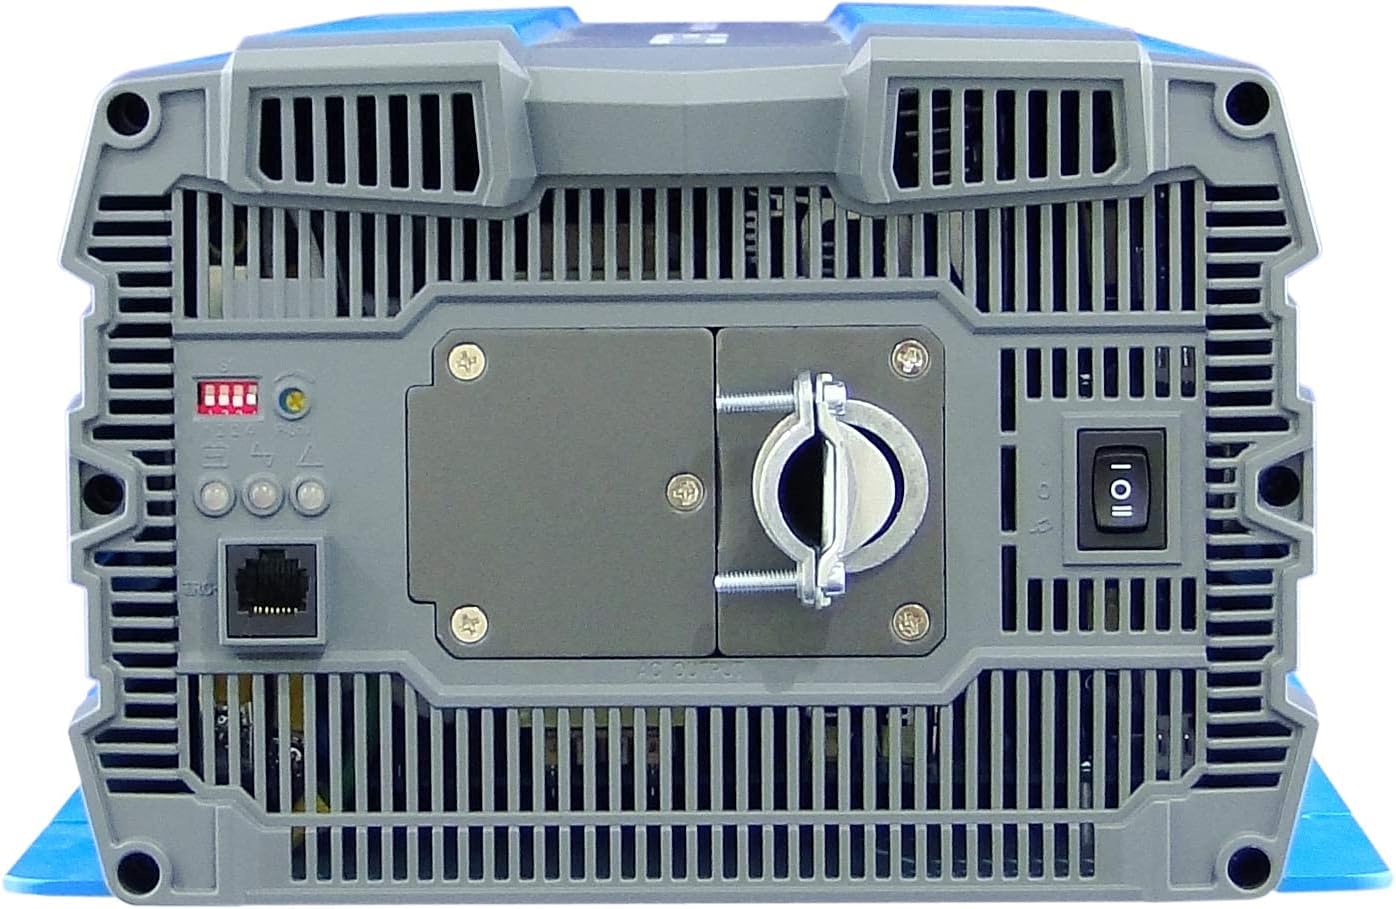
Figure 3.2: Front panel of the inverter. This view highlights the AC output terminal, the remote control terminal (green), LED status indicators, DIP switches, and the main power switch.
- Terminal de sortida de CA: Hardwire connection for 120VAC output.
- Remote Control Terminal (Green): For connecting an optional remote ON/OFF switch.
- Indicadors d'estat LED: Provide visual feedback on inverter status (Power, Fault, Overload).
- Interruptors DIP: Used to select output frequency (50/60 Hz) and output voltage.
- Power Saving Mode Resistor: Adjustable resistor for fine-tuning power saving mode.
- Interruptor principal d’alimentació: Controla la potència de l'inversor.
Rear Panel (DC Input Side):

Figure 3.3: Rear panel of the inverter. This view shows the DC input terminals (red for positive, black for negative) and the chassis ground connection point.
- Terminals d'entrada de CC: Heavy-duty terminals for connecting to the 48VDC battery bank. Ensure correct polarity (Red for Positive, Black for Negative).
- Chassis Ground Terminal: Per connectar l'inversor a una presa de terra.
- Cooling Fan Vents: Ensure these vents are not obstructed for proper heat dissipation.
4. Instal·lació
Una instal·lació correcta és crucial per al funcionament segur i eficient del vostre inversor. Seguiu aquests passos amb atenció.
4.1 Muntatge de l'inversor
- Choose a dry, well-ventilated location away from direct sunlight, heat sources, and moisture.
- Mount the inverter on a non-combustible surface.
- Ensure there is at least 6 inches (15 cm) of clear space around all sides of the inverter for proper airflow.
- Use appropriate fasteners to secure the inverter firmly to the mounting surface.
4.2 Connexió d'entrada de CC
ADVERTIMENT: Ensure the battery bank is disconnected or isolated before making any connections. Use appropriately sized cables and fuses/breakers.
- Connect the positive (+) DC cable (typically red) from your 48VDC battery bank to the red positive (+) terminal on the inverter's rear panel.
- Connect the negative (-) DC cable (typically black) from your 48VDC battery bank to the black negative (-) terminal on the inverter's rear panel.
- Ensure all DC connections are tight and secure to prevent loose connections and arcing.
- Install an external DC fuse or circuit breaker between the battery bank and the inverter's positive terminal, as close to the battery as possible. Consult the specifications for appropriate fuse sizing.
4.3 Connexió de sortida de CA
The SP-4000-148 uses a hardwire AC output connection.
- Ensure the inverter is OFF and all DC power is disconnected.
- Connect your AC load wiring to the designated AC output terminal block on the front panel.
- Follow all local electrical codes for AC wiring.
- Ensure all AC connections are secure.
4.4 Posada a terra
The inverter chassis must be properly grounded.
- Connect a ground wire from the chassis ground terminal on the inverter's rear panel to a reliable earth ground point.
- Ensure the ground connection is secure and meets all local electrical codes.
4.5 Remote Control Connection (Optional)
If using an optional remote control, connect it to the green terminal block on the front panel according to the remote control's instructions.
5. Funcionament
Once the inverter is properly installed and all connections are secure, you can begin operation.
5.1 Engegada/apagada
- Ensure all DC and AC connections are correct and secure.
- If an external DC breaker is installed, ensure it is closed (ON).
- Flip the main power switch on the inverter's front panel to the 'ON' position.
- The LED indicators will illuminate, and the cooling fan may briefly activate.
- Per apagar-lo, gireu l'interruptor principal a la posició 'OFF'.
5.2 indicadors d'estat LED
The inverter features 3-color LED indicators to display its operational status:
- LED verd: Indica el funcionament normal.
- LED groc: Indicates a warning or abnormal condition (e.g., low battery, minor overload). Refer to troubleshooting.
- LED vermell: Indicates a fault or critical error (e.g., severe overload, over-temperature, short circuit). The inverter will typically shut down. Refer to troubleshooting.
5.3 Configuració del commutador DIP
The DIP switches on the front panel allow configuration of output frequency and voltage. Refer to the detailed specifications or the label on the inverter for specific switch positions for desired settings.
- Freqüència de sortida: Select between 50 Hz or 60 Hz.
- Vol. De sortidatage: Select desired AC output voltage (e.g., 100V, 110V, 115V, 120V).
NOTA: Always power off the inverter before changing DIP switch settings.
5.4 Mode d'estalvi d'energia
The power saving mode can be adjusted via the variable resistor on the front panel. This mode reduces standby power consumption when no load or a very light load is detected. Adjust the resistor to set the threshold for entering/exiting power saving mode.
6. Manteniment
Un manteniment regular garanteix la longevitat i el rendiment òptim del vostre inversor.
- Neteja: Netegeu periòdicament l'exterior de l'inversor amb un drap sec i suau. Assegureu-vos que les obertures de ventilació estiguin lliures de pols i residus. No utilitzeu netejadors líquids.
- Comprovacions de connexió: Annually inspect all DC and AC connections for tightness. Loose connections can cause overheating and damage.
- Manteniment de la bateria: Follow the battery manufacturer's recommendations for maintenance, including checking electrolyte levels (for flooded batteries) and terminal cleanliness.
- Medi ambient: Assegureu-vos que l'entorn de funcionament es mantingui dins dels rangs de temperatura i humitat especificats.
7. Solució De Problemes
Aquesta secció ofereix solucions a problemes comuns que podeu trobar amb el vostre inversor.
| Problema | Causa possible | Solució |
|---|---|---|
| Inverter does not turn on (No LEDs) | No DC input power; Blown DC fuse/breaker; Loose DC connections; Reverse polarity. | Comproveu el volum de la bateriatage; Check external DC fuse/breaker; Verify DC connections are tight and correct polarity. |
| Red LED illuminates, inverter shuts down | Overload; Short circuit on AC output; Over-temperature; Input over/under voltage. | Reduce AC load; Check AC wiring for short circuits; Allow inverter to cool down; Verify battery voltage is within operating range. |
| Yellow LED illuminates, intermittent operation | Minor overload; Low battery voltage avís; Avís d'alta temperatura. | Reduce AC load; Recharge batteries; Ensure adequate ventilation. |
| No AC output, Green LED is on | AC output wiring issue; Faulty AC appliance. | Check AC output connections; Test with a different AC appliance. |
| Cooling fan runs constantly or loudly | High ambient temperature; Heavy load; Obstructed vents. | Ensure proper ventilation; Reduce load if possible; Clean vents. |
8. Especificacions
The following table details the technical specifications for the COTEC SP-4000-148 Pure Sine Wave Inverter.

Figure 8.1: Detailed technical specifications for the COTEC SP-4000 series, including input, output, protection, and environmental parameters.
| Especificació | Valor |
|---|---|
| Marca | COTEK |
| Nom del model | Sèrie SP |
| Wattage | 4000 watts |
| Entrada Voltage | 48 Volts DC |
| Potència de sortida | 4000 watts |
| Freqüència de sortida | 60 Hz (Selectable) |
| Preses de corrent total | 1 (Hardwire) |
| Standby Power Shutoff | High Efficiency (Adjustable) |
| Tipus de tancament | Type 1 Indoor Aluminum Enclosure |
| Aprovacions | E13 / UL / CE / FCC |
| UPC | 648152674771 |
| Número de peça del fabricant | SP-4000, 148 |
Dibuixos mecànics:

Figure 8.2: Mechanical drawings providing dimensions for the COTEC SP-4000 series inverter, useful for installation planning.
9. Garantia i Suport
COTEK products are manufactured to high-quality standards. This product is covered by a manufacturer's warranty against defects in materials and workmanship. Please refer to the warranty card included with your product or visit the official COTEC weblloc web per obtenir informació detallada sobre els termes i condicions de la garantia.
Atenció al client:
For technical assistance, troubleshooting, or warranty claims, please contact COTEC customer support through their official channels. Have your product model number (SP-4000-148) and purchase information ready when contacting support.
- Weblloc: www.cotek.com.tw (Example, please verify official weblloc)
- Correu electrònic: support@cotek.com (Example)
- Telèfon: +1-XXX-XXX-XXXX (Example)