
Introducció
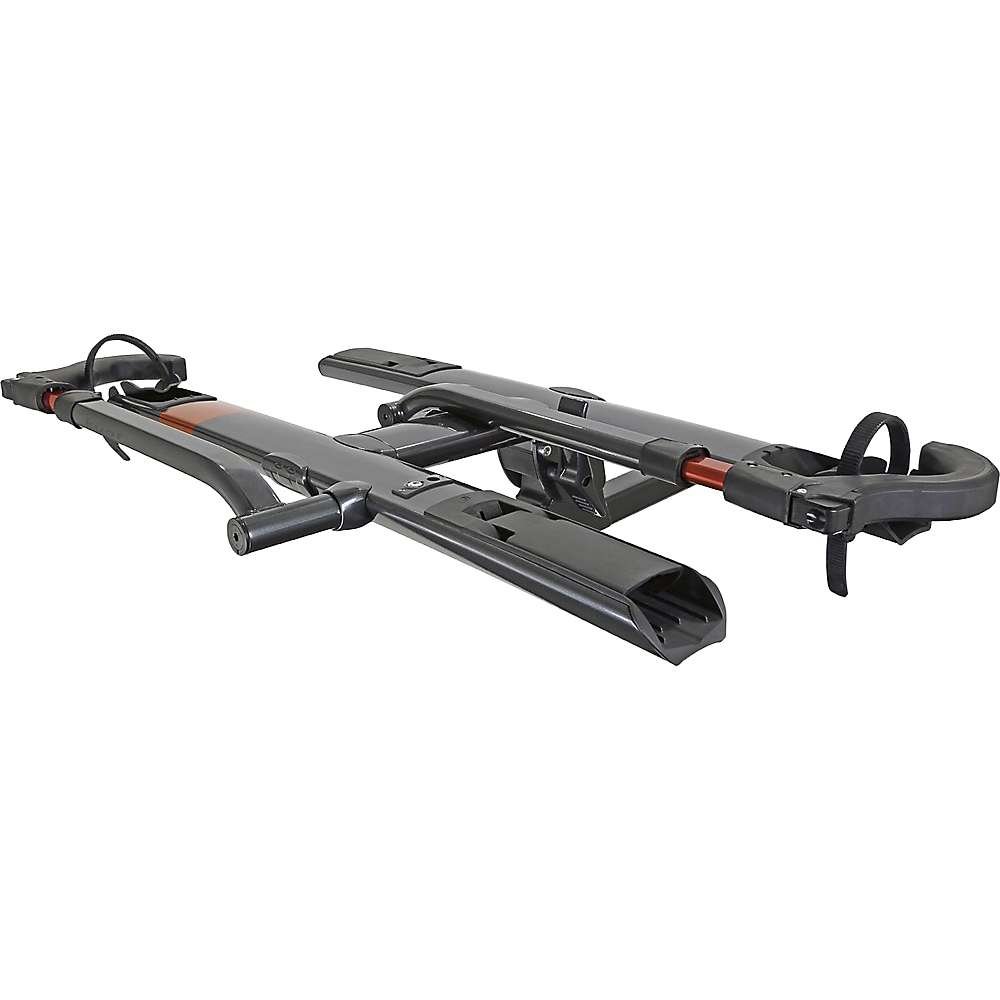
This manual provides detailed instructions for the assembly, operation, and maintenance of your Kuat Sherpa 2.0-2 Bike Rack. The Sherpa 2.0 is an aluminum hitch-mounted bike rack designed for user-friendly transport of up to two bicycles. It features folding tire cradles for clearance and a foot-activated pivot lever for easy access to your vehicle's rear. Please read this manual thoroughly before installation and use to ensure safe and proper operation.
Informació de seguretat
- Always ensure the bike rack is securely installed in the hitch receiver before loading bicycles.
- Verify that all bikes are properly secured to the rack using the provided straps and locking mechanisms.
- Do not exceed the maximum weight capacity of the bike rack or your vehicle's hitch.
- Inspeccioneu regularment el bastidor per detectar qualsevol signe de desgast, danys o components solts.
- Be aware of the increased length and width of your vehicle when the bike rack is installed, especially when parking or maneuvering.
- Ensure that the vehicle's exhaust system does not direct hot gases directly onto bicycle tires, which can cause damage.
- Remove the bike rack when not in use or when passing through automatic car washes.
Contingut del paquet
Abans de començar el muntatge, assegureu-vos que hi hagi tots els components:
- Main hitch arm assembly
- Vertical mast with bike trays
- Wheel cradles and straps
- Front wheel hooks
- Foot-activated pivot lever
- Integrated locking hitch pin
- Integrated cable lock
- Assembly hardware (bolts, washers, nuts)
- Tools for assembly (if included)
- Manual d'instruccions
Muntatge i muntatge
Assembly of the Kuat Sherpa 2.0-2 Bike Rack requires careful attention to detail. It is recommended to have a second person assist during certain steps.
- Desempaquetar components: Carefully remove all parts from the packaging. Retain packaging for future storage or transport if desired.
- Attach Main Mast to Hitch Arm: Connect the vertical mast assembly to the main hitch arm. Ensure proper alignment of bolt holes. Some users have reported that aligning the bolts, particularly those with internal receivers, can be challenging. It may be helpful to loosely attach the main bolts first, then adjust the position to align any perpendicular bolts. Applying slight upward pressure or manipulating the pivot lever (without fully securing it) can sometimes aid in aligning stubborn holes.
- Install Wheel Cradles and Hooks: Secure the wheel cradles and front wheel hooks onto the bike trays as per the diagrams in the manufacturer's guide.
- Attach Foot-Activated Pivot Lever: Install the foot-activated pivot lever mechanism.
- Inseriu al receptor d'enganxall: Slide the main hitch arm into your vehicle's hitch receiver.
- Assegurar amb el passador d'enganxament: Insert and tighten the integrated locking hitch pin. This mechanism is designed to eliminate rack wobble and ensure a secure fit. Turn the knob on the end of the rack until the hitch cam ball is fully engaged.
- Comprovacions finals: Double-check all bolts and connections to ensure they are tightened according to the manufacturer's specifications.
Instruccions de funcionament
Loading Bicycles
- Prepare Rack: Ensure the rack is in the upright, locked position. Unfold the tire cradles and position the front wheel hooks.
- Place Bicycle: Lift the bicycle onto the rack, placing its wheels into the designated cradles.
- Roda davantera segura: Lower the front wheel hook firmly onto the front tire, ensuring it makes contact with the wheel and not the frame.
- Corretja de la roda posterior: Use the provided strap to secure the rear wheel to its cradle.
- Repeat for Second Bike: If carrying two bikes, repeat the process for the second bicycle, ensuring adequate spacing to prevent contact between bikes.
Accessing Vehicle Rear (Tilting Feature)
The foot-activated pivot lever allows you to tilt the rack away from your vehicle for rear access, even with bikes loaded.
- Activate Lever: Press the foot-activated pivot lever located at the base of the rack.
- Bastidor inclinable: Gently guide the rack downwards. The rack is designed to catch before hitting the ground, allowing controlled tilting.
- Torna a Upright: To return the rack to the upright position, lift it until it clicks securely into place. Ensure it is fully locked before driving.
Característiques de seguretat
- Integrated Hitch Lock: The hitch pin includes a locking mechanism to secure the rack to your vehicle. Always engage this lock when the rack is installed.
- Bloqueig de cable integrat: Utilize the integrated cable lock to secure your bicycles to the rack. Thread the cable through the bike frames and wheels, then lock it into the rack.
Manteniment
- Neteja regular: Clean the rack periodically with mild soap and water to remove dirt, road grime, and salt. Rinse thoroughly and dry.
- Lubricació: Lightly lubricate moving parts, such as the pivot points and locking mechanisms, with a silicone-based lubricant to ensure smooth operation.
- Inspect Straps and Cradles: Check wheel straps and cradles for wear, tears, or damage. Replace any compromised components immediately.
- Estanquitat del cargol: Periodically check all bolts and fasteners for tightness. Re-tighten as necessary.
- Emmagatzematge: When not in use, store the bike rack in a dry, protected area to prolong its lifespan.
Resolució de problemes
- Issue: Difficulty aligning bolts during assembly.
- Solució: Loosely attach the primary bolts first. Then, apply slight pressure or manipulate the rack's pivot points to align secondary or perpendicular bolt holes. A second person can assist in holding components steady during alignment.
- Issue: Rack wobbles in the hitch receiver.
- Solució: Ensure the integrated locking hitch pin is fully tightened. The knob on the end of the rack should be turned until the internal cam ball expands and eliminates movement within the hitch receiver.
- Issue: Rack does not tilt smoothly or gets stuck.
- Solució: Check the foot-activated pivot lever for obstructions. Clean any dirt or debris from the pivot mechanism. Apply a silicone-based lubricant to the pivot points.
- Issue: Rack does not accommodate fat tire bikes.
- Solució: The Kuat Sherpa 2.0-2 is designed for standard bicycle tires. It does not natively support fat tire bikes (e.g., 4.25" tires) and Kuat does not offer a specific fat bike kit for this model. Verify tire compatibility before purchase if you own a fat tire bicycle.
Especificacions
| Nom de marca | Kuat |
| Model | Sherpa 2.0-2 |
| Material | Alumini |
| Color | Negre, plata |
| Capacitat | 2 bicicletes |
| Tipus de muntatge | Muntatge d’enganxatge |
| ASIN | B01M69ISSU |
| Fabricant | Kuat Racks |
| Primer disponible | 2 de maig de 2016 |
Garantia i Suport
For specific warranty information, product registration, or technical support, please refer to the official Kuat Racks weblloc web o poseu-vos en contacte amb el seu departament d'atenció al client. Conserveu el rebut de compra com a prova de propietat.


