
Introducció
This manual provides detailed instructions for the safe and efficient operation, maintenance, and troubleshooting of your Rayson TD-1500B34R Binding Machine. Please read this manual thoroughly before using the machine to ensure optimal performance and longevity.
Producte acabatview
The Rayson TD-1500B34R is a versatile binding machine designed for manual punching and binding. It supports various binding accessories including Coil Binding Spiral, Click Binding Spines, and Wire-O Binding Rings. Its robust metal construction ensures durability for long-lasting use.

Figura 1: Acabatview of the Rayson TD-1500B34R Binding Machine with key components labeled, including punching handle, binding handle, paper margin adjustment, wire size selector, metal binding clamp, paper holder, disengaging dies (34), paper scraps drawer, paper stopper, metal slot system, and black metal base. The image also indicates a maximum punch capacity of 15 sheets (20lb paper) and a maximum binding capacity of 130 sheets (20lb paper).
Configuració
1. Muntatge
Attach the punching and binding handles to the machine as shown in the video. Ensure they are securely fastened for safe operation.
Vídeo 1: This video demonstrates the assembly process of the Rayson TD-1500B34R Binding Machine, including attaching the handles.
2. Initial Blade Cleaning
Before first use, the machine's blades may have residual oil from manufacturing. To remove this, punch several sheets of scrap paper (at least 6 times) until no oil stains are visible on the punched paper. This ensures clean punches for your documents.
Vídeo 2: This video illustrates the process of cleaning the blades by punching scrap paper to remove manufacturing oil.
3. Setting Paper Margin
Adjust the paper margin to control the distance of the punched holes from the edge of the paper. Pull and push the margin selector to choose between 3mm (0.12 inch), 5mm (0.19 inch), or 7mm (0.27 inch) margins. The color indicator on the selector corresponds to the selected margin depth.
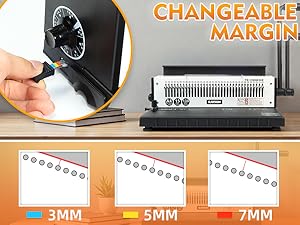
Figura 2: The paper margin adjustment knob, allowing selection of 3mm, 5mm, or 7mm margins for punching.
Vídeo 3: This video demonstrates how to adjust the paper margin on the binding machine.
4. Setting Side Guide
Adjust the side guide according to your paper size (e.g., A4, Letter) to ensure consistent punching alignment. The machine features markings for various paper sizes.

Figura 3: The paper stopper with A4, A5, A6, B4, B5, B6, and Letter size markings for precise paper alignment.
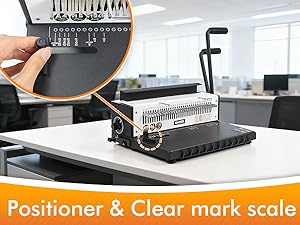
Figura 4: Adjusting the side guide to match the paper size for accurate punching.
Instruccions de funcionament
1. Perforació de documents
The machine can manually punch up to 15 sheets of 20lb paper at a time. For thicker paper or covers (up to 2pcs of 230g leather binding covers or 2pcs of 0.4mm PP/PVC binding cover), reduce the number of sheets per punch. The machine features 34 disengageable blades, allowing you to customize the punching pattern for different document sizes and avoid half-punched holes.

Figura 5: Examples of punching A4 paper, plastic covers, and leathergrain covers.

Figura 6: Step 1 of punching: Adjust the paper size and margin of the punching holes.

Figura 7: Step 2 of punching: After feeding papers, pull down the handle to punch holes.
2. Binding with Wire-O Spines
The machine binds up to 130 sheets of 20lb paper with 5/8" wire-o binding. The wire binding ring closing capacity ranges from 1/4" to 5/8".
- Punch all desired pages and covers.
- Select the correct size of 3:1 pitch wire binding ring.
- Load the wire binding ring onto the metal teeth of the binding mechanism.
- Place the perforated paper and binding cover onto the wire spine.
- Ensure the wire binding spine is magnetically absorbed by the metal and both ends reach the binding metal.
- Press the binding handle to close the wire spine and complete the binding.

Figura 8: Example of a document bound with a wire-o spine.

Figura 9: Step 3 of binding: Choose the correct size of 3:1 wire binding ring and load it onto the metal teeth.

Figura 10: Step 4 of binding: Place the perforated paper and binding cover onto the wire spine.

Figura 11: Step 5 of binding: Ensure the wire binding spine is magnetically absorbed and both ends reach the binding metal.

Figura 12: Step 6 of binding: Press the handle to complete the binding.
3. Binding with Spiral Coil and Click Binding Spines
The machine supports binding with both spiral coil and click binding spines, offering unlimited binding capacity for these types. After punching, manually thread the spiral coil or click binding spine through the holes.

Figura 13: The machine is compatible with coil binding, click binding, and wire binding spines.

Figura 14: Example of a document bound with a spiral coil.
Vídeo 4: This video demonstrates the process of binding with a spiral coil after punching.
4. Handling Oversized Paper (e.g., A3)
The Rayson TD-1500B34R features an open-throat design and disengageable dies, allowing you to punch larger paper sizes like A3 in two steps. Carefully align the paper and punch one side, then reposition and punch the other side to complete the holes for oversized documents.
Vídeo 5: This video demonstrates how to use the open-throat design and disengageable dies to punch and bind oversized paper, such as A3, in multiple steps.
Manteniment
1. Emptying Paper Scraps Drawer
Regularly empty the paper scraps drawer located at the bottom of the machine to prevent jams and ensure smooth operation. A full drawer can impede the punching mechanism.
2. Neteja general
Wipe the exterior of the machine with a soft, dry cloth. Avoid using abrasive cleaners or solvents. Keep the punching and binding mechanisms free from dust and debris.
Resolució de problemes
- Oil Stains on Punched Paper: If oil stains appear on punched paper, continue punching scrap paper until the stains disappear. This is common with new machines as residual manufacturing oil is cleared from the blades.
- Holes Not Matching Pre-Punched Paper: The machine produces 3:1 pitch round holes with a diameter of 0.18 inches. Ensure your pre-punched paper or binding accessories are compatible with these specifications.
- Inability to Close Large Wire Binding Spines: The wire binding ring closing capacity is from 1/4" to 5/8". Spines larger than 5/8" may not close properly with this machine.
- Embussos de paper: Do not exceed the maximum punching capacity of 15 sheets (20lb paper) or the recommended capacity for covers. If a jam occurs, carefully remove the paper without forcing the handles.
- Inconsistent Punching: Ensure the paper is properly aligned with the side guide and the margin selector is set correctly. Check that all disengageable dies are either fully engaged or disengaged as needed.
Especificacions
| Característica | Detall |
|---|---|
| Model | TD-1500B34R |
| Capacitat de perforació | Up to 15 sheets of 20lb paper |
| Capacitat d'enquadernació | Up to 130 sheets of 20lb paper (with 5/8" wire-o binding); Unlimited for Click/Coil binding |
| Hole Shape | Ronda |
| Diàmetre del forat | 0.18 polzades |
| Pitch | 3:1 |
| Disengageable Blades | 34 |
| Material | Construcció metàl·lica |
| Dimensions del producte | 18.11 x 10.43 x 13.98 polzades |
| Pes de l'article | 20.1 lliures |
Informació de la garantia
For detailed warranty information, please refer to the warranty card included with your product packaging or visit the official RAYSON weblloc web. Conserveu el comprovant de compra per a qualsevol reclamació de garantia.
Atenció al client
If you encounter any issues or have questions regarding your Rayson TD-1500B34R Binding Machine, please contact RAYSON customer support. Contact details can typically be found in your product packaging or on the official RAYSON weblloc.