
1. Instruccions de seguretat importants
Si us plau, llegiu atentament totes les instruccions abans de fer servir aquest dispositiu. Conserveu aquest manual per a futures consultes.
- Seguretat elèctrica: Assegureu-vos que la font d'alimentació voltage matches the device's requirements (AC86-265V). Always disconnect power before installation, maintenance, or cleaning.
- Ventilació: No bloquegeu les obertures de ventilació. Assegureu-vos que hi hagi un flux d'aire adequat al voltant de la unitat per evitar el sobreescalfament.
- Medi ambient: This device is intended for indoor use. Avoid exposure to moisture, extreme temperatures, or corrosive environments.
- Manipulació: Handle the unit with care. Do not drop or subject it to strong impacts.
- Instal·lació professional: For complex DMX setups, professional installation is recommended.
2. Contingut del paquet
Verifiqueu que tots els elements que s'enumeren a continuació s'inclouen al vostre paquet:
- 1x 45W RGB Light Engine
- 1x 28-Key RF Remote Controller
- 1x Adapter Plug
- 1x Manual d'usuari (aquest document)

Figure 2.1: Package Contents Diagram. This image illustrates the light engine, PG connector, remote control, instruction manual, and power adapter included in the box.

Figure 2.2: Product Components. A photograph showing the 45W light engine, a PG connector, the RF remote controller, and the power adapter.
3. Producte acabatview
The AMKI DMX 45W Light Source Engine Driver is designed to create dynamic and colorful fiber optic lighting effects. It features multiple color options, dynamic modes, and can be controlled via an RF remote or a DMX512 console.
Característiques principals:
- Multicolor & Dynamic Modes: Offers seven colors (red, green, blue, white, yellow, cyan, purple) with jump, flash, fade, and DIY dynamic modes.
- Control DMX512: Compatible with DMX512 consoles and decoders for advanced lighting control.
- Control remot RF: Includes a 28-key RF remote for convenient wireless operation.
- Sortida d'alta potència: 45W LED for bright illumination, suitable for various applications like starry ceilings, curtains, and art installations.
- Match Code Function: Allows one-to-one control between the remote and specific light engines.

Figure 3.1: Multicolor and Dynamic Effects. This image displays the light engine producing various colors and dynamic lighting patterns through fiber optic cables.
4. Components i dimensions del producte
Familiarize yourself with the physical components and dimensions of the light engine:

Figure 4.1: Product Dimensions and Labeled Ports. The diagram shows the light engine with its length (227mm / 8.93in), width (195mm / 7.67in), and height (80mm / 3.14in). Key ports are labeled: 1. Power Input, 2. DMX512 IN, 3. DMX512 OUT, 4. RF Signal Receiver, 5. Fan, 6. DMX address (DIP switches).
- Entrada d'alimentació: Connects to the provided adapter plug.
- DMX512 IN/OUT: XLR ports for connecting to a DMX512 console or other DMX devices.
- RF Signal Receiver: Internal receiver for the wireless remote control.
- Ventilador: Cooling fan to dissipate heat during operation.
- Adreça DMX: DIP switches for setting the DMX start address.
- Fiber Head Inner Diameter: 29mm, for connecting fiber optic bundles.
5. Instal·lació
5.1 Fiber Optic Cable Connection
Insert the fiber optic cables into the fiber head opening on the front of the light engine. Ensure the cables are securely fastened. A PG connector (if included) can be used to secure the fiber bundle.
5.2 Connexió d'alimentació
Connect the provided adapter plug to the 'Power Input' port on the light engine. Then, plug the adapter into a suitable AC power outlet (AC86-265V).
5.3 DMX512 Console Connection (DMX Mode)
To control the light engine via DMX512, connect a DMX512 console or PC DMX512 console to the 'DMX512 IN' port using an XLR cable. If connecting multiple light engines or DMX decoders, use the 'DMX512 OUT' port to daisy-chain them.

Figure 5.1: DMX and RF Model Connection Diagrams. The top section shows how to connect the light engine to a DMX512 console, either directly or through a DMX512 decoder. The bottom section illustrates connecting multiple light engines in an RF control setup (master/slave configuration).
5.4 Built-in Effects Mode Connection
For built-in effects mode, the light engine can operate standalone or in a master/slave configuration. Ensure the DMX address switches are set appropriately (refer to Section 6.3).

Figure 5.2: Built-in Model Connection Diagrams. This image shows how to connect multiple light engines in a master/slave setup for built-in effects, both directly and with DMX512 decoders.
6. Funcionament
6.1 RF Remote Control Operation
The included 28-key RF remote control allows for easy adjustment of colors, brightness, and dynamic modes.
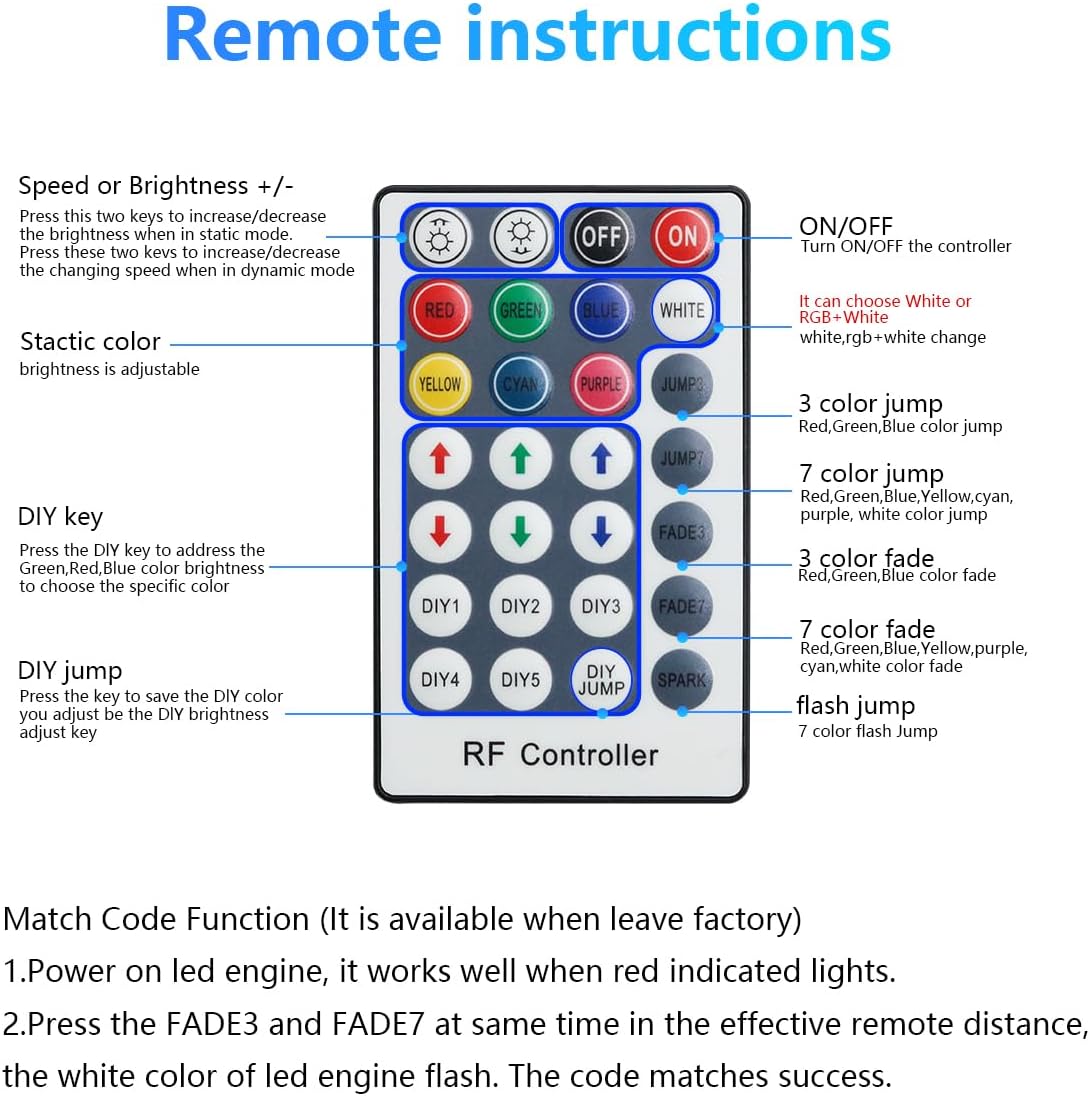
Figure 6.1: RF Remote Control Instructions. This diagram details the function of each button on the 28-key RF remote, including ON/OFF, color selection, speed/brightness adjustment, jump/fade modes, and DIY settings.
- ON/OFF: Turns the light engine on or off.
- Speed or Brightness +/-: Adjusts brightness in static color mode or speed in dynamic modes.
- Static Color Buttons (RED, GREEN, BLUE, WHITE, YELLOW, CYAN, PURPLE): Selects a single static color.
- Jump Modes (3 Color Jump, 7 Color Jump): Canvia ciclísticament pels colors amb transicions brusques.
- Fade Modes (3 Color Fade, 7 Color Fade): Cycles through colors with smooth transitions.
- Flash Jump: A rapid flashing mode.
- DIY Keys (DIY1-DIY5, DIY Jump): Allows users to customize and save specific color and brightness settings.
Match Code Function:
By default, one remote can control multiple light sources. To achieve one-to-one control:
- Power on the LED engine. It will indicate readiness with a red light.
- Within the effective remote distance, simultaneously press the FADE3 i FADE7 buttons. The LED engine's white color will flash, indicating successful code matching.
6.2 DMX Mode Operation
When operating in DMX mode, the light engine accepts DMX512 signals from a DMX console. The DMX address is set using the DIP switches on the unit.
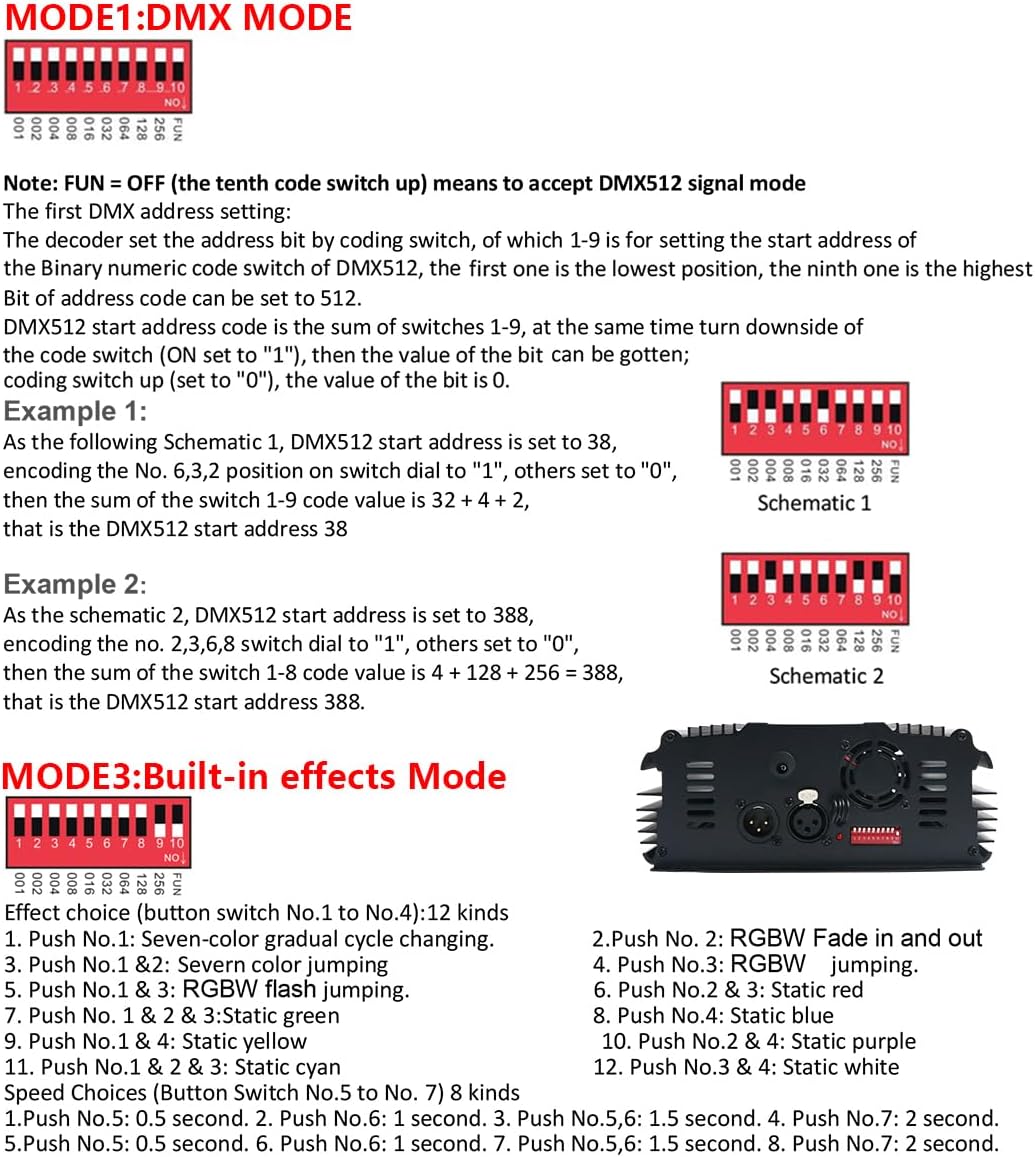
Figure 6.2: DMX Mode and Built-in Effects Settings. This image provides instructions for setting the DMX address using DIP switches and lists the available built-in effects and speed choices.
Configuració de l'adreça DMX:
- Ensure the 'FUN' switch (the tenth switch) is set to OFF to enable DMX512 signal mode.
- The DMX address is set by the binary numeric code switches (1-9). Switch 1 is the lowest position, and switch 9 is the highest.
- To set a switch to 'ON', push it up. To set it to 'OFF', push it down.
- The DMX512 start address is the sum of the values of switches 1-9 that are set to 'ON'.
DMX Address Examples:
- Example 1 (Address 38): Set switches 6, 3, 2 to 'ON', and others to 'OFF'. The sum is 32 + 4 + 2 = 38.
- Example 2 (Address 388): Set switches 8, 6, 3, 2 to 'ON', and others to 'OFF'. The sum is 256 + 128 + 4 + 2 = 388.
DMX Channel Assignment (3 Channels):
- Channel 1: Red (R)
- Channel 2: Green (G)
- Channel 3: Blue (B)
6.3 Built-in Effects Mode
The light engine has several pre-programmed effects. To activate built-in effects, set the 'FUN' switch (the tenth switch) to ON. The DMX address switches (1-9) can then be used to select specific effects and speeds.
Effect Choices (Button Switch No.1 to No.4):
- Push No.1: Seven-color gradual cycle changing
- Push No.1 & 2: Seven-color jumping
- Push No.1 & 3: RGBW flash jumping
- Push No.1 & 2 & 3: Static green
- Empenta núm. 1 i 4: groc estàtic
- Premsa núm. 1 i 2 i 4: cian estàtic
- Push No.2: RGBW Fade in and out
- Push No.3: RGBW jumping
- Premsa núm. 2 i 3: vermell estàtic
- Push No.4: Blau estàtic
- Empenta núm. 2 i 4: morat estàtic
- Push No.3 i 4: blanc estàtic
Speed Choices (Button Switch No.5 to No.7):
- Push No.5: 0.5 second
- Push No.6: 1 second
- Push No.5,6: 1.5 second
- Push No.7: 2 second
- Push No.5,7: 0.5 second
- Push No.6,7: 1 second
- Push No.5,6,7: 1.5 second
- Push No.8: 2 second
7. Manteniment
To ensure the longevity and optimal performance of your AMKI Light Source Engine Driver, follow these maintenance guidelines:
- Neteja: Feu servir un drap suau i sec per netejar l'exterior de la unitat. No utilitzeu productes químics agressius ni netejadors abrasius.
- Ventilació: Regularly check that the fan and ventilation openings are free from dust and debris. Blocked vents can lead to overheating.
- Emmagatzematge: When not in use for extended periods, store the unit in a cool, dry place, away from direct sunlight and moisture.
- Fiber Optic Care: Handle fiber optic cables carefully to prevent kinking or damage. Keep the fiber head clean.
8. Solució De Problemes
If you encounter issues with your light engine, refer to the following common problems and solutions:
- Remote Controller Not Working:
- Ensure the remote has working batteries (not included with the product).
- Check if the remote is within effective range of the light engine.
- Perform the 'Match Code Function' as described in Section 6.1 to re-pair the remote with the light engine.
- Sense sortida de llum:
- Verify that the power adapter is securely connected to both the light engine and a working power outlet.
- Ensure the unit is powered on using the remote or DMX signal.
- Check if fiber optic cables are properly inserted into the fiber head.
- Incorrect DMX Control:
- Confirm that the 'FUN' switch on the DMX address panel is set to 'OFF'.
- Double-check the DMX start address settings on the DIP switches according to Section 6.2.
- Ensure your DMX console is sending signals on the correct channels.
- Sobreescalfament:
- Ensure the fan and ventilation openings are not obstructed.
- Utilitzeu la unitat en una zona ben ventilada.
9. Especificacions tècniques
| Característica | Especificació |
|---|---|
| Entrada Voltage | AC86-265V |
| Poder | 45W |
| Sortida de color | RGB (Multicolor) |
| Output DMX Channels | 3 canals (RGB) |
| Output Gray Level | 256 |
| Senyal d'entrada | DMX512/1990 |
| DMX512 Socket Standard | XLR |
| Tipus de LED | CREE CHIP LED |
| Pes net | 1.68 kg (3.7 lliures) |
| Dimensions (L*W*H) | 227 mm * 195 mm * 80 mm (8.93" * 7.67" * 3.14") |
| Fiber Head Inner Diameter | 29 mm |
| Light Body Material | Alumini |
| Tipus remot | RF 28-key remote control |
| Tota la vida | 50,000 hores |
| Número de model de l'article | Driver-APP |
| Tipus de muntatge | Muntatge al sostre |
| Piles incloses | No |
10. Informació de la garantia
This AMKI product comes with a 2 any de garantia from the date of purchase. This warranty covers manufacturing defects and malfunctions under normal use. Please retain your proof of purchase for warranty claims. The warranty does not cover damage caused by misuse, unauthorized modifications, accidents, or improper installation.
11. Atenció al client
For further assistance, technical support, or warranty inquiries, please contact AMKI customer service through the retailer where the product was purchased or refer to the official AMKI weblloc per obtenir informació de contacte.