
1. Introducció
This manual provides detailed instructions for the installation, operation, and maintenance of the EPEVER LS2024B PWM Solar Charge Controller. The LS2024B is designed for solar off-grid systems, managing the charging process of the battery from solar panels and controlling the load. It features automatic 12V/24V system voltage recognition, intelligent three-level PWM charging, and multiple load working modes.
The controller ensures efficient and safe operation of your solar lighting system, protecting the battery from overcharge and over-discharge.
2. Instruccions de seguretat
- Llegiu atentament totes les instruccions abans de la instal·lació i el funcionament.
- Install the controller indoors, away from direct sunlight, high temperature, and humid environments.
- Ensure good ventilation around the controller.
- The battery should be installed as close as possible to the controller. The suggested cable length between the battery and controller is within 150mm.
- Use appropriate cables for connections to avoid excessive voltage drop and ensure safety.
- Connecteu sempre primer la bateria, després el panell solar i finalment la càrrega. Desconnecteu-ho en ordre invers.
- Ensure all connections are tight to avoid loose connections which can cause excessive heat.
- This controller is designed for lead-acid batteries (Sealed, Gel, Flooded). Do not use with other battery types unless specified.
- Do not disassemble or attempt to repair the controller yourself. Contact qualified personnel for service.
3. Producte acabatview
The EPEVER LS2024B controller features a compact design with clear indicators and connection terminals.

Figura 3.1: Frontal View of LS2024B Controller. This image shows the front panel of the EPEVER LS2024B solar charge controller, highlighting the LED indicators for PV charging, battery status, and load status, along with the load switch button and the main power terminals.

Figura 3.2: Angle View amb Ports. Aquesta imatge ofereix un angle view of the LS2024B controller, showing the temperature sensor input and the RS485 communication port on the side, in addition to the main terminals.

Figure 3.3: LED Indicators and Switch Button. This diagram illustrates the function of each LED indicator (Charging Status, Battery Status, Load Status) and the Load Switch Button on the EPEVER LS2024B controller.
3.1 Característiques principals:
- 20A 12V/24V automatic system voltage reconeixement.
- Three-level intelligent PWM charging: Equalize, Boost, and Float.
- Multiple load working modes: Manual Control, Light ON/OFF, Light On+Timer, and Time Control.
- RS485 port for communication with remote meter (MT50), PC software, or mobile app.
- External temperature sensor interface for accurate temperature compensation.
- Proteccions electròniques integrals.
4. Configuració i instal·lació
Follow these steps to correctly install your EPEVER LS2024B solar charge controller. Ensure all safety precautions are observed.
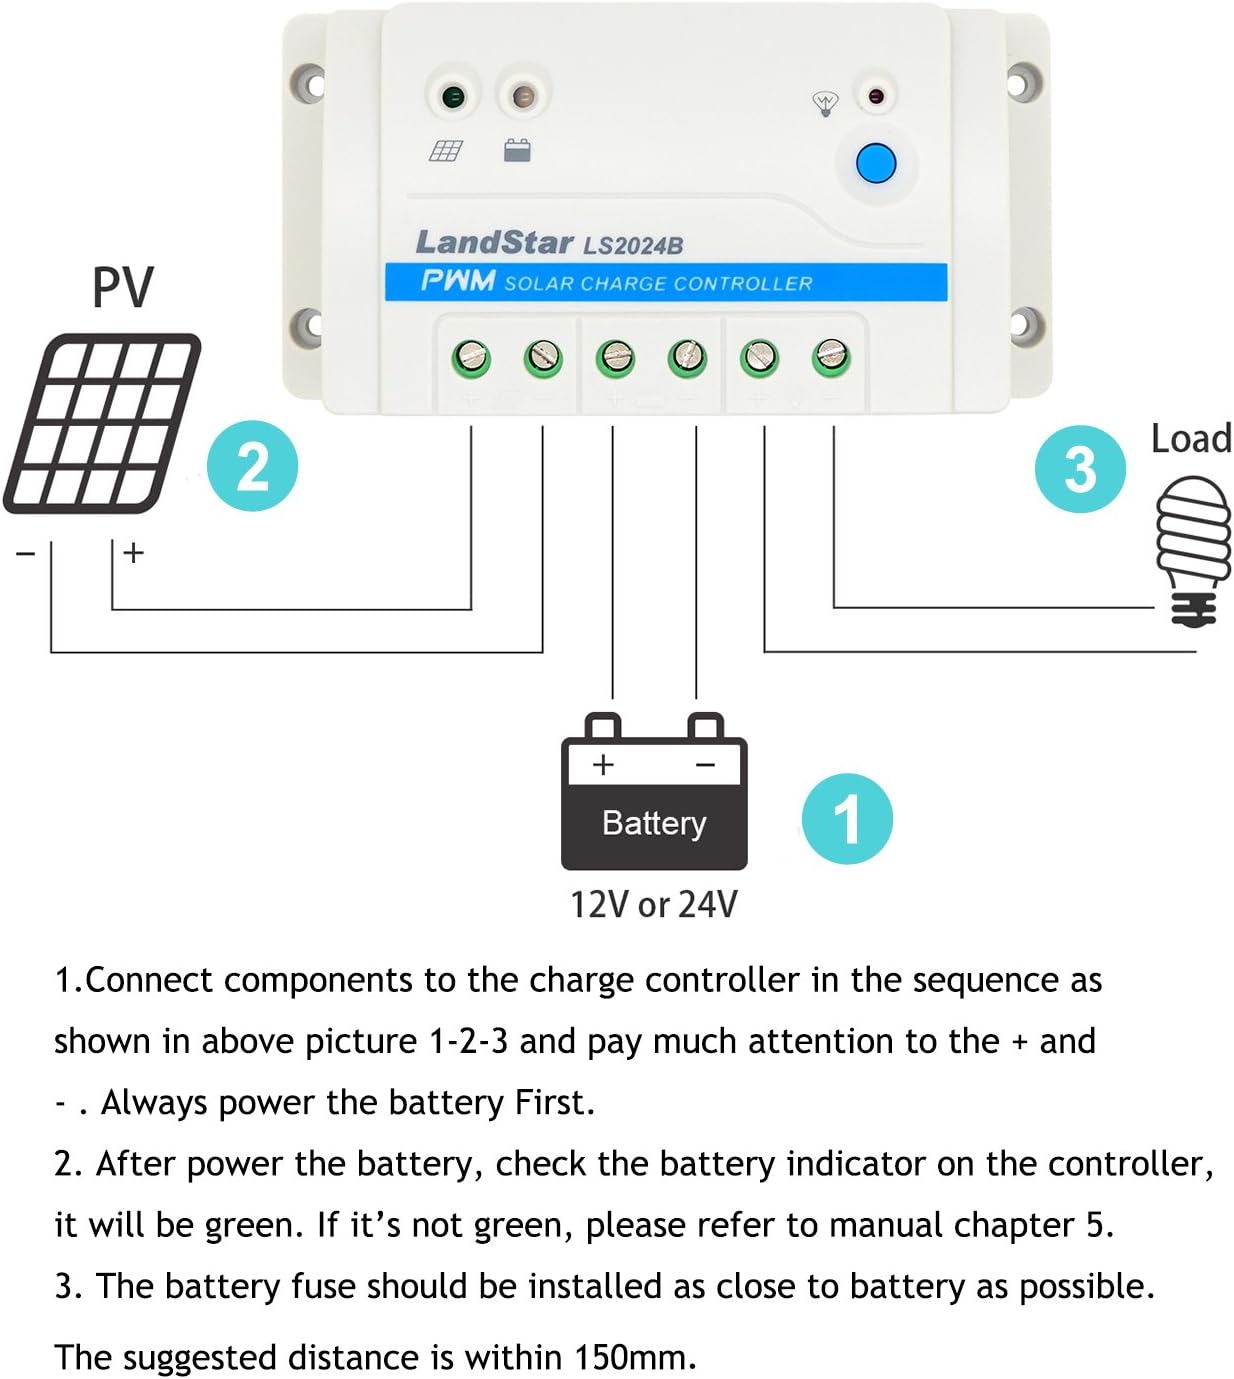
Figura 4.1: Diagrama de cablejat. This diagram illustrates the correct connection sequence for the battery, solar panel, and load to the EPEVER LS2024B solar charge controller.
- Connecteu la bateria: Connect the battery to the charge controller first. Ensure correct polarity (+ to + and - to -). The battery indicator on the controller should illuminate. If it does not, check connections and battery voltage. The suggested distance between the battery and controller is within 150mm. Install a battery fuse as close to the battery as possible.
- Connecteu el panell solar: Connect the solar panel to the charge controller. Ensure correct polarity. The PV charging indicator should illuminate if there is sufficient sunlight.
- Connect the Load: Connect the DC load to the charge controller. Ensure correct polarity. The load indicator should illuminate if the load is active.
- Connect Optional Temperature Sensor (RTS): If using an external temperature sensor, connect it to the designated port. This improves charging accuracy by compensating for battery temperature fluctuations.
- Connect RS485 Communication Cable: For remote monitoring or parameter setting via MT50, PC software, or mobile app, connect the RS485 communication cable to the COM port.
Important: Always connect the battery first and disconnect it last to prevent damage to the controller.
5. Instruccions de funcionament
5.1 Indicadors LED
- PV Charging Indicator: Indicates the status of solar panel charging.
- Indicador d'estat de la bateria: Shows the battery charge level and status.
- Load Status Indicator: Indicates if the load is active or inactive.
Refer to Figure 3.3 for the location of these indicators.
5.2 Modes de treball de càrrega
The LS2024B supports various load working modes, which can be configured via the load switch button or through the RS485 communication interface (MT50, PC software, or app).
- Control manual: The load can be turned ON/OFF manually using the switch button.
- Llum ON/OFF: The load turns on automatically at dusk and off at dawn.
- Light On+Timer: The load turns on at dusk and stays on for a set duration (e.g., 2 hours, 4 hours), then turns off.
- Control de temps: The load operates according to a pre-set schedule.
5.3 Communication Interface (RS485)
The RS485 port allows for real-time data monitoring and parameter setting. This requires an optional remote meter (MT50) or a connection to a PC (via CC-USB-RS485-150U cable) or mobile device (via OTG cable and app). This enables advanced configuration of load modes, battery types, and other system parameters.
6. Manteniment
Un manteniment regular garanteix la longevitat i el rendiment òptim del vostre controlador de càrrega solar.
- Comproveu les connexions: Periodically inspect all wiring connections for tightness and corrosion. Loose connections can cause overheating and damage.
- Netegeu el controlador: Keep the controller clean and free from dust and debris. Use a dry cloth for cleaning. Ensure ventilation openings are not blocked.
- Inspeccionar els cables: Check all cables for signs of wear, fraying, or damage. Replace damaged cables immediately.
- Inspecció de la bateria: Regularly check the battery terminals for corrosion and ensure the battery is in good condition. For flooded batteries, check electrolyte levels.
- Control ambiental: Ensure the controller is operating within its specified temperature range and is not exposed to excessive moisture.
7. Solució De Problemes
This section provides solutions to common issues you might encounter with your LS2024B controller and outlines its built-in electronic protections.

Figure 7.1: Electronic Protections and System Overview. This diagram illustrates the various electronic protections integrated into the EPEVER LS series controllers, such as PV short circuit, battery over-discharge, and load overload protection, alongside a general system connection overview.
7.1 Electronic Protections
The controller is equipped with multiple electronic protections to prevent damage to the system and ensure safe operation:
- Protecció contra curtcircuits fotovoltaics
- Protecció de polaritat inversa PV
- Bateria sobre voltage protecció
- Protecció de sobre descàrrega de la bateria
- Protecció de polaritat inversa de la bateria
- Protecció contra el sobreescalfament de la bateria
- Protecció contra curtcircuits de càrrega
- Protecció de sobrecàrrega de càrrega
- Protecció contra el sobreescalfament del controlador
If any of these protections are triggered, the controller will automatically attempt to recover or indicate an error through its LED indicators.
7.2 Problemes comuns i solucions
- No Indicators On:
- Check battery connections and ensure correct polarity.
- Comproveu el volum de la bateriatage is within the operating range (e.g., for a 12V system, typically above 9V).
- PV Charging Indicator Off (during daylight):
- Check solar panel connections and polarity.
- Ensure sufficient sunlight is reaching the solar panel.
- Verifica el volum del panell solartage està dins del rang d'entrada del controlador.
- La càrrega no funciona:
- Check load connections and polarity.
- Ensure the load switch button is pressed (for manual mode) or the load mode is correctly configured.
- Comproveu si la bateria voltage is too low (low voltage disconnect protection may be active).
- Check for load short circuit or overload.
- La bateria no es carrega correctament:
- Comproveu totes les connexions.
- Ensure solar panel output is adequate for charging.
- Verify battery type settings if configured via RS485.
- Inspect the battery for signs of damage or age.
8. Especificacions tècniques
The following table details the technical specifications for the EPEVER LS2024B Solar Charge Controller.

Figure 8.1: Technical Specifications Table. This image displays a table outlining the technical specifications for the LS1024B, LS2024B, and LS3024B models, including nominal system voltage, current ratings, voltage ranges, and environmental conditions.
| Paràmetre | Value (LS2024B) |
|---|---|
| Sistema nominal Voltage | 12/24V Auto Work |
| Màx. PV Voltage of Storage Battery | 34 V |
| Current of Storage Battery | 20A |
| Corrent de càrrega | 20A |
| Volum baixtage Reconnect Voltage | Sealed/Gel/Flooded: 12.6V, User: 9~17V |
| Volum baixtage Desconnectar Voltage | Sealed/Gel/Flooded: 11.1V, User: 9~17V |
| Autoconsum | 8.4mA (12V); 7.8mA (24V) |
| Coeficient de compensació de temperatura | -3mV/℃/2V (25℃) |
| Tancament | IP30 |
| Posada a terra | Comú positiu |
| Temperatura de l'entorn de treball | -35 ℃ ~ 55 ℃ |
| Terminal | 8 AWG (10 mm²) |
| Dimensió | 159.6 × 81.4 × 47.8 mm |
| Pes net | 0.3 kg |
| UPC | 652042950982 |
9. Garantia i Suport
Warranty information for the EPEVER LS2024B Solar Charge Controller is typically provided with your purchase documentation or can be found on the official EPEVER weblloc web. Si us plau, conserveu el comprovant de compra per a reclamacions de garantia.
For technical support, troubleshooting assistance beyond this manual, or warranty inquiries, please contact EPEVER customer service or your authorized dealer.