1. Introducció
The Logicool Meet-upTVMT is a dedicated TV mount designed to securely attach the Logitech MeetUp conference camera to a television display. This accessory facilitates flexible placement of the MeetUp camera, allowing it to be positioned either above or below the display, thereby integrating it seamlessly into your conference room or meeting space setup. This manual provides essential information for the safe and correct installation, operation, and maintenance of your Meet-upTVMT mount.
2. Informació de seguretat
- Read all instructions thoroughly before attempting installation. Failure to follow these instructions may result in property damage, injury, or product malfunction.
- Ensure that the television and the mounting surface (if applicable, for the TV itself) can safely support the combined weight of the TV, the Meet-upTVMT mount, and the Logitech MeetUp camera.
- Use only the tools and hardware specified in this manual or provided with the product.
- Keep all small parts, such as screws and washers, out of reach of children to prevent choking hazards.
- Si teniu dubtes sobre alguna part del procés d'instal·lació, consulteu un professional qualificat.
- Do not overtighten screws, as this may damage the product or the TV.
3. Contingut del paquet
Verifiqueu que tots els components siguin presents abans de començar la instal·lació:
- Meet-upTVMT Mounting Bracket
- Assorted VESA Mounting Screws (M6, M8, etc.)
- Volanderes i separadors
- Full d'instruccions (aquest manual)
4. Configuració i instal·lació
Follow these steps to install the Meet-upTVMT mount and attach your Logitech MeetUp camera.
- Prepare Your Television: Carefully lay your television face down on a soft, clean surface to prevent screen damage. Locate the VESA mounting holes on the back of your TV. These are typically in a square or rectangular pattern.
- Attach the Mounting Bracket to the TV: Align the Meet-upTVMT bracket with the VESA mounting holes on the back of your television. Select the appropriate screws, washers, and spacers from the provided hardware kit that match your TV's VESA pattern and depth. Securely fasten the bracket to the TV. Ensure the bracket is oriented correctly for your desired camera placement (above or below the TV).

Imatge: Part posterior view of a television with the Meet-upTVMT bracket securely attached to the VESA mounting points. This shows how the bracket connects to the TV's existing mounting holes.
- Mount the Logitech MeetUp Camera: Once the Meet-upTVMT bracket is firmly attached to the television, carefully align your Logitech MeetUp camera with the designated mounting points on the bracket. Use the screws provided with the MeetUp camera (or the mount, if specified) to secure the camera to the bracket. Ensure the camera is stable and level.
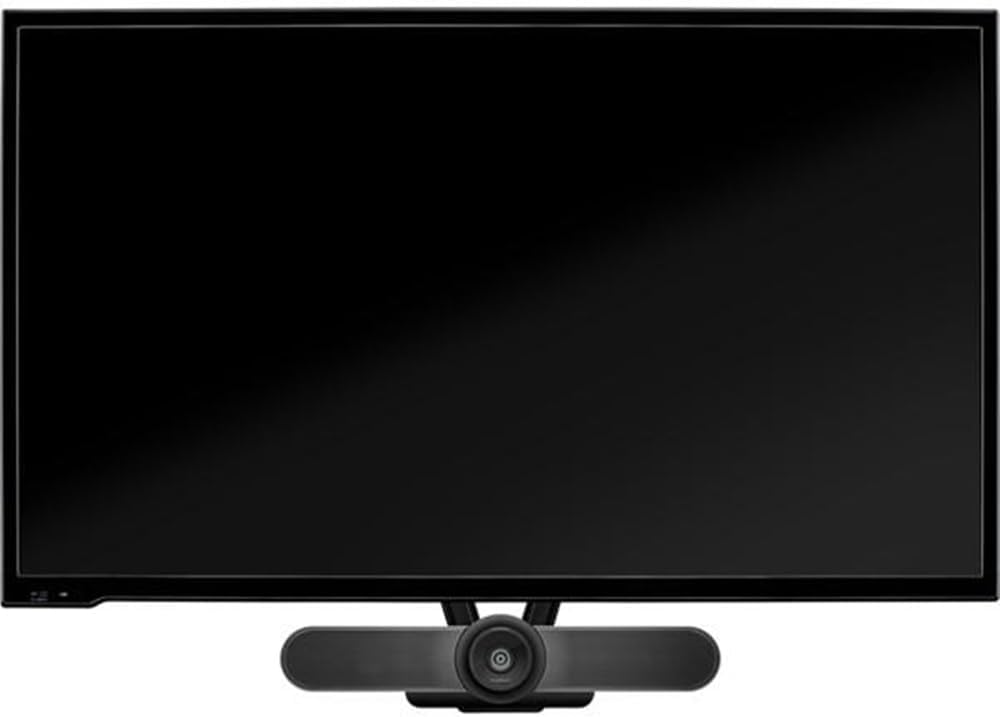
Imatge: Frontal view of a television with the Logitech MeetUp camera mounted below the screen, demonstrating the final setup with the Meet-upTVMT bracket.
- Ajustaments finals: The Meet-upTVMT mount allows for omnidirectional adjustment. Once the camera is attached, you can fine-tune its angle and position to achieve the optimal view for your conference calls. Ensure all connections are tight and secure before use.

Imatge: Frontal view of a television with the Meet-upTVMT bracket installed, showing its discreet profile when ready to receive the MeetUp camera.
5. Funcionament
The Meet-upTVMT is a passive mounting bracket. Its primary function is to hold the Logitech MeetUp camera securely in place on your television. Once installed, ensure the camera is stable and does not wobble. The omnidirectional adjustment feature allows you to manually pivot and tilt the camera to achieve the desired field of view for your video conferences. No electrical operation is involved with the mount itself.
6. Manteniment
- Neteja: To clean the mount, use a soft, dry cloth. Do not use abrasive cleaners or solvents, as these may damage the finish.
- Inspecció periòdica: Periodically check all screws and connections to ensure they remain tight and secure. Over time, vibrations or adjustments may cause screws to loosen. Retighten as necessary.
7. Solució De Problemes
- La muntura sembla inestable: Double-check that all screws attaching the bracket to the TV are fully tightened. Ensure you used the correct size and type of screws for your TV's VESA holes.
- MeetUp camera does not attach securely: Verify that the camera is correctly aligned with the mounting points on the bracket and that its securing screws are tightened. Refer to the MeetUp camera's own manual for specific attachment instructions if needed.
- Bracket does not fit TV: Confirm your TV has standard VESA mounting holes and that the bracket's design is compatible. If issues persist, contact Logicool support.
8. Especificacions
| Marca | Logicool |
| Model | Meet-upTVMT |
| Dispositiu compatible | Television (for mounting Logitech MeetUp camera) |
| Color | Negre |
| Material | Metall |
| Tipus de muntatge | TV-mounted bracket for MeetUp camera |
| Tipus de moviment | Omnidirectional adjustment |
| Dimensions del paquet | 44.8 x 9 x 2.2 cm |
| Pes del paquet | 440 g |
9. Garantia i Suport
For detailed warranty information regarding your Logicool Meet-upTVMT TV Mount, please refer to the official Logicool website or the warranty card included with your purchase. If you encounter any issues or require technical assistance, please contact Logicool customer support through their official channels. Keep your proof of purchase for warranty claims.


