
1. Introducció
This manual provides essential information for the safe and efficient operation of your EPEVER® ET6415BND MPPT Charge Controller. Please read this manual thoroughly before installation and use to ensure optimal performance and longevity of the device.
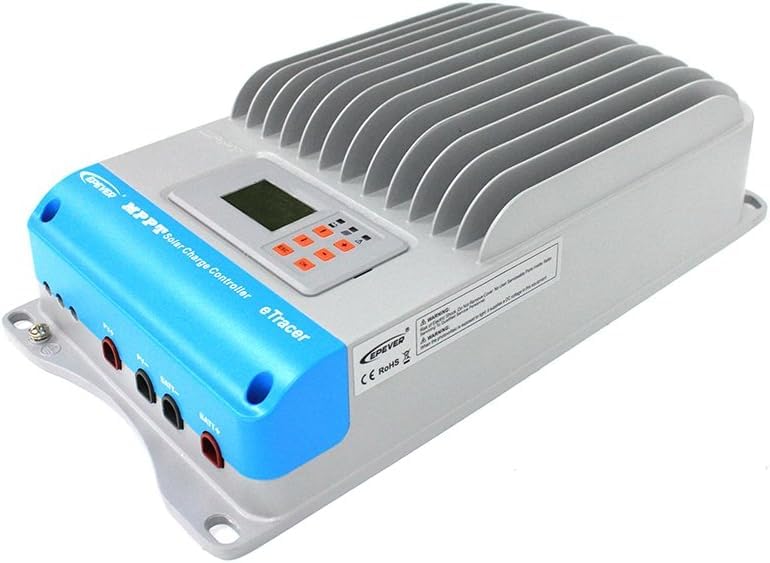
The EPEVER® eTracer series is an advanced Maximum Power Point Tracking (MPPT) controller designed for off-grid photovoltaic (PV) systems. It features an intelligent tracking algorithm to maximize energy yield from PV modules under various weather conditions, offering high efficiency and low power dissipation. This controller also supports data logging for up to 450 days via network connection.
2. Informació de seguretat
Si us plau, observeu les següents precaucions de seguretat durant la instal·lació i el funcionament:
- Ensure all wiring is correct and secure before powering on the controller.
- Do not attempt to disassemble or repair the controller yourself. Refer to qualified personnel.
- Instal·leu el controlador en una zona ben ventilada, allunyada de materials inflamables i de la llum solar directa.
- Utilitzeu l'equip de protecció individual (EPI) adequat quan treballeu amb sistemes elèctrics.
- Disconnect all power sources (PV and battery) before performing any maintenance or wiring.
- The battery bank must be properly fused and protected.
3. Característiques del producte
- Advanced Maximum Power Point Tracking (MPPT) technology for optimal energy harvesting.
- High tracking efficiency of up to 98% and peak conversion efficiency of 98%.
- Supports 12V/24V/36V/48V DC battery systems with auto-recognition.
- Volum màxim d'entrada PVtage de 150V.
- Comprehensive electronic protection against overcharge, over-discharge, overload, short circuit, and reverse polarity.
- LCD display for real-time system information and parameter settings.
- RS485 communication port for external display, PC software, or remote monitoring.
- Up to 450 days of data logging capability.
4. Producte acabatview


5. Configuració i instal·lació
5.1 Desembalatge
Carefully remove the charge controller from its packaging. Inspect the unit for any signs of damage during transit. Retain the packaging for future transport or storage.
5.2 Muntatge
- Choose a mounting location that is dry, well-ventilated, and protected from direct sunlight, high temperatures, and moisture.
- Ensure there is sufficient clearance around the controller for air circulation, especially above and below the heat sink fins.
- Mount the controller vertically on a non-flammable surface using appropriate screws and anchors.
5.3 Connexions de cablejat
Important: Always connect the battery first, then the PV array. Disconnect in the reverse order (PV first, then battery).
- Connexió de la bateria: Connect the positive (+) and negative (-) terminals of the battery bank to the BATT+ and BATT- terminals on the controller, respectively. Ensure correct polarity.
- Connexió del panell fotovoltaic: Connect the positive (+) and negative (-) terminals of the PV array to the PV+ and PV- terminals on the controller, respectively. Ensure correct polarity.
- Posada a terra: Connect the grounding terminal of the controller to an earth ground. The controller has negative grounding.
5.4 Engegada inicial
Once all connections are secure, the controller will automatically detect the battery voltage and begin operation. The LCD display will illuminate, showing system status and parameters.
6. Instruccions de funcionament
Pantalla LCD i botons 6.1
The controller features an LCD display and several buttons for navigation and setting adjustments:
- ESC: Exit current menu or return to previous screen.
- Fletxes AMUNT/AVALL: Navigate through menus and adjust parameter values.
- D'ACORD: Confirma la selecció o entra en un submenú.
6.2 Monitoring Data
The LCD display cycles through various parameters, including PV voltage, bateria voltage, charging current, and power. Use the UP/DOWN arrows to manually scroll through the data screens.
6.3 Configuració dels paràmetres
To enter the parameter setting mode, press and hold the OK button. Use the UP/DOWN arrows to select the desired parameter and OK to confirm. Adjust the value using UP/DOWN and confirm with OK. Refer to the detailed parameter list in the full product manual for specific settings.
6.4 Registre de dades
The eTracer controller can log up to 450 days of operational data. This data can be accessed and analyzed via the RS485 communication port using compatible PC software or an external display unit (sold separately).
7. Manteniment
Regular maintenance ensures the longevity and optimal performance of your charge controller:
- Neteja: Periodically clean the controller's exterior with a dry cloth. Ensure the heat sink fins are free of dust and debris to maintain proper cooling.
- Comprovacions de connexió: Inspeccioneu anualment totes les connexions del cablejat per comprovar si estan ben ajustades i si hi ha corrosió. Les connexions soltes poden causar sobreescalfament i un rendiment deficient.
- Condicions ambientals: Verify that the installation environment remains within the specified operating temperature range and humidity levels.
- Salut de la bateria: Monitor your battery bank's health regularly, as recommended by the battery manufacturer.
8. Solució De Problemes
Aquesta secció tracta problemes comuns que podeu trobar. Per a problemes més complexos, poseu-vos en contacte amb l'atenció al client.
| Problema | Causa possible | Solució |
|---|---|---|
| El controlador no s'encén | Bateria no connectada o de baix volumtage; polaritat inversa. | Comproveu les connexions de la bateria i el voltage. Ensure correct polarity. Charge battery if too low. |
| No PV charging | PV array not connected; low sunlight; PV reverse polarity; PV voltage massa baix/alt. | Check PV connections and polarity. Verify sufficient sunlight. Ensure PV voltage is within controller's operating range. |
| Baix corrent de càrrega | Insufficient PV power; high battery internal resistance; high ambient temperature. | Check PV array for shading or dirt. Inspect battery health. Ensure adequate ventilation around controller. |
| Es mostra el codi d'error | Error específic del sistema (per exemple, sobrevolum)tage, sobretemperatura). | Refer to the full product manual for a list of error codes and their corresponding solutions. Address the underlying issue. |
9. Especificacions
| Paràmetre | Valor |
|---|---|
| Número de model | eTracer6415BND (60A, 12/24/36/48V) |
| Vol. nominal de la bateriatage | 12V/24V/36V/48V DC Auto |
| Corrent de càrrega nominal | 60A |
| Màx. Volum d’entrada PVtage | 150 V |
| Max. Module Power (12V) | 800W |
| Max. Module Power (24V) | 1600W |
| Max. Module Power (36V) | 2400W |
| Max. Module Power (48V) | 3200W |
| Posada a terra | Negatiu |
| Temperatura de funcionament | -25 °C a +55 °C |
| Classe de protecció | IP20 |
| Dimensions del producte | 28.5 x 20.3 x 12.1 cm |
| Pes de l'article | 6.38 quilos |
| Material | Plàstic |
| Tipus de visualització | LCD o LED |
10. Garantia i Suport
10.1 Informació de la garantia
This EPEVER® ET6415BND MPPT Charge Controller comes with a Garantia del fabricant de 2 anys des de la data de compra. Aquesta garantia cobreix els defectes de materials i fabricació en condicions d'ús normal. No cobreix els danys causats per una instal·lació incorrecta, un mal ús, accidents, reparacions no autoritzades o desastres naturals.
10.2 Atenció al client
For technical assistance, warranty claims, or further inquiries, please contact your authorized EPEVER® dealer or visit the official EPEVER® website for support resources. When contacting support, please have your product model number and purchase information ready.