
1. Introducció
This manual provides detailed instructions for the installation, operation, and maintenance of the EPEVER Tracer3210AN MPPT Solar Charge Controller. The Tracer3210AN is designed for solar power systems, featuring Maximum Power Point Tracking (MPPT) technology to maximize energy harvest from solar panels. It supports 12V/24V DC auto-work systems and is compatible with various battery types, including Lead-acid (Sealed, Gel, Flooded) and Lithium-ion (LiFePO4, Li(NiCoMn)O2).
Les característiques clau inclouen:
- Advanced MPPT control algorithm with tracking efficiency ≥99.5%.
- Sistema automàtic voltage recognition (12V/24V).
- Support for multiple battery types: Sealed, Gel (AGM), Flooded, LiFePO4, Li(NiCoMn)O2, and User-defined.
- Disseny comú de connexió a terra negativa.
- Independent voltage regulation constant voltage output function.
- Upgraded ultra-quiet design.
- LCD display for operational status and parameter settings.
- Communication interface (RS485) for external monitoring and parameter adjustment.
2. Instruccions de seguretat
Please read all instructions and warnings in this manual before installation and operation. Failure to follow these instructions may result in electric shock, fire, or severe injury.
- Ensure all wiring is correctly connected and securely fastened.
- Do not disassemble or attempt to repair the controller yourself. Contact qualified personnel for service.
- Install the controller in a well-ventilated area, away from flammable materials and corrosive gases.
- Assegureu-vos que el sistema voltage is compatible with the controller's specifications.
- Connecteu sempre primer la bateria, després el panell solar i finalment la càrrega. Desconnecteu-ho en ordre invers.
- Wear appropriate personal protective equipment, including eye protection, when working with batteries and solar panels.
3. Producte acabatview
The EPEVER Tracer3210AN is a compact and efficient solar charge controller. It features an LCD display for real-time monitoring and two buttons for navigation and settings.

Figura 3.1: Frontal view of the EPEVER Tracer3210AN MPPT Solar Charge Controller, showing the LCD display and control buttons.
The controller's top and bottom panels feature connection terminals and heat dissipation fins.

Figura 3.2: superior i inferior views of the controller, highlighting the terminals and model information.
4. Configuració i instal·lació
Proper installation is critical for the safe and efficient operation of your solar system. Follow the connection order carefully.
4.1 Connexions de cablejat
The Tracer3210AN uses common negative grounding. Ensure all connections are tight to prevent loose contacts and overheating.

Figure 4.1: Connection diagram illustrating the proper sequence for connecting the battery, load, and PV panel to the solar charge controller.
- Connecteu la bateria: Connect the battery to the controller's battery terminals (marked with a battery symbol). Observe polarity.
- Connect the Load: Connect the DC load to the controller's load terminals (marked with a light bulb symbol). Observe polarity.
- Connect the PV Panel: Connect the solar panel array to the controller's PV terminals (marked with a solar panel symbol). Observe polarity.
Important: Disconnect in the reverse order: PV Panel → Load → Battery.
4.2 No-Battery Mode (G3 Version)
The G3 version of the Tracer-AN series supports a "No-Battery Mode," allowing direct connection to an inverter without a battery. This mode is suitable for specific applications where immediate power conversion is required.

Figure 4.2: Illustration of the controller operating in Battery Mode (with battery) and No-Battery Mode (direct to inverter).
Warning for No-Battery Mode:
- For high-frequency inverters: PV input power > (load output power + inverter conversion efficiency + controller conversion efficiency).
- For power frequency inverters: PV input power > (load output power + inverter conversion efficiency + controller conversion efficiency × 2).
5. Funcionament
The controller's LCD display provides real-time system information, and the two buttons (SELECT and ENTER) allow for navigation and parameter adjustment.
Interfície de pantalla LCD 5.1
The LCD cycles through various screens displaying parameters such as PV voltage, bateria voltage, charging current, load current, and energy statistics.

Figura 5.1: Examples of the LCD browse interface screens and the menu for setting battery types.
5.2 Configuració del tipus de bateria
The controller supports various battery types. It is crucial to select the correct battery type for optimal charging and battery longevity. The default setting is "Sealed" lead-acid battery.
Per configurar el tipus de bateria:
- Press the "SELECT" button to navigate through the display interfaces until you reach the battery type setting screen.
- Press the "ENTER" button to enter the setting mode.
- Use the "SELECT" button to cycle through the available battery types (Sealed, Gel, Flooded, LiFePO4, Li(NiCoMn)O2, User).
- Premeu "ENTER" per confirmar la vostra selecció.
For "User" defined battery types, detailed parameters can be set via optional accessories like MT50, WiFi adapter, BLE adapter, or PC software. Refer to the battery manufacturer's specifications for accurate user-defined parameters.

Figure 5.2: Table detailing voltage parameters for various battery types (Sealed, Gel, Flooded, User, LiFePO4, Li(NiCoMn)O2).
6. Manteniment
Un manteniment regular garanteix la longevitat i el rendiment òptim del vostre controlador de càrrega solar.
- Neteja: Mantingueu el controlador net i lliure de pols i brutícia. Feu servir un drap sec per netejar-lo.
- Connexions: Periodically check all wiring connections for tightness. Loose connections can cause overheating and damage.
- Ventilació: Ensure the installation area has adequate ventilation to prevent overheating. Keep the heat sink fins clear of obstructions.
- Condicions ambientals: Verifiqueu que l'entorn operatiu es mantingui dins dels rangs de temperatura i humitat especificats.
7. Solució De Problemes
This section addresses common issues you might encounter with the Tracer3210AN controller.
- Sense pantalla/alimentació:
- Check battery connections and ensure correct polarity.
- Comproveu el volum de la bateriatage is within the controller's operating range (8-32V).
- Sense càrrega:
- Ensure PV panel connections are correct and secure.
- Check PV panel voltage; it must be higher than battery voltage for charging to occur.
- Verify solar panel output under current light conditions.
- La càrrega no funciona:
- Check load connections and ensure correct polarity.
- Verify load current does not exceed the controller's rated load current.
- Comproveu el volum de la bateriatage; if it's too low, the load output may be disconnected to protect the battery.
- Configuració incorrecta del tipus de bateria:
- Ensure the selected battery type matches your installed battery. Incorrect settings can lead to improper charging and reduced battery life. Refer to Section 5.2 for instructions on setting battery type.
For persistent issues, refer to the detailed troubleshooting guide in the full product manual or contact technical support.
8. Especificacions
Detailed technical specifications for the EPEVER Tracer3210AN MPPT Solar Charge Controller.

Figure 8.1: Electrical parameters for Tracer 1210AN G3, 2210AN G3, 3210AN G3, and 4210AN G3 models.
| Paràmetre | Valor |
|---|---|
| Model | Tracer3210AN (G3) |
| Corrent nominal de càrrega/descàrrega | 30 Amp |
| Sistema nominal Voltage | 12V/24V DC Auto Work |
| Màx. Potència d'entrada fotovoltaica | 390W (12V system) / 780W (24V system) |
| Màx. Circuit obert PV Voltage | 100V (at min. operating temp) / 92V (at 25°C) |
| Voltage Rang | 8V ~ 32V |
| MPP Voltage Rang | V(BAT+2V) ~ 72V |
| Posada a terra | Negatiu comú |
| Eficiència de seguiment | ≥99.5% |
| Màx. Eficiència de conversió | 98% |
| Temperatura de l'entorn de treball | -25 °C ~ +50 °C (-13 °F ~ 122 °F) |
| Temperatura d'emmagatzematge | -20 °C ~ +70 °C (-4 °F ~ 158 °F) |
| Temps de retroil·luminació LCD | 60S (per defecte) |
| Terminals del controlador | #6 AWG (16mm²) |
| Recommended Wire Cable | #8 AWG (10mm²) |
| Dimensions (L×W×H) | 228 × 164 × 55 mm (8.98 × 6.46 × 2.17 polzades) |
| Pes | 1.26 kg (2.77 lliures) |
| Tancament | IP30 |

Figure 8.2: Product packaging with dimensions for the Tracer 3210AN.
9. Accessoris opcionals
The Tracer3210AN controller can be enhanced with various optional accessories for remote monitoring and advanced parameter configuration.
- Remote Meter (MT50/MT52): Provides a remote display for monitoring system status and modifying parameters.
- WiFi Adapter (EPEVER-WiFi-2.4G-RJ45-D): Enables wireless monitoring and control via a mobile application.
- Bluetooth Adapter (EPEVER-BLE-RJ45-D): Allows Bluetooth connectivity for monitoring and control via a mobile application.
- eLOG01: Data logger for recording system performance.
- USB-RS485 Cable: For connecting the controller to a PC for monitoring and advanced settings using PC software.
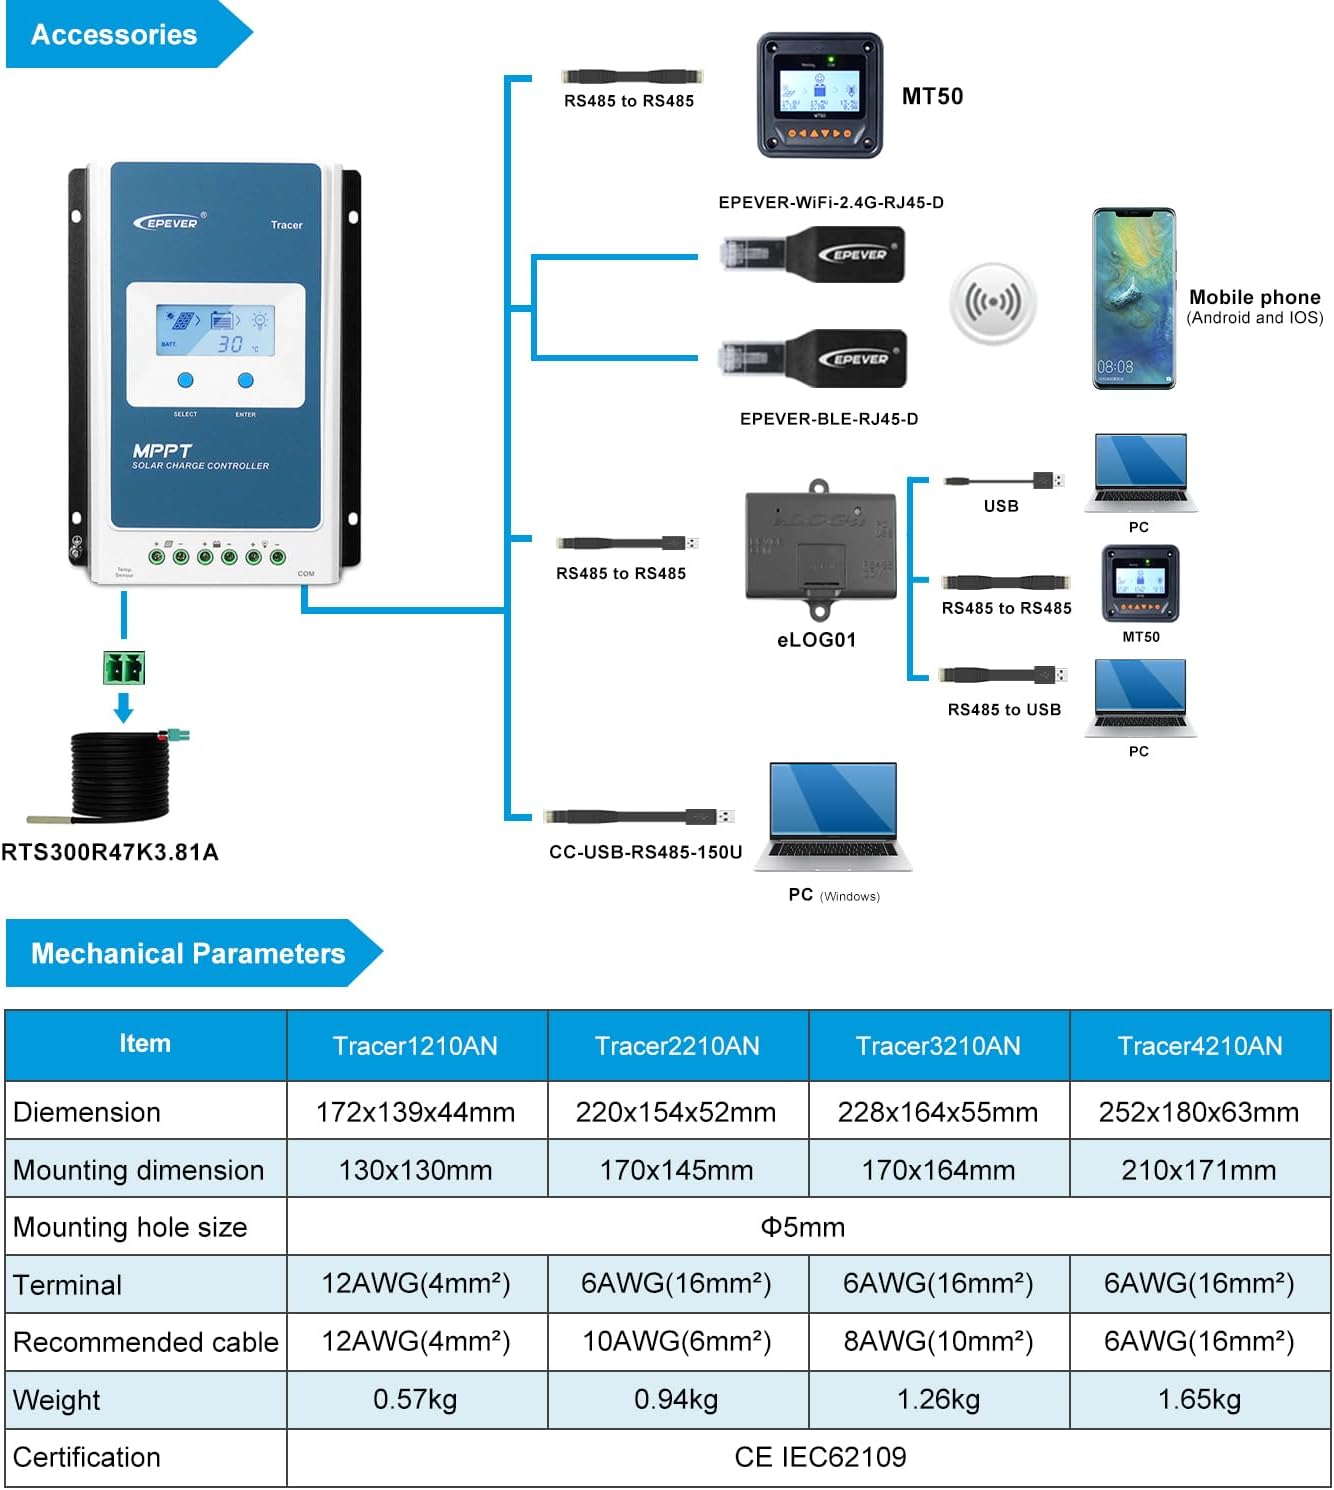
Figura 9.1: Mésview of the controller and compatible accessories, including MT50, WiFi, Bluetooth, and PC connection options.

Figure 9.2: Illustration of real-time remote monitoring capabilities using a mobile app via WiFi and a PC cloud platform.
10. Garantia i Suport
EPEVER products are distributed by authorized sellers. GolandCentury is an official authorized sales agent for the EPEVER brand.
- Suport tècnic: GolandCentury provides free technical support. They have service centers in Chicago (USA), Munich (Germany), Toronto (Canada), and Melbourne (Australia).
- Product Authenticity: Ensure you purchase from authorized distributors to receive genuine products and valid support.
For specific warranty terms and conditions, please refer to the warranty card included with your product or contact your authorized dealer.