
1. Introducció
This manual provides comprehensive instructions for the installation, operation, and maintenance of your StarTech.com 4-Port Dual DisplayPort KVM Switch (SV431DPDDUA2). This device allows you to control up to four computers, each with dual DisplayPort outputs, from a single console consisting of two DisplayPort monitors, a USB keyboard, a USB mouse, and audio peripherals. It supports resolutions up to 4K at 60Hz, making it suitable for demanding multimedia and professional applications.
2. Què hi ha a la caixa
- 1x SV431DPDDUA2 KVM Switch
- 1x Universal Power Adapter (NA/JP, EU, UK, ANZ)
- 1x Guia d’inici ràpid
- 4x peus de goma

3. Característiques del producte
- Suport de monitor dual: Connects two DisplayPort monitors to a single console.
- High Resolutions: Supports dual 4K (3840x2160) resolution at 60Hz.
- 4-Port KVM: Control up to four computers from one workstation.
- Compartició perifèrica: Features separate 3.5 mm microphone and speaker ports, and two USB ports for sharing peripherals independently of the keyboard and mouse.
- Funcionalitat versàtil: Ideal for graphic design, video editing, CAD drawing, and other high-bandwidth applications.
- TAA Compliant: Meets Trade Agreements Act requirements.
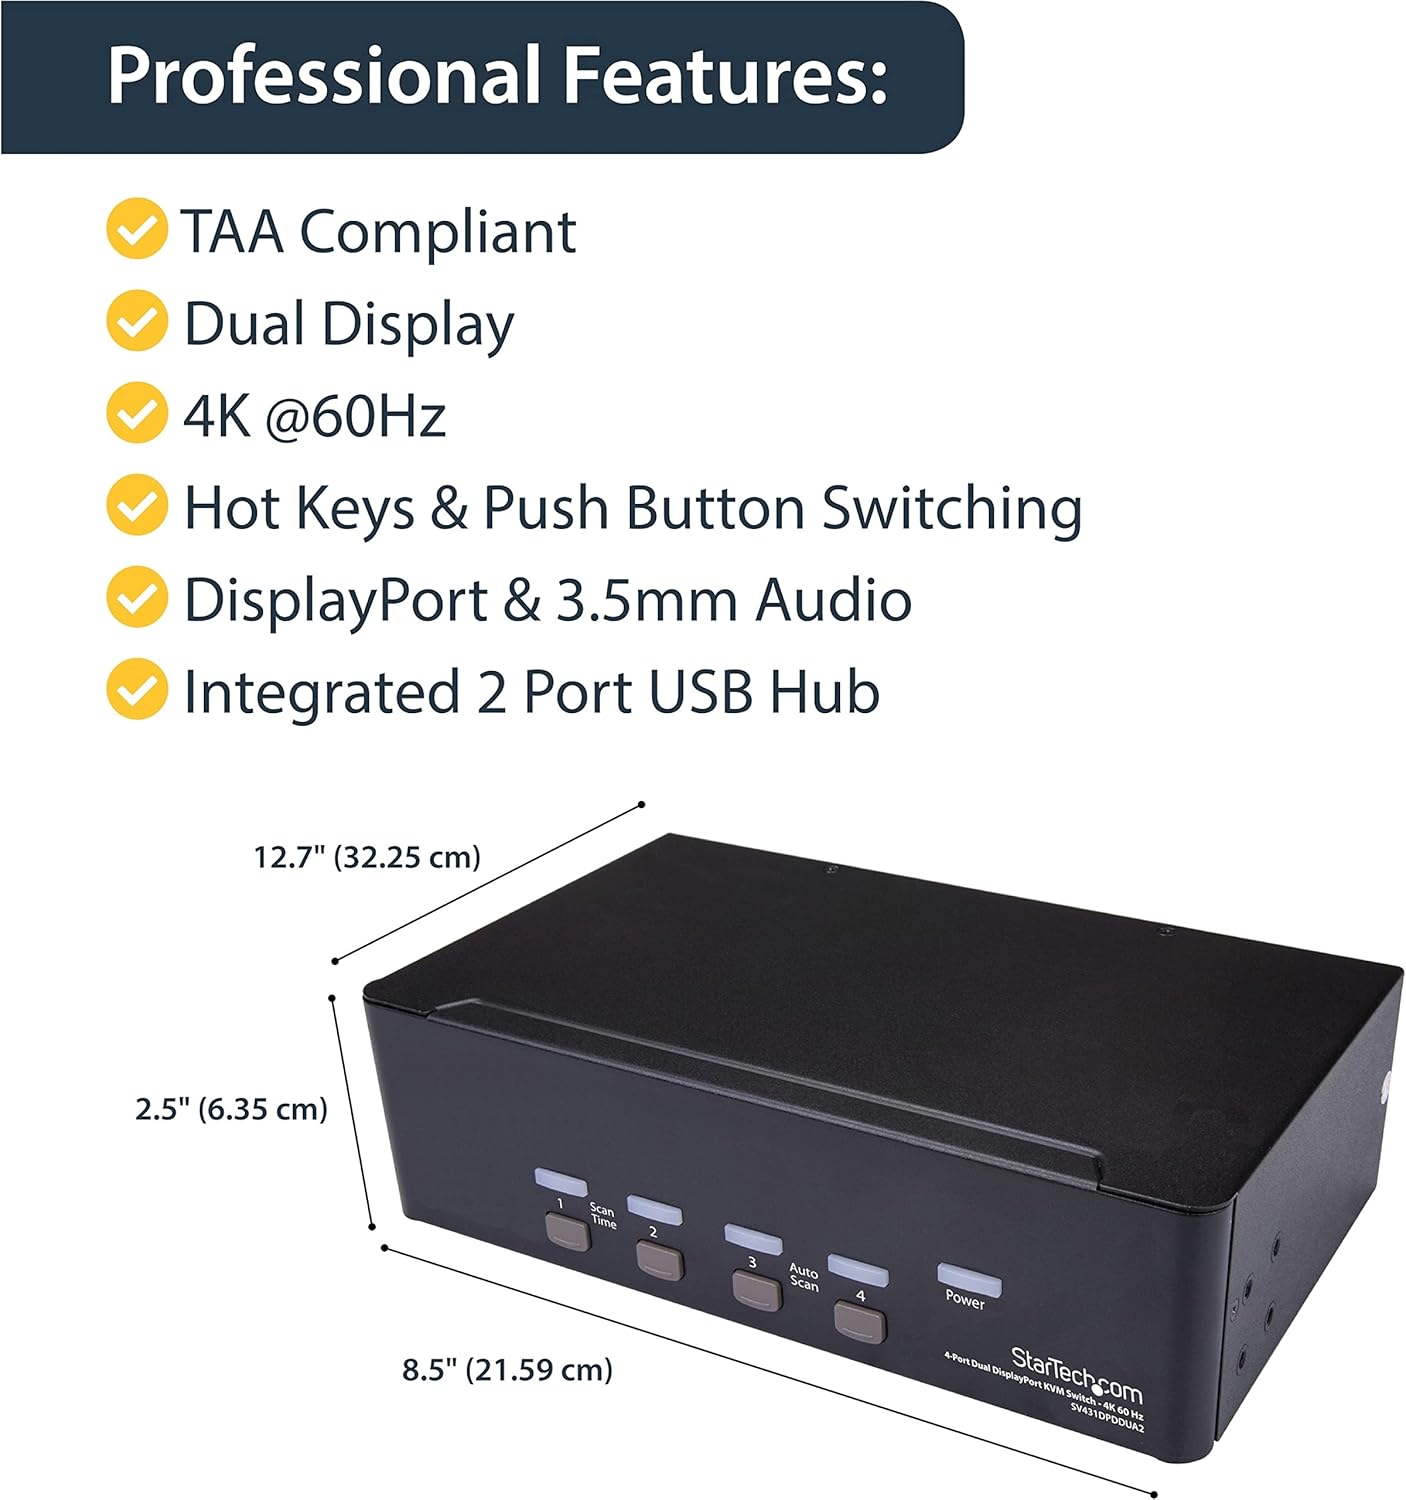
4. Producte acabatview
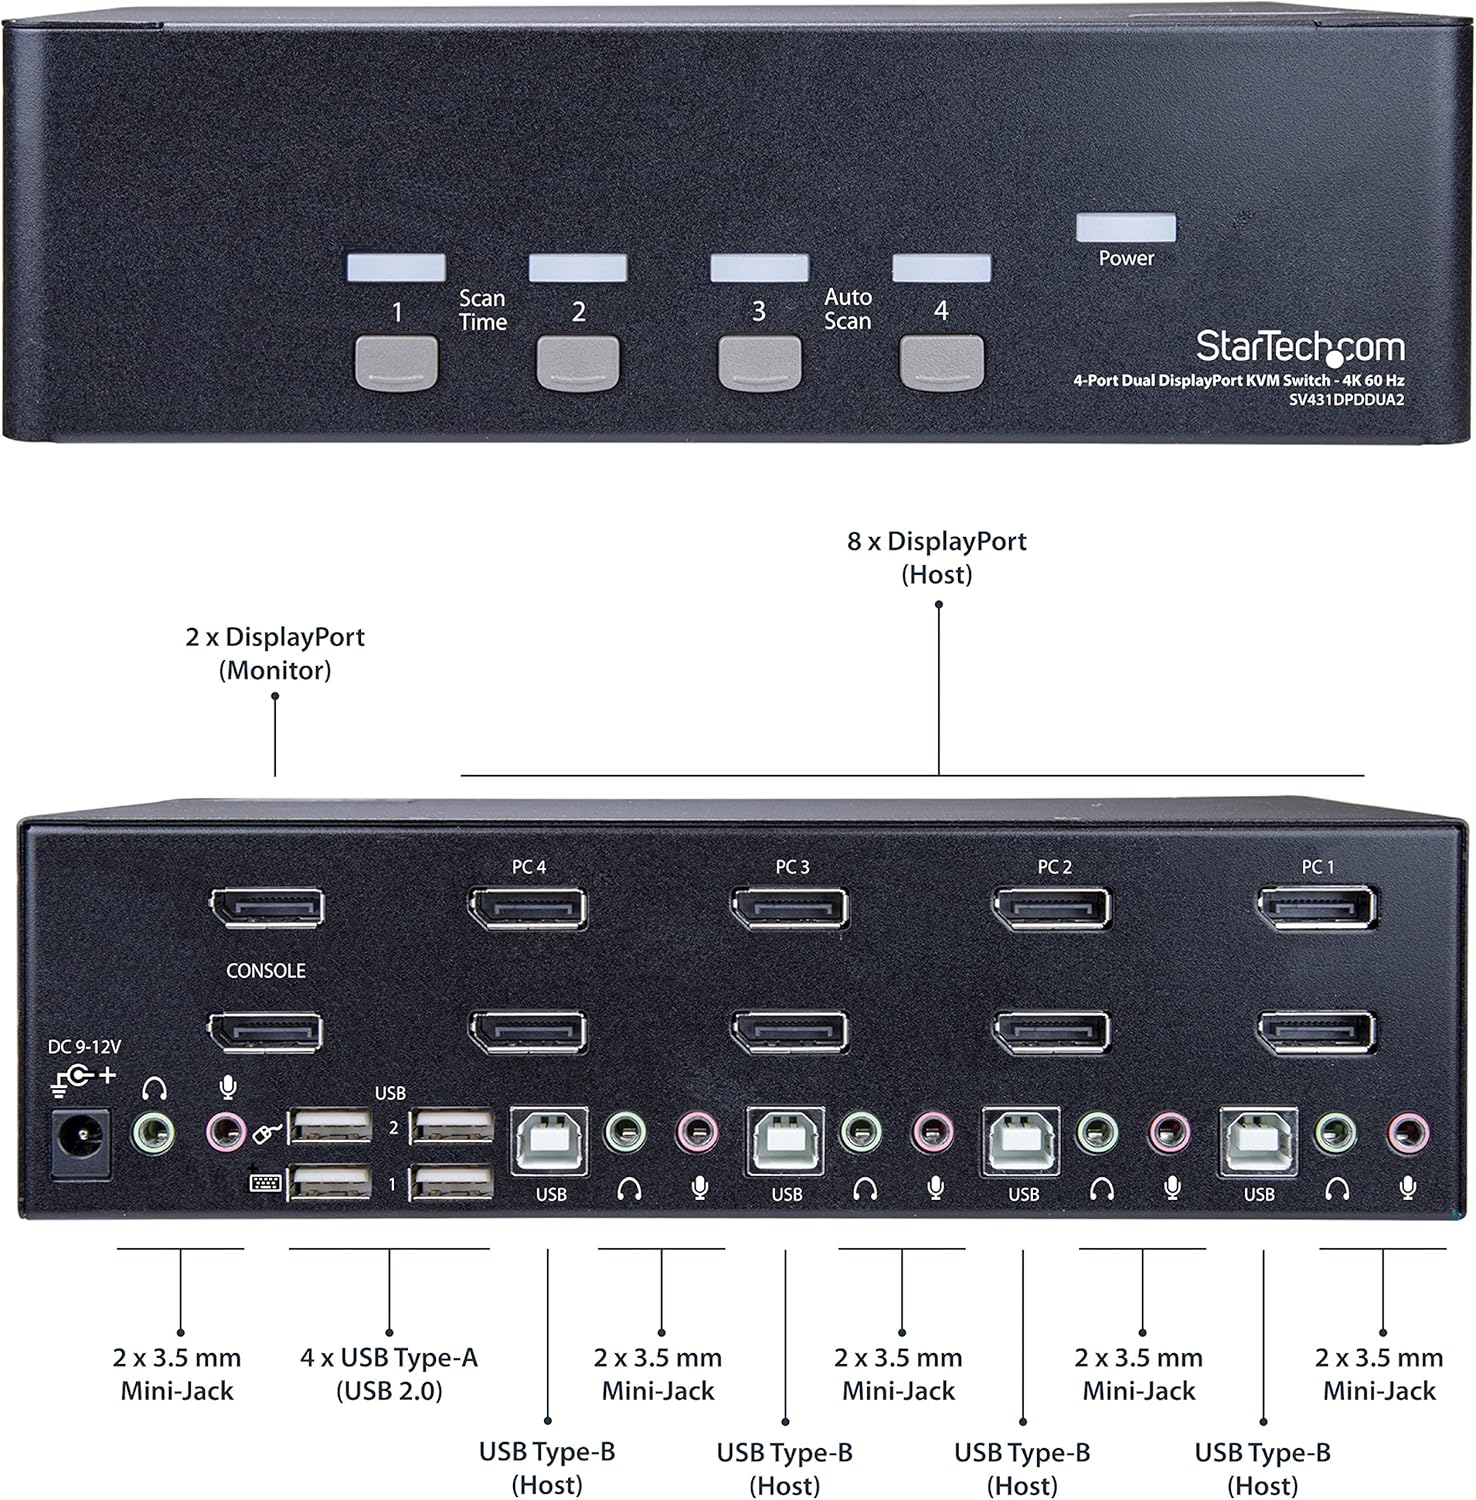
4.1 Tauler frontal

The front panel features four push buttons (1, 2, 3, 4) for direct port selection. Each button has an associated LED indicator. Additional buttons for 'Scan Time' and 'Auto Scan' are present, along with a 'Power' indicator LED.
4.2 Panell posterior

El panell posterior proporciona tots els ports de connexió necessaris:
- DC 9-12V Power Input: For connecting the universal power adapter.
- Ports de consola: Two DisplayPort outputs for connecting your primary and secondary monitors.
- USB Ports (Console): Two dedicated USB-A ports for keyboard and mouse, and two additional USB-A ports for other peripherals.
- Audio Jacks (Console): 3.5mm jacks for microphone and speakers.
- PC Input Ports (1-4): Each PC input includes two DisplayPort inputs, one USB-B input, and 3.5mm audio jacks for microphone and speakers.
5. Configuració
Segueix aquests passos per configurar el commutador KVM:
- Apaga tots els dispositius: Ensure all computers, monitors, and the KVM switch are powered off before making any connections.
- Connectar monitors: Connect your two DisplayPort monitors to the 'CONSOLE' DisplayPort output ports on the rear of the KVM switch.
- Connecteu els perifèrics de la consola: Connect your USB keyboard and mouse to the dedicated USB-A ports on the rear panel. Connect your microphone and speakers to the respective 3.5mm audio jacks in the 'CONSOLE' section.
- Connectar ordinadors: For each computer (up to four), connect:
- Two DisplayPort cables from the computer's video outputs to the corresponding 'PC' DisplayPort inputs on the KVM switch.
- One USB-B cable from a USB-A port on the computer to the corresponding USB-B input for that PC on the KVM switch.
- 3.5mm audio cables from the computer's audio output/input to the corresponding audio jacks for that PC on the KVM switch (optional).
- Connectar l'alimentació: Connect the universal power adapter to the 'DC 9-12V' input on the KVM switch, then plug it into a power outlet.
- Encès: Power on the KVM switch, then power on your monitors, and finally power on your connected computers.


6. Instruccions de funcionament
6.1 Canviar entre ordinadors
You can switch between connected computers using two methods:
- Botons del tauler frontal: Press the corresponding numbered button (1, 2, 3, or 4) on the front panel of the KVM switch to select the desired computer.
- Tecles d'accés directe: Use keyboard hotkey commands. The default hotkey sequence is to press the Bloqueig de desplaçament key twice, followed by the port number (1, 2, 3, or 4). For example, to switch to PC 2, press Bloqueig de desplaçament, Bloqueig de desplaçament, 2.
6.2 Auto Scan Function
The 'Auto Scan' feature allows the KVM switch to automatically cycle through all connected computers, displaying each for a set duration. To activate or adjust this feature, refer to the detailed instructions in the included Quick Start Guide or the full product manual available on the StarTech.com weblloc.
7. Manteniment
To ensure optimal performance and longevity of your KVM switch:
- Neteja: Feu servir un drap suau i sec per netejar l'exterior del dispositiu. Eviteu netejadors líquids o dissolvents.
- Ventilació: Assegureu-vos que el commutador KVM estigui col·locat en una zona ben ventilada per evitar el sobreescalfament. No bloquegeu cap obertura de ventilació.
- Condicions ambientals: Operate the device within the specified temperature range (0°C to 45°C) and humidity levels.
- Gestió de cables: Keep cables organized and avoid excessive bending or tension to prevent damage to connectors and ports.
8. Solució De Problemes
If you encounter issues with your KVM switch, refer to the following common solutions:
- No Display on Monitor(s):
- Verify all DisplayPort cables are securely connected between the computers, KVM, and monitors.
- Ensure the KVM switch is powered on and the correct input port is selected.
- Test monitors by connecting them directly to a computer to rule out monitor or cable issues.
- If a monitor does not wake from sleep, try switching to another port and then back, or power cycling the monitor.
- El teclat/ratolí no respon:
- Ensure the USB keyboard and mouse are connected to the dedicated console USB ports.
- Verify the USB-B cables are securely connected from each computer to the KVM switch.
- Prova de connectar el teclat/ratolí directament a l'ordinador per confirmar-ne la funcionalitat.
- Some specialized keyboards/mice with integrated hubs or unique drivers may require connection to the shared USB ports or direct connection to the computer.
- Sense àudio o mala qualitat d'àudio:
- Check all 3.5mm audio cables for secure connections.
- Ensure audio settings on the connected computers are correctly configured for the KVM's audio output/input.
- Test audio devices by connecting them directly to a computer.
- Switching Delays or Inconsistencies:
- Ensure high-quality DisplayPort and USB cables are used. Cable quality can impact performance, especially with 4K resolutions.
- If experiencing occasional failures to switch, try pressing input buttons 1 and 3 simultaneously to reset the KVM, then select the desired port.
9. Especificacions
| Característica | Especificació |
|---|---|
| Model | SV431DPDDUA2 |
| Nombre de Ports | 4 |
| Interfície de vídeo | DisplayPort 1.2 |
| Resolució màxima | 4K (3840x2160) a 60 Hz |
| Interfície USB | USB 2.0 (Dedicated for HID), USB 2.0 (Shared) |
| Interfície d'àudio | 3.5mm Mini-Jack (Microphone, Speaker) |
| Mètode de control | Push Button, Hotkeys |
| Material | Acer |
| Dimensions de l'article (L x A x A) | 8.5 x 5 x 2.5 polzades (21.59 x 12.7 x 6.35 cm) |
| Pes de l'article | 2.64 lliures (1.2 kg) |
| Consum d'energia | 18 watts |
| Temperatura de funcionament | De 0 °C a 45 °C (32 °F a 113 °F) |
| Certificacions | RoHS, RAEE |
10. Garantia i Suport
This StarTech.com product is backed by a 2 anys de garantia. For the most current warranty information and technical support, please visit the official StarTech.com website or contact their customer service department. Support resources typically include online FAQs, driver downloads, and direct contact options via phone or live chat.