
1. Introducció
This manual provides instructions for the Night Owl WM-861P-3MP 8 Channel 3MP Extreme HD Video Security DVR system. This system includes a Digital Video Recorder (DVR) with a 1 TB Hard Disk Drive (HDD) and six 3MP wired infrared cameras. The cameras feature Dual Sensor Technology, combining passive infrared and motion sensors for accurate detection of humans, animals, and vehicles. L2 Color Boost Technology enables full-color video recording in low-light conditions, switching to night vision only when necessary. The cameras are weather-resistant for both indoor and outdoor use.
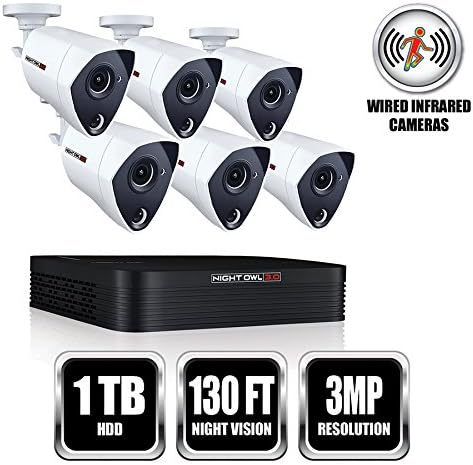
Image 1.1: Night Owl WM-861P-3MP DVR system with six cameras. Icons indicate 1TB HDD, 130 ft night vision, 3MP resolution, and wired infrared cameras.
2. Què s'inclou
Verifiqueu que tots els components que s'enumeren a continuació siguin presents al vostre paquet:
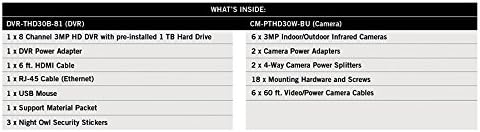
Image 2.1: Detailed list of included items for the DVR and cameras.
- 1 x 8 Channel 3MP HD DVR with pre-installed 1 TB Hard Drive
- 1 x DVR Power Adapter
- 1 x 6 ft. HDMI Cable
- 1 x RJ-45 Cable (Ethernet)
- 1 x ratolí USB
- 1 x Support Material Packet
- 3 x Night Owl Security Stickers
- 6 x 3MP Indoor/Outdoor Infrared Cameras
- 2 x Camera Power Adapters
- 2 x 4-Way Camera Power Splitters
- 18 x Mounting Hardware and Screws
- 6 x 60 ft. Video/Power Camera Cables
3. Característiques del producte
- Extreme 3MP Resolution: Provides 50% more pixels than standard 1080p for enhanced video clarity.
- Dual Sensor Technology: Cameras utilize both passive infrared (PIR) and motion sensors to detect humans, animals, and vehicles, reducing false alerts.
- L2 Color Boost Technology: Records in full color in low-light conditions, switching to night vision only when necessary.
- Weather-Resistant Cameras: Designed for reliable operation in both indoor and outdoor environments.
- Disc dur d'1 TB: Pre-installed for local video storage.
- Wired Infrared Cameras: Ensures a stable and secure connection for video transmission.
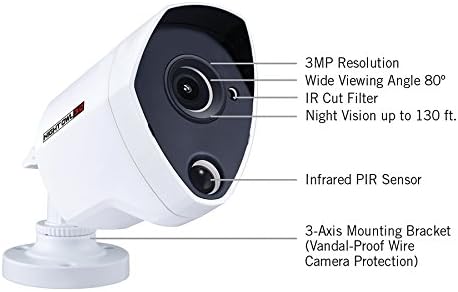
Imatge 3.1: Primer pla view of a 3MP camera, highlighting features like 3MP resolution, wide viewing angle, IR cut filter, night vision, infrared PIR sensor, and 3-axis mounting bracket.
4. Guia de configuració
4.1 DVR Connection
- Connecta el monitor: Use the provided HDMI cable to connect the DVR to a TV or monitor. Alternatively, use a VGA cable (not included) for VGA output.
- Connecta el ratolí: Connecteu el ratolí USB a un dels ports USB del DVR.
- Connecta la xarxa (opcional): Per a comandament a distància viewing, connect an Ethernet cable from the DVR's LAN port to your router.
- Connectar l'alimentació: Plug the DVR power adapter into the DVR's power input and then into an electrical outlet. The DVR will power on automatically.

Imatge 4.1: posterior view of the DVR, illustrating connection points for video input, HDMI, VGA, audio, LAN, USB, and power.
4.2 Instal·lació de la càmera
- Muntar càmeres: Select desired locations for your cameras. Use the included mounting hardware and screws to securely attach the cameras. Ensure the cameras are positioned to cover the desired surveillance areas.
- Executar cables: Connect one end of the 60 ft. video/power camera cable to the camera and the other end to a video input (BNC) on the DVR.
- Power Cameras: Use the camera power adapters and 4-way power splitters to provide power to the cameras. Connect the power splitter to the camera power input and then to an electrical outlet.
- Ajust de l'angle de la càmera: Loosen the 3-axis mounting bracket to adjust the camera's viewing angle, then tighten to secure.
5. Instruccions de funcionament
5.1 Assistent de configuració inicial
Upon first power-on, the DVR will guide you through an initial setup wizard. Follow the on-screen prompts to configure language, date/time, network settings, and create a password for the system.
5.2 Viu View
Després de la configuració, el DVR mostrarà la imatge en directe view from all connected cameras. Use the USB mouse to navigate the on-screen menu. Right-click to access the main menu options.
5.3 Modes d'enregistrament
The DVR supports various recording modes:
- Gravació contínua: Registres 24/7.
- Gravació de detecció de moviment: Records only when motion or PIR detection is triggered.
- Enregistrament programat: Records during specific times.
Configure recording settings through the DVR's main menu under 'Record' or 'Schedule'.
5.4 Reproducció
Per tornarview foo gravattage, access the 'Playback' option from the main menu. Select the desired date, time, and camera channel to view enregistraments.
5.5 Accés remot
Per a comandament a distància viewing on a smartphone or tablet, download the Night Owl Protect App. Ensure the DVR is connected to your network and follow the app's instructions to add your device.
6. Manteniment
- Neteja: Netegeu regularment les lents de la càmera amb un drap suau i sec.amp cloth to ensure clear image quality. Keep the DVR free from dust by wiping its exterior.
- Actualitzacions de firmware: Periodically check the Night Owl website for firmware updates for your DVR. Updates can improve performance and add new features.
- Gestió del disc dur: The DVR will automatically overwrite older footage when the hard drive is full. Back up important recordings regularly to an external USB drive if needed.
- Inspecció del cable: Periodically inspect all cables for wear or damage, especially those exposed to outdoor elements.
7. Solució De Problemes
- Sense visualització de vídeo: Ensure the monitor is correctly connected to the DVR via HDMI or VGA and is set to the correct input source. Check that the DVR is powered on.
- Sense imatge de càmera: Verify that the camera's video/power cable is securely connected to both the camera and the DVR. Ensure the camera is receiving power.
- Sense gravació: Check recording schedules and motion detection settings. Ensure the hard drive is functioning correctly and has available space.
- Problemes d'accés remot: Confirm the DVR is connected to the internet via an Ethernet cable. Verify network settings and ensure the Night Owl Protect App is correctly configured.
- Alertes de moviment falses: Adjust the sensitivity settings for motion detection in the DVR menu. Ensure cameras are not pointed at moving objects like trees or busy roads if not desired.
8. Especificacions

Image 8.1: Detailed specifications for the DVR and cameras.
| Característica | Detall |
|---|---|
| Número de model | WM-861P-3MP |
| Nombre de canals | 8 |
| Entrada de vídeo | BNC |
| Sortida de vídeo | 1 x HDMI, 1 x VGA |
| Entrada/sortida d'àudio | RCA |
| Resolució de gravació | 3MP, 1080p |
| Modes d'enregistrament | Motion, Continuous, Schedule |
| Compressió de vídeo | H.264 / H.264 + |
| Disc dur | 1 TB (preinstal·lat) |
| Font d'alimentació | Corded Electric (DC 12V / 1.5A) |
| Temperatura de funcionament | De 14 °F a 131 °F (-10 °C a 55 °C) |
| Dimensions (L x A x A) | 7.9" x 7.9" x 1.8" |
| Pes | Aprox. 2.1 lliures |
| Característica | Detall |
|---|---|
| Senyal | TVI |
| Resolució | 3MP - 2048 x 1536 |
| Lent / Viewangle ing | 3.6 mm / 80° |
| Night Vision Length | Fins a 130 peus. |
| Weather Resistant Rating | IP-66 |
| Font d'alimentació | DC 12V / 2A |
| Temperatures de funcionament | -4 °F a 122 °F (-20 °C a 50 °C) |
| Pes | Aprox. 0.65 lliures |
| Dimensions (L x A x A) | 2.7" x 2.7" x 7.2" |
| Longitud del cable de la càmera | 60 ft. per camera |
| Max Run Length of Cable | 240 ft. (loss less) |
| Video Connection Type | BNC |
| Classificació UL | CL2 |
9. Informació de seguretat
ATTN CA RESIDENTS: WARNING: This product can expose you to Polybrominated biphenyls, which is known to the State of California to cause Cancer and birth defects or other reproductive harm. For more information go to www.p65warnings.ca.gov
10. Garantia i Suport
For warranty information, technical support, or further assistance, please refer to the support materials included with your product or visit the official Night Owl website. Contacting customer service directly can provide specific guidance for your system.