Introducció
Gràcies per la compraasing the Nedis CLAR005BK Digital LED Projection Alarm Clock Radio. This manual provides detailed instructions for the safe and efficient use of your new device. Please read this manual thoroughly before use and keep it for future reference.
Instruccions de seguretat
- Llegiu atentament totes les instruccions abans d'utilitzar el dispositiu.
- No exposeu el dispositiu a degoteigs o esquitxades d'aigua.
- No col·loqueu objectes plens de líquids, com ara gerros, al dispositiu.
- Assegureu-vos que hi hagi una ventilació adequada. No bloquegeu cap obertura de ventilació.
- Col·loqueu el dispositiu sobre una superfície plana i estable.
- Utilitzeu només l'adaptador d'alimentació subministrat amb el dispositiu.
- No intenteu reparar ni modificar el dispositiu vosaltres mateixos. Envieu totes les tasques de manteniment a personal qualificat.
- Mantingueu el dispositiu allunyat de la llum solar directa, de fonts de calor i de camps magnètics forts.
Contingut del paquet
Si us plau, comproveu el contingut del paquet per assegurar-vos que tots els articles hi són i estan en bon estat:
- Nedis CLAR005BK Projection Alarm Clock Radio
- Power Adapter (if included, otherwise integrated cable)
- Manual d'usuari (aquest document)
Producte acabatview
Familiarize yourself with the various parts and controls of your alarm clock radio.

Figura 1: Frontal View. This image displays the front of the alarm clock radio, featuring a prominent red LED display showing "8:00". The "Nedis" brand logo is visible above the display, and text "ALARM CLOCK RADIO / TIME PROJECTION" is below. Buttons are visible on the top surface.

Figure 2: Top Controls. This image shows the top panel of the alarm clock radio, highlighting the various control buttons for setting time, alarms, radio functions, and snooze.
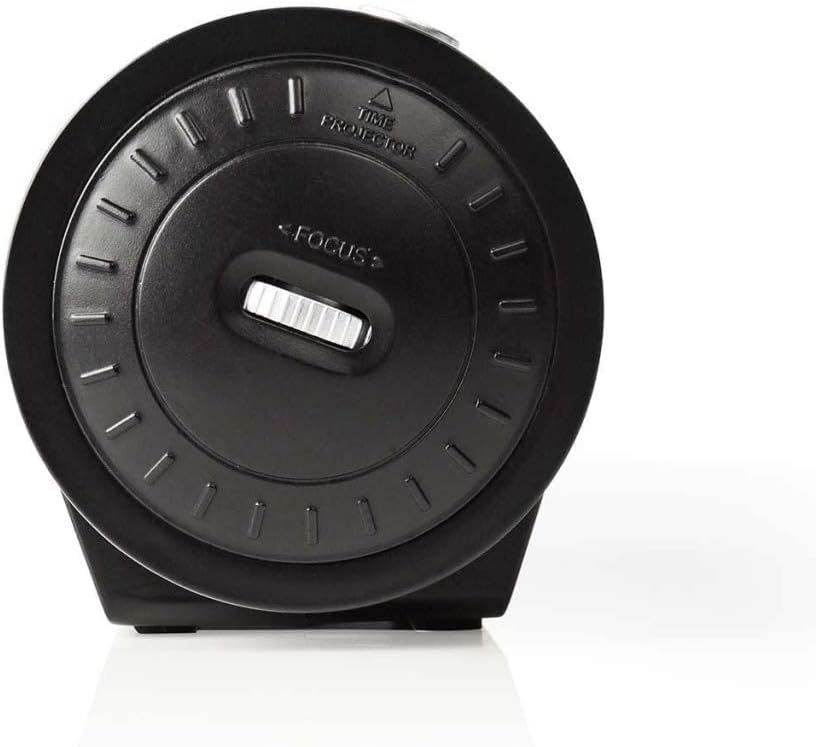
Figure 3: Projector Side. This image focuses on the side of the alarm clock radio where the time projector lens is located. A "FOCUS" wheel is clearly visible for adjusting the clarity of the projected time, along with an indicator for "TIME PROJECTOR".
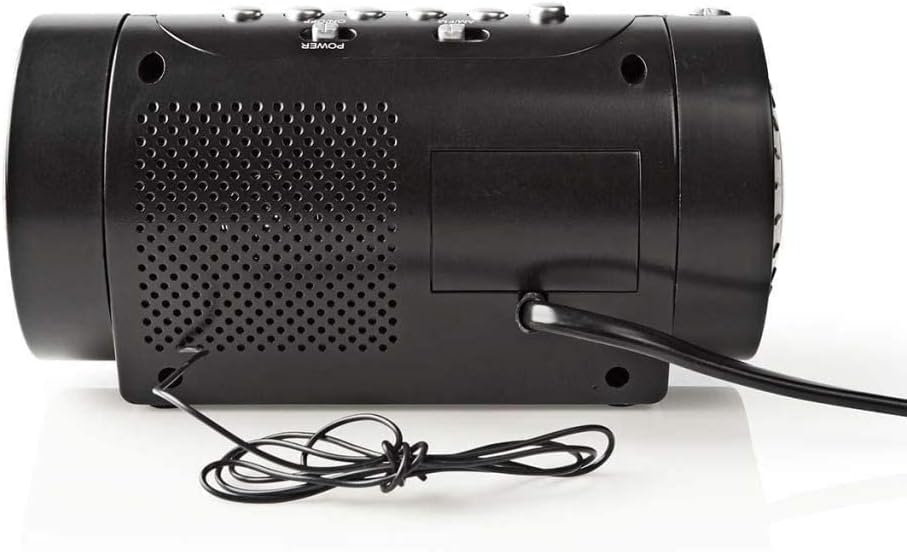
Figura 4: Panell posterior. This image shows the back of the alarm clock radio, featuring the integrated power cable, a speaker grille for audio output, and a battery compartment cover (if applicable).
Control Buttons (Refer to Figure 2)
- HORA ESTABLECIDA: Press to enter time setting mode.
- HORA / MIN: Use to adjust hour and minute during time/alarm setting.
- ALARMA 1 / ALARMA 2: Press to set Alarm 1 or Alarm 2.
- SNOOZE / SLEEP / DIMMER: Press to activate snooze, set sleep timer, or adjust display brightness.
- RADIO ON/OFF / BAND: Power on/off the radio or switch between AM/FM bands.
- TUNE +/-: Adjust radio frequency.
- VOLUM +/-: Adjust radio volume.
- PROJECTION ON/OFF: Turn the time projection on or off.
- PROJECTION ROTATION: Rotate the projected time display.
- FOCUS (Figure 3): Adjust the clarity of the projected time.
Configuració
1. Connexió d'alimentació
- Uncoil the power cable from the rear of the unit (Figure 4).
- Plug the power cable into a standard wall outlet. The LED display will light up.
- (Optional) For battery backup, open the battery compartment (usually at the bottom or rear) and insert 2x AAA batteries (not included). This will preserve time settings during a power outage.
2. Configuració de l'hora
- Manteniu premut el botó HORA CONFIGURADA button until the hour digits start flashing.
- Utilitza el HORA button to adjust the hour. Pay attention to AM/PM indicators if present.
- Premeu el botó HORA CONFIGURADA button again, and the minute digits will flash.
- Utilitza el MIN per ajustar els minuts.
- Premeu HORA CONFIGURADA una vegada més per confirmar i sortir del mode de configuració de l'hora.
3. Adjusting the Projection
- Locate the projector lens on the side of the unit (Figure 3).
- Premeu el botó PROJECCIÓ ON/OFF button to activate the time projection.
- Gira el ROTACIÓ DE PROJECCIÓ button/dial to adjust the angle of the projected time on your wall or ceiling.
- Gireu el ENFOCAR wheel (Figure 3) until the projected time is clear and sharp.
En funcionament
1. Operació de ràdio
- Premeu el botó RÀDIO ON/OFF botó per encendre la ràdio.
- Premeu el botó BANDA button (often the same as RADIO ON/OFF) to switch between AM and FM bands.
- Utilitza el TUNE +/- buttons to manually tune to your desired station.
- Ajusteu el volum amb el botó VOLUM +/- botons.
- To save a preset station: Tune to the desired station, then press and hold a preset button (if available, usually numbered 1-10 or M1-M5) until you hear a confirmation beep.
- To recall a preset station: Briefly press the corresponding preset button.
- Per apagar la ràdio, premeu el botó RÀDIO ON/OFF botó de nou.
2. Configuració d'alarma
This device features two independent alarms (Alarm 1 and Alarm 2).
- Configuració de l'hora de l'alarma:
- Manteniu premut el botó ALARMA 1 or ALARMA 2 fins que els dígits de l'hora de l'alarma parpellegin.
- Utilitza el HORA per configurar l'hora d'alarma desitjada.
- Premeu el botó ALARMA 1 or ALARMA 2 button again, and the minute digits will flash.
- Utilitza el MIN per configurar els minuts d'alarma desitjats.
- Premeu el botó ALARMA 1 or ALARMA 2 button once more to confirm the alarm time.
- Selecting Alarm Source (Buzzer/Radio):
- Després de configurar l'hora de l'alarma, premeu el botó ALARMA 1 or ALARMA 2 button repeatedly to cycle through alarm modes: Buzzer, Radio, or Off. An indicator icon will show the selected mode.
- Funció de posposar: Quan soni l'alarma, premeu el botó DORMITAR per silenciar temporalment l'alarma durant aproximadament 9 minuts. L'alarma tornarà a sonar després d'aquest període.
- Aturar l'alarma: To turn off the alarm for the day, press any button other than SNOOZE. The alarm will reset for the next day.
- Disabling Alarm Permanently: Cycle through the alarm source options until "OFF" or no alarm icon is displayed.
3. Temporitzador de son
El temporitzador de son permet que la ràdio funcioni durant un temps determinat abans d'apagar-se automàticament.
- Mentre sona la ràdio, premeu el botó DORMIR button (often combined with SNOOZE/DIMMER) repeatedly to cycle through sleep timer options (e.g., 90, 60, 30, 15 minutes, OFF).
- La ràdio s'apagarà automàticament després del temps seleccionat.
4. Regulador d'intensitat de la pantalla
Adjust the brightness of the LED display.
- Premeu el botó DIMMER button (often combined with SNOOZE/SLEEP) repeatedly to cycle through different brightness levels (e.g., High, Medium, Low, Off).
Manteniment
Neteja
- Desendolleu sempre el dispositiu de la presa de corrent abans de netejar-lo.
- Feu servir un drap suau i sec per netejar les superfícies exteriors.
- No utilitzeu netejadors abrasius, ceres o dissolvents, ja que poden danyar l'acabat.
- For the projector lens, use a soft, lint-free cloth specifically designed for optics.
Battery Replacement (for backup)
- If the time display is incorrect after a power outage., pot ser que calgui substituir les bateries de reserva.
- Open the battery compartment cover (refer to Figure 4 for general location).
- Traieu les piles velles i llenceu-les correctament d'acord amb la normativa local.
- Insert new 2x AAA batteries, ensuring correct polarity (+/-).
- Tanqueu la tapa del compartiment de la bateria.
Resolució de problemes
| Problema | Causa possible | Solució |
|---|---|---|
| Sense engegada/Pantalla apagada | Cable d'alimentació no connectat; alimentació no connectadatage. | Ensure power cable is securely plugged into a working outlet. Check household circuit breaker. |
| Projected time is blurry | Enfocament no ajustat. | Ajusteu el ENFOCAR wheel on the projector side until the image is clear. |
| Projected time is upside down or sideways | Projection rotation needs adjustment. | Utilitza el ROTACIÓ DE PROJECCIÓ button/dial to orient the time correctly. |
| L'alarma no sona | Alarm not set; Alarm volume too low; Alarm mode set to OFF. | Verify alarm time and ensure alarm is activated (Buzzer or Radio mode). Increase radio volume if alarm source is radio. |
| Mala recepció de ràdio | Antena no estesa/col·locada correctament; Interferències. | Extend the wire antenna fully and reposition it for better reception. Move the unit away from other electronic devices. |
Especificacions
- Marca: NEDIS
- Model: CLAR005BK
- Color: Negre
- Tipus de visualització: LED digital
- Característiques especials: Alarm, Snooze, Time Projection
- Font d'alimentació: Electric (AC), Battery Backup (2x AAA, not included)
- Connectivitat: Jack 3,5 mm (likely for antenna or headphone output)
- Pes: 364.9 grams
- Material: Plàstic
- Ús: Interior
- Número de peça del fabricant: CLAR005BK
- GTIN: 05412810274116
Garantia
This product is covered by a manufacturer's warranty. Please refer to the warranty card included in your package or contact your retailer for specific terms and conditions. Keep your proof of purchase for warranty claims.
Suport
For technical support, troubleshooting assistance, or to inquire about spare parts, please contact Nedis customer service. Contact details can typically be found on the Nedis weblloc web o a l'embalatge del producte.
També podeu visitar el Nedis Store on Amazon per obtenir més informació sobre el producte.