
Introducció
This manual provides detailed instructions for the installation, operation, and maintenance of your Amazon Basics Electronic Keypad Deadbolt Door Lock. Please read this manual thoroughly before installation and use to ensure proper function and safety. Keep this manual for future reference.

Image: The Amazon Basics Electronic Keypad Deadbolt Door Lock, featuring a touch-control keypad and a traditional key cylinder, in an oil bronze finish.
Informació de seguretat
Always follow basic safety precautions when installing and operating this electronic deadbolt. Failure to do so may result in injury, damage to the product, or property damage.
- No intenteu desmuntar ni modificar el pany. Això pot anul·lar la garantia i comprometre la seguretat.
- Use only the specified battery type (4 AA 1.5V Alkaline batteries). Do not mix old and new batteries or different types of batteries.
- Ensure the door is properly aligned and the deadbolt operates smoothly before relying on the electronic locking mechanism.
- Keep your programming code and user codes confidential.
- Avoid exposing the lock to extreme temperatures or direct moisture.
Contingut del paquet
Verifiqueu que tots els components siguin presents abans de començar la instal·lació. Si falta alguna peça o hi ha alguna peça danyada, poseu-vos en contacte amb el servei d'atenció al client.

Image: A complete set of components for the deadbolt lock, including the keypad assembly, interior assembly, deadbolt latch, strike plate, screws, and keys.
El paquet ha d'incloure:
- Drive-in Sleeve x 1
- Square corner latch x 1
- Placa de cop x 1
- Cilindre x 1
- Deadbolt Latch x 1
- Placa de muntatge x 1
- Deadbolt Chassis Screws x 2
- Cargols de màquina x 3
- Cargols de fusta x 5
- Clau x 2
- Deadbolt Keypad Assembly x 1
- Receiver Assembly x 1
For a visual guide on package contents, refer to the video below:
Video: A segment from the official product video demonstrating the package contents of the electronic keypad deadbolt door lock.
Instal·lació
This section guides you through the step-by-step installation process of your new electronic keypad deadbolt. Ensure you have the necessary tools, such as a screwdriver, before you begin.
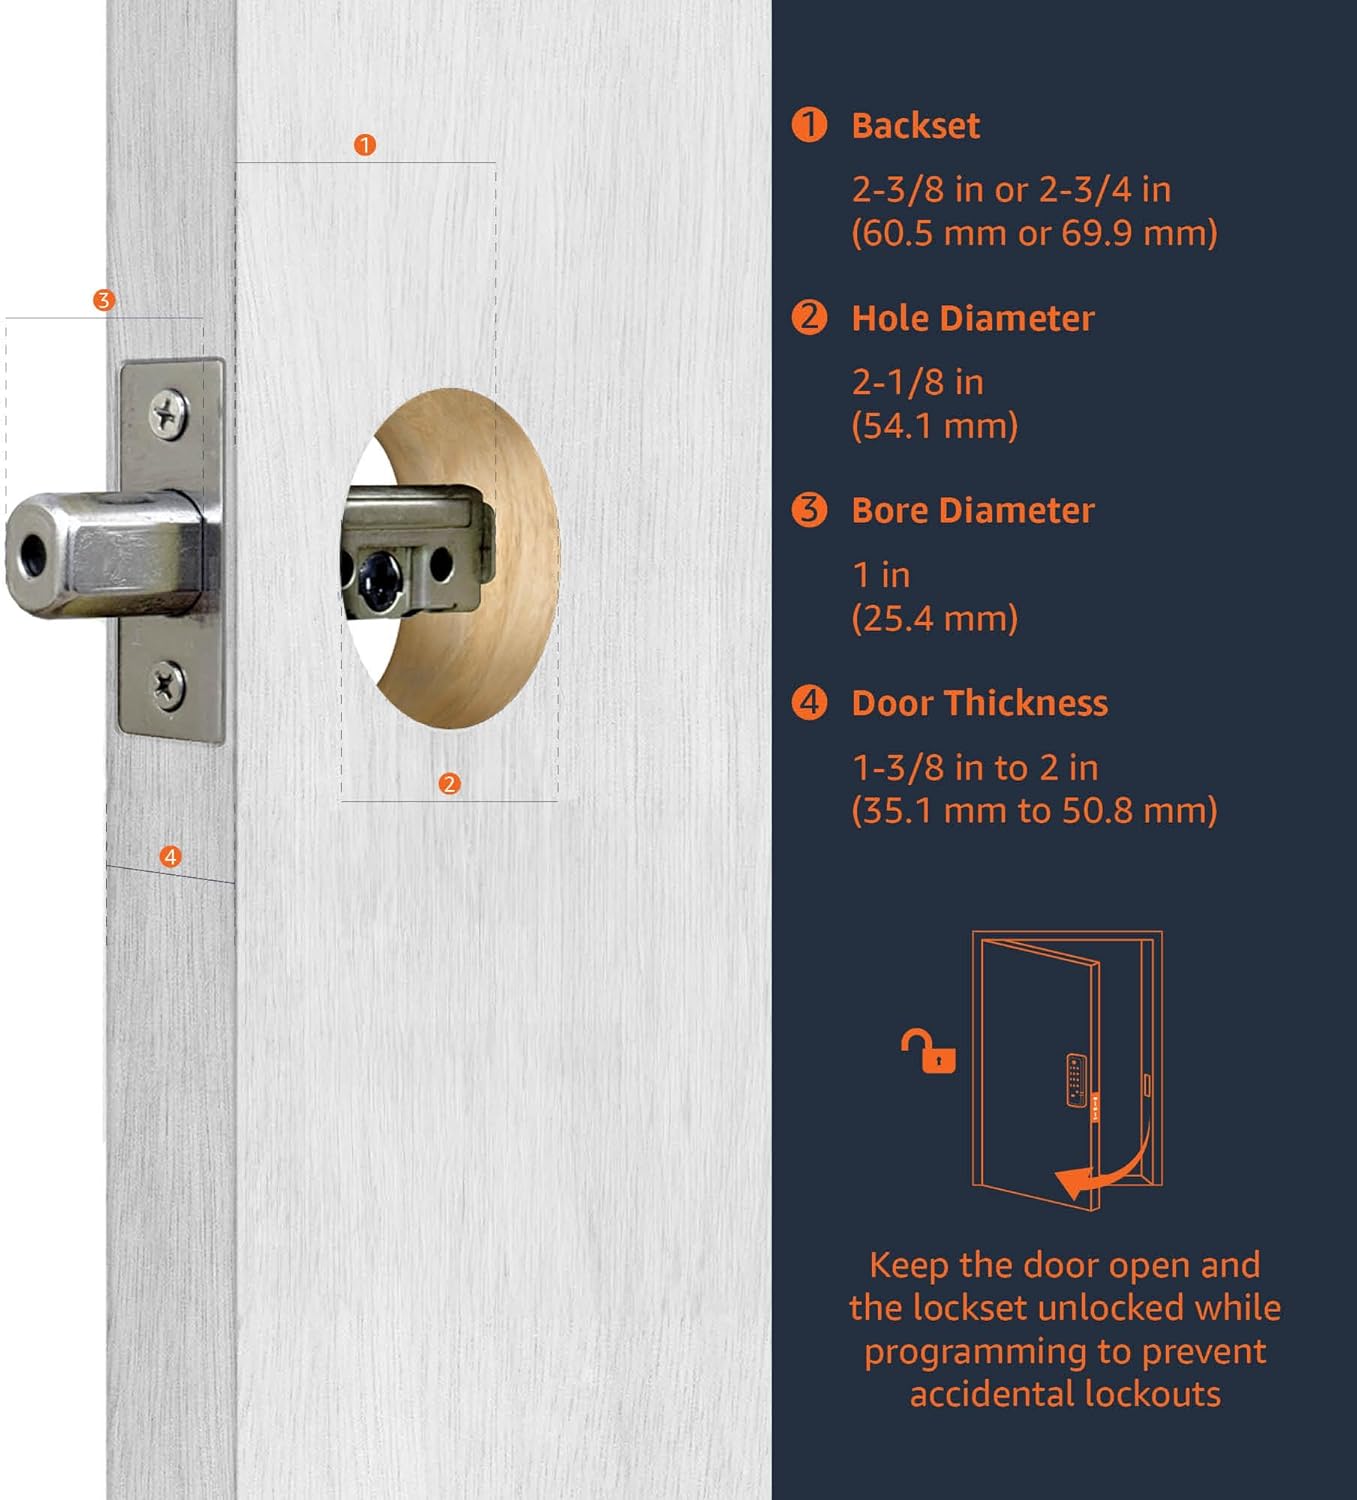
Image: A detailed diagram illustrating the required door measurements for proper deadbolt installation, including backset, hole diameter, bore diameter, and door thickness.
Step 1: Install Latch & Keypad Assembly
Determine if the latch needs to be adjusted to the 2-3/4" (70mm) backset. To adjust, rotate the latch until it stops. Reverse the direction to return to the 2-3/8" (60mm) backset. Insert the latch and ensure it is parallel to the door face. Use 2 wood screws to secure the latch.
Video: A segment from the official product video demonstrating how to install the latch and keypad assembly, including adjusting the backset and securing the latch.
Step 2: Install Inside Mounting Plate
Insert the tailpiece of the outside assembly until it passes through the latch. The tailpiece should fit through the black cam. Pass the harness under the latch to the interior side of the door. Attach the mounting plate with screws, tightening them lightly at first. Adjust the outside lock assembly position as needed, then fully tighten the screws.
Video: A segment from the official product video detailing the installation of the inside mounting plate, including routing the harness and securing the plate.
Pas 3: identifiqueu el lliurament de la porta
Face the door from the outside. The door is left-handed if the hinges are on the left side of the door. Whereas, the door is right-handed if the hinges are on the right side of the door.

Image: A visual guide to determine if your door is left-handed or right-handed based on hinge placement when viewed des de fora.
Video: A segment from the official product video explaining how to identify door handing (left-handed vs. right-handed).
Step 4: Adjust Turn Piece
Rotate the turn piece to the RIGHT at 45° for left-handed doors. Rotate the turn piece to the LEFT at 45° for right-handed doors.
Video: A segment from the official product video demonstrating how to adjust the turn piece based on the door's handing.
Pas 5: instal·leu el conjunt interior
Connect the inner and outer harness connectors. Then attach the interior assembly to the door with screws. Insert 4 (AA) 1.5V Alkaline batteries and cover the battery lid. Alkaline batteries are recommended to stabilize the power supply.
Video: A segment from the official product video detailing the installation of the interior assembly, including connecting wires and inserting batteries.
Instruccions de funcionament
Learn how to program and manage your lock's features for optimal security and convenience.
Procés d'identificació de lliurament de portes
The lock needs to learn if this is a right-handed or left-handed door. This must be done first after installation or restoring default settings. Enter the Programming Code (PC), then press the lock/unlock button, then '0', then the lock/unlock button again. The default Programming Code (PC) is 0000.
Video: A segment from the official product video demonstrating the door handing identification process for the lock.
Canviar el codi de programació (PC)
To change the Programming Code, enter the current PC, then press the lock/unlock button, then '4', then the lock/unlock button again. Then enter your New PC and press the lock/unlock button. Programming Codes should be 4-10 digits in length.
Video: A segment from the official product video showing how to change the Programming Code (PC) of the lock.
Create New User Code (UC)
Up to 6 sets of user codes can be saved. To create a new User Code, enter the PC, then press the lock/unlock button, then '1', then the lock/unlock button again. Then enter your New User Code and press the lock/unlock button. User codes should be 4-10 digits in length.
Video: A segment from the official product video demonstrating the process of creating a new User Code (UC).
Delete an Existing User Code (UC)
To delete an existing User Code, enter the PC, then press the lock/unlock button, then '2', then the lock/unlock button again. Then enter the User Code you want to delete and press the lock/unlock button.
Video: A segment from the official product video showing how to delete an existing User Code (UC) from the lock.
Delete All User Codes (UC) at once
Auto-locking and Keypad locking functions will be invalid when User Codes are deleted. The lock can only be operated by key during that time. To delete all user codes, enter the PC, then press the lock/unlock button, then '3', then the lock/unlock button again.
Video: A segment from the official product video explaining how to delete all User Codes (UC) at once.
Activa/desactiva el bloqueig automàtic
The preset delay-time is 30 sec. You can change the time by following instructions in the 'Set Auto-Lock Time Delay' section. To toggle auto-lock, enter the PC, then press the lock/unlock button, then '5', then the lock/unlock button again. Repeat the steps to cancel the auto-locking function.
Video: A segment from the official product video demonstrating how to toggle the auto-lock feature on and off.
Estableix el retard de temps de bloqueig automàtic
10 - 99 sec. delay-time available. To set the auto-lock time delay, enter the PC, then press the lock/unlock button, then '6', then the lock/unlock button again. Then enter the desired seconds (10-99) and press the lock/unlock button.
Video: A segment from the official product video showing how to set the auto-lock time delay for the lock.
Enable / Disable All User Codes
Auto-locking and keypad locking functions will be invalid when user codes are disabled. The lock can only be operated by key during the time. To enable/disable all user codes, enter the PC, then press the lock/unlock button, then '8', then the lock/unlock button again. Repeat the steps to enable the user codes again.
Video: A segment from the official product video demonstrating how to enable or disable all user codes.
Create a One-Time User Code
User Codes should be 4-10 digits in length. The one-time user code will automatically cancel after it is used one time. To create a one-time user code, enter the PC, then press the lock/unlock button, then '9', then the lock/unlock button again. Then enter the One Time Code and press the lock/unlock button.
Video: A segment from the official product video showing how to create a one-time user code for temporary access.
Manteniment
Regular maintenance ensures the longevity and optimal performance of your electronic keypad deadbolt.
- Substitució de la bateria: Replace all four AA batteries when the low battery indicator appears or when the lock's response becomes sluggish. Always use new, high-quality alkaline batteries.
- Neteja: Clean the keypad and lock body with a soft, dry cloth. Avoid abrasive cleaners, solvents, or harsh chemicals that could damage the finish or electronic components.
- Lubricació: Periodically lubricate the deadbolt latch mechanism with a silicone-based lubricant to ensure smooth operation. Do not lubricate the key cylinder.
- Alineació de la porta: Ensure your door and frame remain properly aligned. Misalignment can cause the deadbolt to bind, leading to premature wear or malfunction.
Resolució de problemes
If you encounter issues with your Amazon Basics Electronic Keypad Deadbolt, refer to the common problems and solutions below.
| Problema | Causa possible | Solució |
|---|---|---|
| El teclat no s'il·lumina ni respon. | Piles gastades o instal·lació incorrecta de les piles. | Replace all four AA batteries. Ensure they are inserted with correct polarity. |
| Lock does not lock/unlock electronically. | Incorrect programming code or user code. Door handing not identified. Deadbolt binding due to misalignment. | Verify codes. Perform the Door Handing Identification Process (Step 7). Check door alignment and adjust if necessary. |
| Auto-lock feature is not working. | Auto-lock is disabled or user codes were deleted. | Toggle Auto-Lock On/Off (Step 12) to enable it. If user codes were deleted, re-enable them (Step 14) or restore default settings (Step 16) and re-program. |
| El bloqueig sona contínuament. | Avís de bateria baixa. | Replace all four AA batteries immediately. |
Especificacions
- Marca: Conceptes bàsics d'Amazon
- Nom del model: PL13910
- Tipus de bloqueig: Teclat Deadbolt
- Material: Bronze
- Color: Bronze a l'oli
- Dimensions de l'article (L x A x A): 9.05 x 6.13 x 2.99 polzades
- Pes de l'article: 2.07 lliures (0.94 quilograms)
- Font d'alimentació: 4 x AA 1.5V Alkaline Batteries (not included)
- Compatibilitat amb el gruix de la porta: 1-3/8 a 1-3/4 polzades
- Part posterior: Adjustable 2-3/8 inches (60mm) or 2-3/4 inches (70mm)
- Característiques especials: Alarm, Keyless Entry, Auto-locking, Customizable User Codes, One-Time User Codes
- Components inclosos: Latch, strikes, screws pack
Garantia i Suport
This Amazon Basics product is backed by a limited warranty. For specific warranty details, please refer to the warranty document provided with your purchase or visit the official Amazon Basics weblloc.
For technical support, troubleshooting assistance, or to inquire about replacement parts, please contact Amazon Basics customer service through your Amazon account or the contact information provided on the product packaging.
També podeu trobar recursos addicionals i preguntes freqüents a Botiga bàsica d'Amazon.