
EPEVER LS1024B
EPEVER LandStar LS1024B PWM Solar Charge Controller User Manual
Model: LS1024B | Brand: EPEVER
1. Introducció
This manual provides detailed instructions for the installation, operation, and maintenance of the EPEVER LandStar LS1024B PWM Solar Charge Controller. This device is designed to manage the power flow from a solar panel to a battery bank and DC load, ensuring efficient and safe charging and discharging.
The LS1024B controller features automatic 12V/24V system voltage recognition, multiple charging options (Sealed, Gel, Flooded, User-defined), and various load working modes. It incorporates industrial-standard MOSFET open architecture for reliable performance and comprehensive electronic protections.
2. Informació de seguretat
Llegiu atentament totes les instruccions i advertències abans de la instal·lació i el funcionament. Si no seguiu aquestes instruccions, podeu patir descàrregues elèctriques, incendis o lesions greus.
- Assegureu-vos que tot el cablejat estigui correctament polaritzat i connectat de manera segura.
- Instal·leu el controlador en una zona ben ventilada, allunyada de materials inflamables.
- Do not disassemble or attempt to repair the controller yourself. Contact qualified personnel for service.
- Always disconnect the solar panel and battery power before installing or moving the controller.
- A fuse should be installed on the battery positive line, as close to the battery as possible (suggested distance within 150mm).
3. Característiques del producte
- Support 4 Charging Options: Sealed, Gel, Flooded, and User-defined.
- Multiple Load Working Modes: Manual Control, Light ON/OFF, Light On+Timer, and Time Control.
- Equipped with industrial standard MOSFET open architecture, ensuring no mechanical switch.
- 12V/24V Auto Work, Max PV 50V input, and Real-time Energy Statistics.
- High Efficient PWM Charging Method and convenient checking via three LED indicators.
4. Components i indicadors
Familiarize yourself with the various parts and indicators of the LS1024B controller.
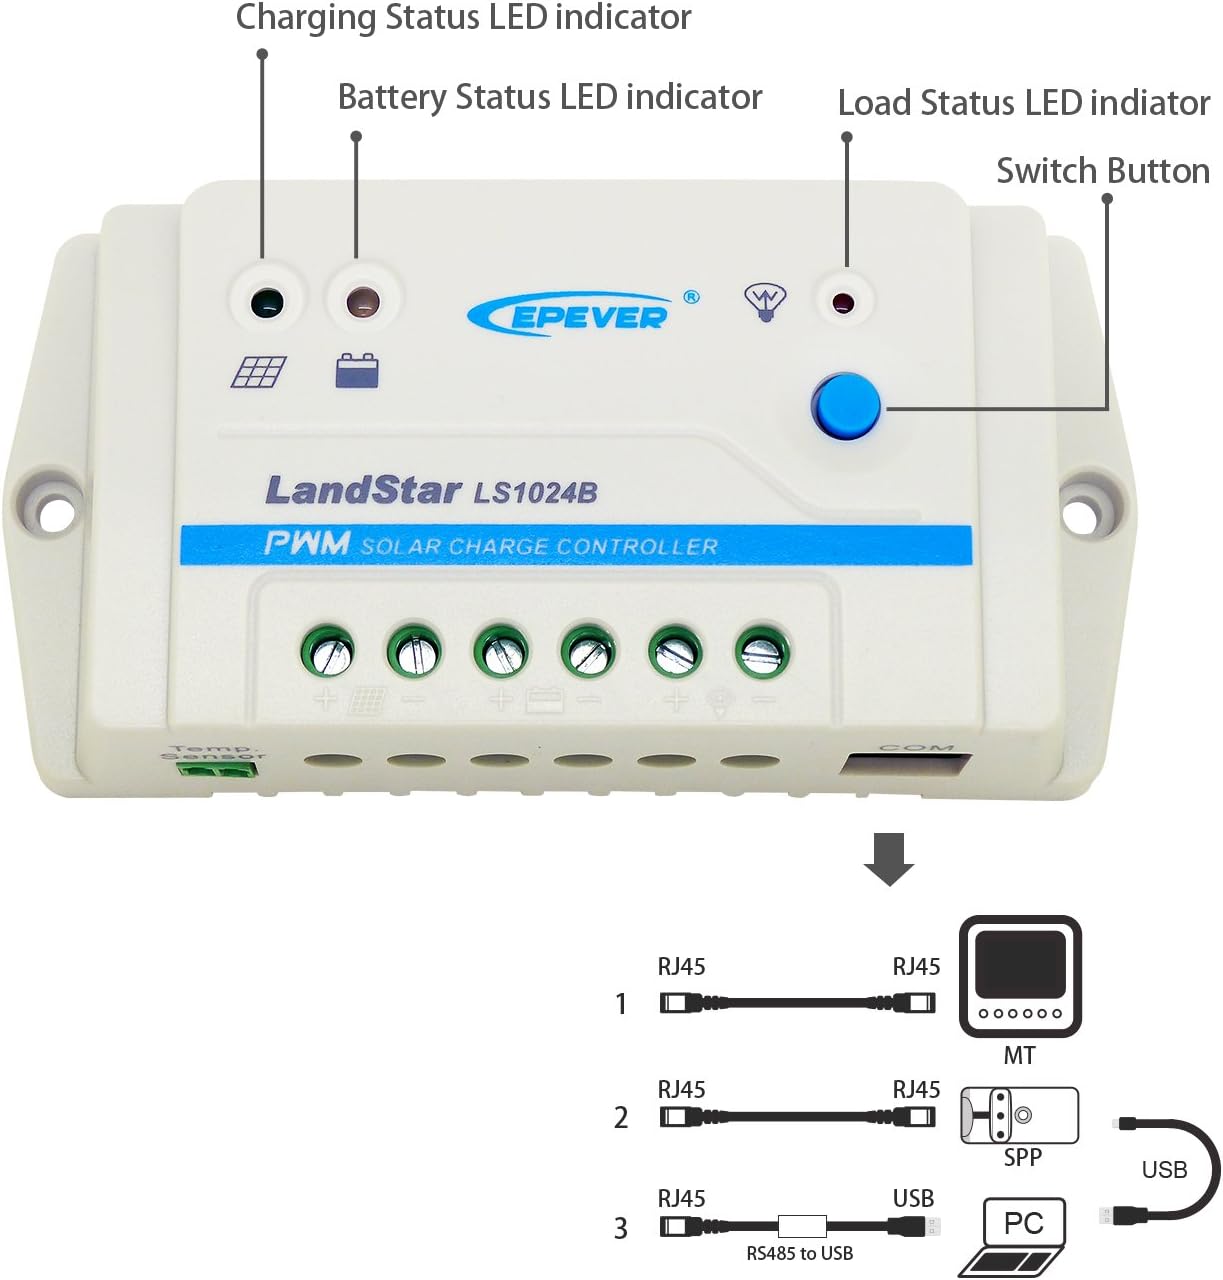
Figura 4.1: Davant view of the LS1024B controller with key components labeled.
- Charging Status LED indicator: Shows the status of solar charging.
- Battery Status LED indicator: Displays the battery's charge level.
- Load Status LED indicator: Indicates the status of the DC load output.
- Botó de canvi: Used for controlling the load output and navigating settings.
- PV Terminals: Connect to the solar panel.
- Terminals de bateria: Connect to the battery bank.
- Terminals de càrrega: Connect to the DC load.
- Temp. Sensor Port: For connecting an optional remote temperature sensor.
- COM Port (RJ45): For communication with external devices like an MT50 remote meter or PC via an RS485 to USB cable.

Figura 4.2: De dalt a baix view of the EPEVER LS1024B Solar Charge Controller, showing the terminals and indicators clearly.

Figura 4.3: A baix view of the EPEVER LS1024B Solar Charge Controller, showing the mounting holes and heat sink design.
5. Configuració i instal·lació
Follow these steps for proper installation of your solar charge controller.
5.1 Wiring Sequence
It is crucial to connect the components in the correct sequence to prevent damage to the controller or other system components. Always connect the battery first.

Figura 5.1: Recommended wiring sequence for the LS1024B controller.
- Connecteu la bateria: Connect the battery to the charge controller's battery terminals (marked with a battery symbol). Pay close attention to polarity (+ and -). The battery indicator on the controller should turn green. If not, refer to the troubleshooting section. A battery fuse should be installed on the positive line, as close to the battery as possible (suggested distance within 150mm).
- Connecteu el panell solar: Connect the solar panel to the charge controller's PV terminals (marked with a solar panel symbol). Ensure correct polarity.
- Connect the Load: Connect the DC load to the charge controller's load terminals (marked with a light bulb symbol). Ensure correct polarity.
Important: Disconnect in the reverse order: first the solar panel, then the load, and finally the battery.
5.2 Muntatge
Mount the controller vertically on a flat, solid surface, ensuring adequate air circulation around the unit for heat dissipation. Avoid direct sunlight, high temperatures, and humid environments.
6. Instruccions de funcionament
6.1 Indicadors LED
The LS1024B features three LED indicators to display system status:
- Charging Status LED (Solar Panel Icon):
- Green Solid: Charging.
- Green Flashing: Float charging.
- Off: No charging.
- Battery Status LED (Battery Icon):
- Green Solid: Battery full.
- Green Flashing: Battery normal.
- Red Solid: Battery low voltage.
- Red Flashing: Battery over-discharge.
- Load Status LED (Light Bulb Icon):
- Green Solid: Load ON.
- Off: Load OFF.
- Red Flashing: Load overload/short circuit.
6.2 Load Control Button
The blue button on the controller is used to control the DC load output and cycle through load working modes.
- Premsa curta: Toggles the load output ON/OFF (in Manual Control mode).
- Premda llarga (5 segons): Cycles through the load working modes. The Load Status LED will flash to indicate the current mode.
6.3 Modes de treball de càrrega
The LS1024B supports several load working modes:
- Control manual: Load is turned ON/OFF by pressing the button.
- Llum ON/OFF: Load turns ON at dusk and OFF at dawn.
- Light On + Timer: Load turns ON at dusk and stays ON for a set number of hours.
- Control de temps: Load turns ON and OFF based on pre-set times (requires external programming via PC software or MT50 remote meter).
Note: Detailed configuration of "Light On + Timer" and "Time Control" modes typically requires an external communication device (e.g., MT50 remote meter or PC software via RS485 to USB cable).
Figura 6.1: The COM port (RJ45) on the LS1024B for connecting communication accessories.
7. Manteniment
Un manteniment regular garanteix un rendiment òptim i una llarga vida útil del controlador de càrrega solar.
- Neteja: Mantingueu el controlador net i lliure de pols i brutícia. Feu servir un drap sec per netejar-lo.
- Connexions: Comproveu periòdicament totes les connexions del cablejat per assegurar-vos que estiguin ben ajustades i que no estiguin corroses. Les connexions soltes poden causar sobreescalfament i danys.
- Ventilació: Ensure the area around the controller remains well-ventilated and free from obstructions to allow for proper heat dissipation.
- Inspecció de la bateria: Regularly inspect the battery for any signs of damage, swelling, or leaks. Ensure battery terminals are clean.
8. Solució De Problemes
This section addresses common issues you might encounter with your LS1024B controller.
| Problema | Causa possible | Solució |
|---|---|---|
| No LED indicators are ON. | Bateria no connectada o polaritat invertida; Volum de la bateriatage massa baix. | Comproveu les connexions i la polaritat de la bateria. Assegureu-vos del volum de la bateria.tage està per sobre del baix voltage disconnect threshold. |
| Charging Status LED is OFF during daylight. | Solar panel not connected or reverse polarity; PV voltage too low; PV short circuit. | Check solar panel connections and polarity. Ensure sufficient sunlight and PV voltage. Check for PV short circuits. |
| Load Status LED is OFF when it should be ON. | Load is OFF (manual control); Battery low voltage disconnect; Load overload/short circuit. | Press the load button to turn ON. Charge battery. Check load for overload or short circuit. |
| Battery Status LED is Red Flashing. | Battery over-discharge. | Charge the battery immediately. Reduce load. |
9. Especificacions tècniques
Detailed specifications for the EPEVER LS1024B Solar Charge Controller.
| Sistema nominal Voltage | 12V/24V Auto Work |
| Màx. PV Voltage | 50 V |
| Corrent nominal de càrrega/descàrrega | 10A |
| Equalize Charging Voltage (Sealed) | 14.6 V |
| Equalize Charging Voltage (Flooded) | 14.8 V |
| Augmentar la càrrega Voltage (Sealed) | 14.4 V |
| Augmentar la càrrega Voltage (Gel) | 14.2 V |
| Augmentar la càrrega Voltage (Flooded) | 14.6 V |
| Float Charging Voltage (Sealed/Gel/Flooded) | 13.8 V |
| Volum baixtage Reconnect Voltage (Sealed/Gel/Flooded) | 12.6 V |
| Volum baixtage Desconnectar Voltage (Sealed/Gel/Flooded) | 11.1 V |
| Autoconsum | 8.4mA (12V); 7.8mA (24V) |
| Coeficient de compensació de temperatura | -3mV/℃/2V (25℃) |
| Tancament | IP30 |
| Posada a terra | Comú positiu |
| Temperatura de l'entorn de treball | -35 ℃ a + 55 ℃ |
| Dimensió general | 138 × 69.3 × 37 mm (5.43 x 2.72 x 1.46 polzades) |
| Pes net | 0.13 kg (4.6 unces) |
9.1 Electronic Protections
- Protecció contra curtcircuits fotovoltaics
- Protecció de polaritat inversa PV
- Bateria sobre voltage protecció
- Protecció de sobre descàrrega de la bateria
- Protecció de polaritat inversa de la bateria
- Protecció contra el sobreescalfament de la bateria
- Protecció contra curtcircuits de càrrega
- Protecció de sobrecàrrega de càrrega
- Protecció contra el sobreescalfament del controlador
10. Garantia i Suport
10.1 Informació de la garantia
The EPEVER LS1024B solar charge controller is warranted to be free from defects in materials and workmanship for a period of dos anys from the date of shipment to the original end user.
Avís: The manufacturer is not responsible for any damage to the product due to operator's misuse, incorrect battery parameters, unreasonable system configuration, unauthorized repair, or exceeding the specified parameters.
10.2 Atenció al client
For technical assistance, troubleshooting beyond this manual, or warranty claims, please contact EPEVER customer support or visit the official EPEVER website for further resources and contact information.
Ask a question about this manual
Ask about setup, troubleshooting, compatibility, parts, safety, or missing instructions. Manuals+ will review the question and use this page’s manual context to help answer it.