
1. Introducció
This manual provides essential information for the safe and effective operation of your Skyking MECO-G R-2025THz Digital Auto-Ranging Clamp Meter. This True RMS meter is designed for measuring AC current up to 1000A, voltage, resistance, frequency, and temperature. Please read this manual thoroughly before use and retain it for future reference.
2. Informació de seguretat
To ensure safe operation and avoid damage to the meter, observe the following safety precautions:
- Always adhere to safety regulations as per GB4793-1 and IEC 61010-1. This meter is rated for CAT III 600V and CAT II 1000V.
- No supereu els valors d'entrada màxims especificats per a cada funció.
- Ensure test leads are properly connected to the correct input terminals before making any measurements.
- Inspect the meter, test leads, and accessories for any damage before each use. Do not use if damaged.
- Never attempt to measure current on circuits with voltagsuperant la classificació del comptador.
- Extremeu les precaucions quan treballeu amb circuits elèctrics en tensió.
3. Producte acabatview
The Skyking MECO-G R-2025THz is a compact and versatile digital clamp meter. Key components include:
- Cl actualamp Mandíbula: For non-contact AC current measurement. Features a 45mm jaw opening.
- Rotary Function Dial: Selects measurement functions (OFF, 1000A~, 600A~, 60A~, V, mV, Ω, Hz/Duty, Temp).
- Pantalla LCD: 3 digits, 6000 counts, True RMS readings. Includes backlight for low-light conditions.
- Botons de funció: Includes buttons for Hz/Duty, Range, and Select.
- Terminals d'entrada: Dedicated ports for 'V', 'COM', and 'Hz/°C°F Ω' test lead connections.
- Activador: Located on the side for opening the clamp mandíbula.
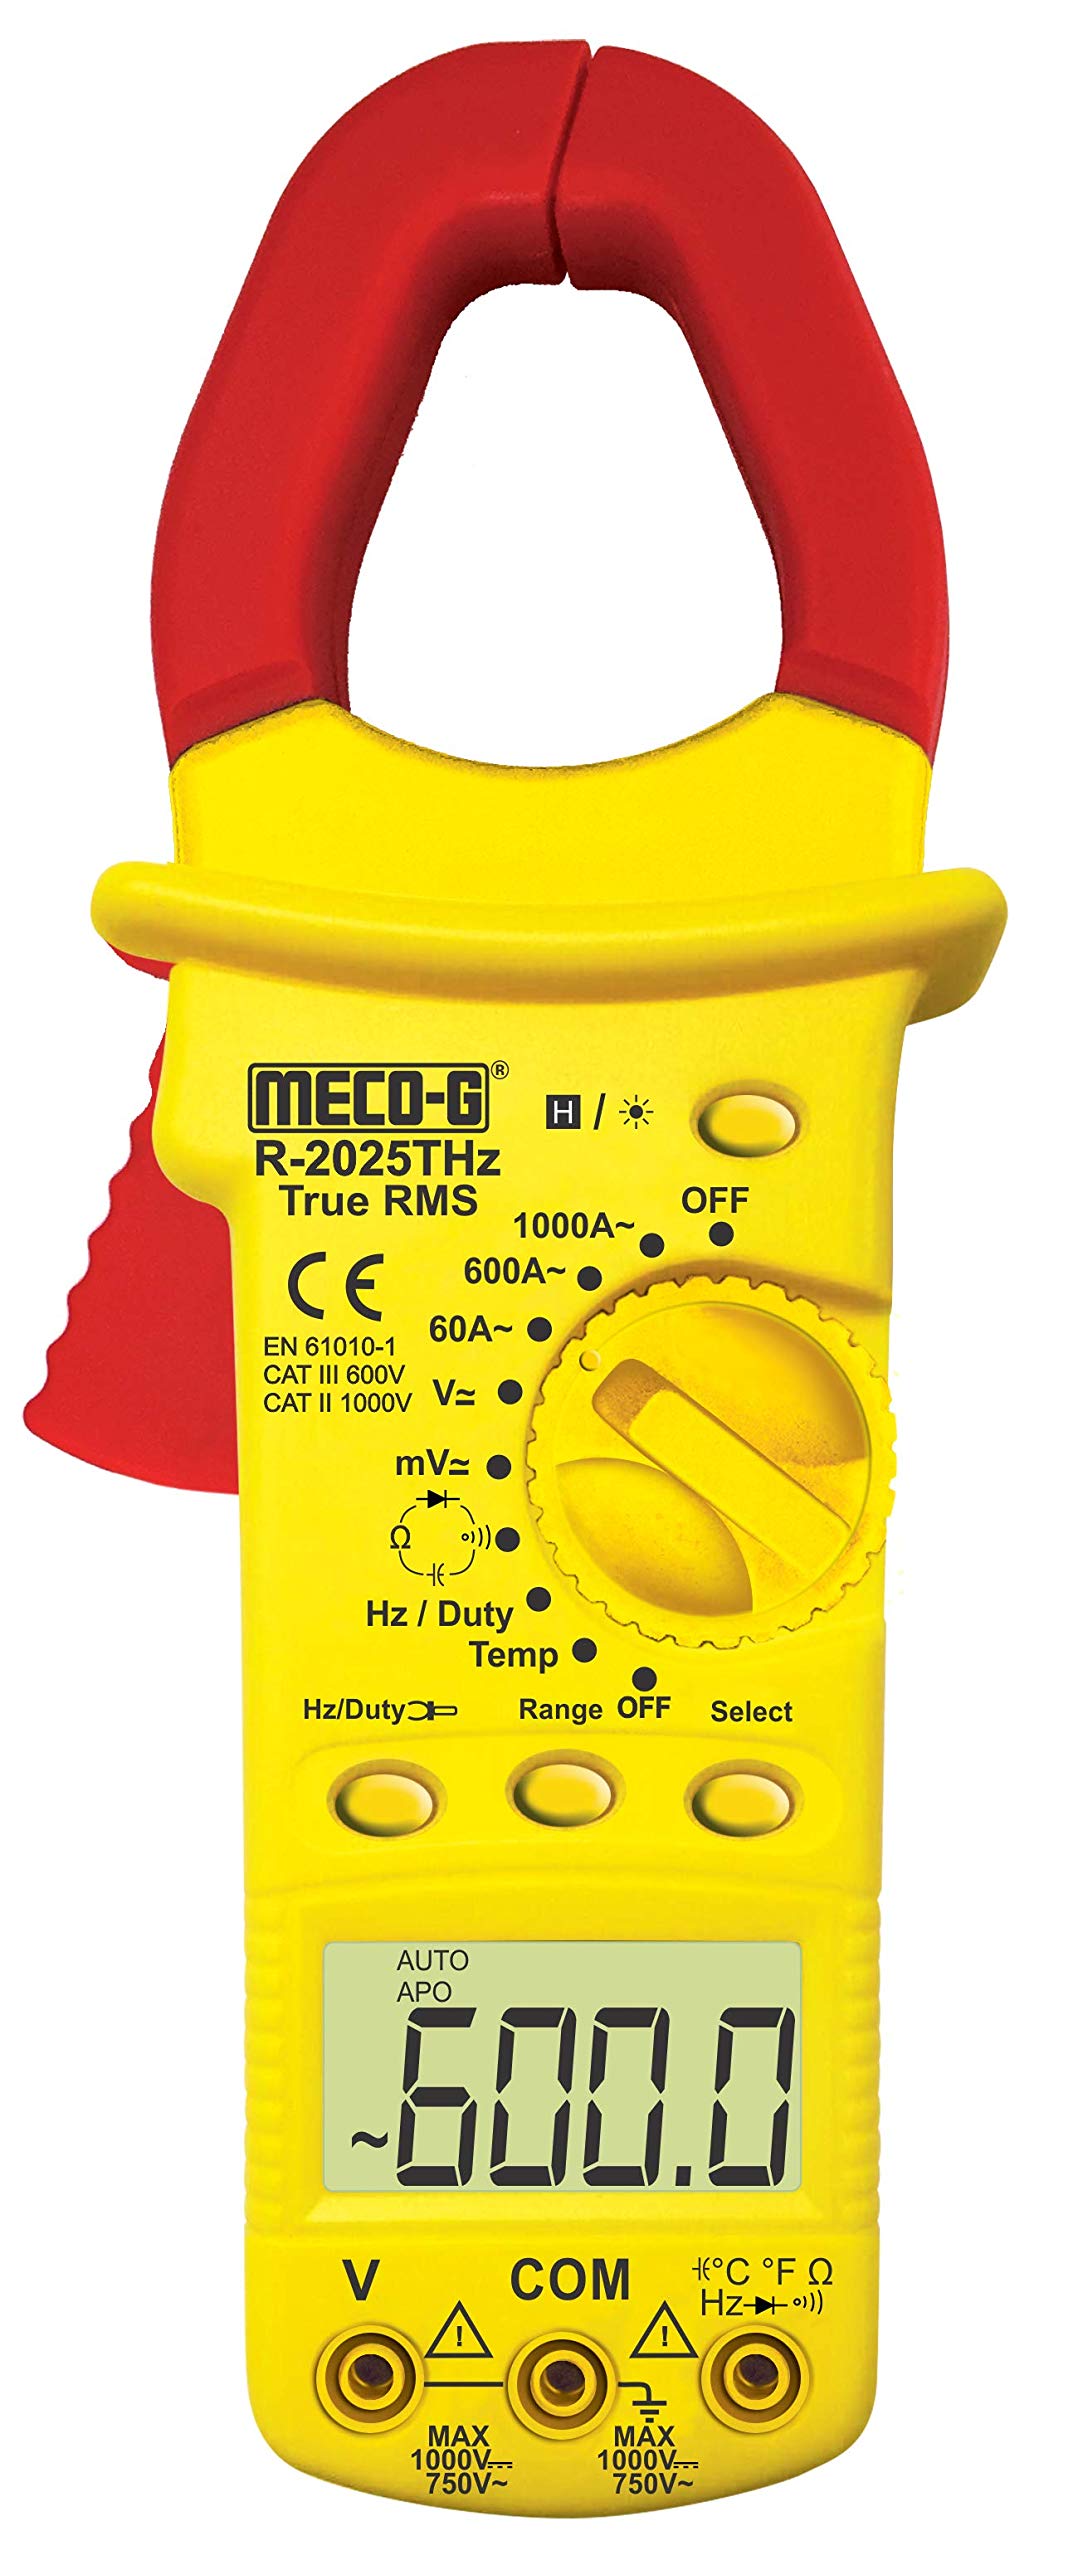
This image displays the main components of the clamp meter, including the current clamp, function selector dial, LCD display, and input jacks for test leads.
4. Configuració
Abans d'utilitzar el clamp meter, perform the following setup steps:
4.1. Instal·lació de la bateria
- Assegureu-vos que el comptador estigui apagat.
- Localitzeu la tapa del compartiment de la bateria a la part posterior del mesurador.
- Descargoleu el(s) cargol(s) de subjecció i traieu la coberta.
- Insert the required batteries (not included) according to the polarity indicators inside the compartment.
- Torneu a col·locar la tapa de la bateria i fixeu-la amb el(s) cargol(s).
4.2. Connexió dels cables de prova
Per al voltage, resistance, frequency, and temperature measurements, connect the test leads as follows:
- Insert the red test lead into the 'V' or 'Hz/°C°F Ω' input terminal.
- Insert the black test lead into the 'COM' (common) input terminal.
5. Instruccions de funcionament
Follow these steps for various measurement functions:
5.1. Encendre/apagar
Rotate the function dial from the 'OFF' position to the desired measurement function to turn the meter ON. Rotate back to 'OFF' to power down. The meter features an Auto Power-Off function after 15 minutes of inactivity.
5.2. AC Current Measurement (1000A, 600A, 60A)
- Rotate the function dial to the '1000A~', '600A~', or '60A~' position.
- Premeu el gallet per obrir el clamp mandíbula.
- Encercla només un conductor del circuit amb el clamp mandíbula. Assegureu-vos que la mandíbula estigui completament tancada.
- Llegiu el valor del corrent altern a la pantalla LCD.
5.3. Voltage Measurement (V, mV)
- Connecteu els cables de prova tal com es descriu a la secció 4.2.
- Rotate the function dial to the 'V' or 'mV' position.
- Touch the test probes to the desired test points in the circuit.
- Llegeix el voltage value on the LCD display. Use the 'Select' button to switch between AC and DC voltage si escau.
5.4. Mesura de resistència (Ω)
- Connecteu els cables de prova tal com es descriu a la secció 4.2.
- Rotate the function dial to the 'Ω' position.
- Assegureu-vos que el circuit o component que s'està provant estigui desenergitzat.
- Touch the test probes across the component or circuit to measure resistance.
- Llegiu el valor de la resistència a la pantalla LCD.
5.5. Frequency / Duty Cycle Measurement (Hz/Duty)
- Connecteu els cables de prova tal com es descriu a la secció 4.2.
- Rotate the function dial to the 'Hz/Duty' position.
- Touch the test probes to the desired test points.
- Press the 'Hz/Duty' button to toggle between frequency and duty cycle measurements.
- Llegiu el valor a la pantalla LCD.
5.6. Temperature Measurement (Temp)
- Connect the K-Type Thermocouple leads (included) to the 'V' and 'COM' input terminals, observing polarity.
- Rotate the function dial to the 'Temp' position.
- Col·loqueu la sonda del termopar al punt on es vol mesurar la temperatura.
- Read the temperature value on the LCD display. Use the 'Select' button to switch between Celsius (°C) and Fahrenheit (°F).
5.7. Funció de retenció de dades
Press the 'Hold' button (if available, or 'Select' button may serve this function) to freeze the current reading on the display. Press it again to release the hold function.
5.8. Funció de retroiluminació
Press the 'Back Light' button (if available, or 'Select' button may serve this function) to illuminate the LCD display for better visibility in dark environments. Press it again to turn off the backlight.
6. Manteniment
Proper maintenance ensures the longevity and accuracy of your clamp metre:
- Neteja: Netegeu el comptador casing amb anunciamp tela. No utilitzeu netejadors abrasius ni dissolvents.
- Substitució de la bateria: When the low battery indicator appears on the display, replace the batteries promptly to ensure accurate readings. Refer to Section 4.1 for battery installation.
- Emmagatzematge: If the meter is not used for an extended period, remove the batteries to prevent leakage. Store the meter in a dry environment, within the specified storage temperature range of -10°C to 50°C (14°F to 122°F).
7. Solució De Problemes
Si teniu problemes amb el vostre clamp comptador, consulteu els següents problemes i solucions habituals:
- Sense pantalla: Check if the meter is turned ON. Verify battery installation and ensure batteries are not depleted. Replace batteries if necessary.
- Lectures incorrectes: Ensure test leads are correctly connected. Verify that the correct measurement function and range are selected. Check for any damage to the test leads or meter.
- Meter Turns Off Automatically: This is a normal function (Auto Power-Off) designed to conserve battery life. The meter will turn off after 15 minutes of inactivity. Rotate the function dial to turn it back on.
8. Especificacions
| Característica | Especificació |
|---|---|
| Mostra | 3 Digits, 6000 Counts Trms |
| Apagat automàtic | 15 minutes idle |
| Temperatura i humitat de funcionament | 0°C ~ 40°C (32°F ~ 104°F) & ≤ 80% RH |
| Temperatura i humitat d'emmagatzematge | -10 ° C ~ 50 ° C (14 ° F ~ 122 ° F) |
| Normes de seguretat | GB4793-1, IEC 61010-1, CAT II 600V, CAT III 1000V |
| Indicació de bateria baixa | Battery icon displayed |
| Obertura de la mandíbula | 45 mm |
| Dimensions (L x A x A) | 140 x 70 x 35mm (Approx.) |
| Pes | 180gms. Approx (With Battery) |
| Material | Metall |
| Font d'alimentació | Funciona amb piles (piles no incloses) |
| Número de model | R-2025THz |
9. Garantia i Suport
Per obtenir informació sobre la garantia o assistència tècnica, consulteu la documentació proporcionada en el moment de la compra o poseu-vos en contacte amb el vostre distribuïdor. Conserveu el rebut de compra com a comprovant de compra.