
1. Informació de seguretat
Always read and understand all safety warnings and instructions before operating the HITBOX 200A MIG Welder. Failure to follow these instructions may result in electric shock, fire, serious injury, or death.
- Descàrrega elèctrica: Welding current can cause electric shock. Do not touch live electrical parts. Wear dry, insulating gloves.
- Fums i gasos: Welding produces fumes and gases. Work in a well-ventilated area. Use local exhaust or ventilation.
- Raigs d'arc: Arc rays can burn eyes and skin. Wear a welding helmet with appropriate shade and protective clothing.
- Incendi i explosió: La soldadura pot causar incendis o explosions. Mantingueu els materials inflamables allunyats de la zona de soldadura. Tingueu a mà un extintor.
- Parts calentes: Welded parts are hot. Allow them to cool before handling.
2. Producte acabatview
The HITBOX 200A MIG Welder is a versatile 5-in-1 smart welding machine designed for MIG, MAG, LIFT TIG, and Stick (MMA) welding processes. It features a colorful LCD screen for easy operation and supports dual voltage input (110V/220V).
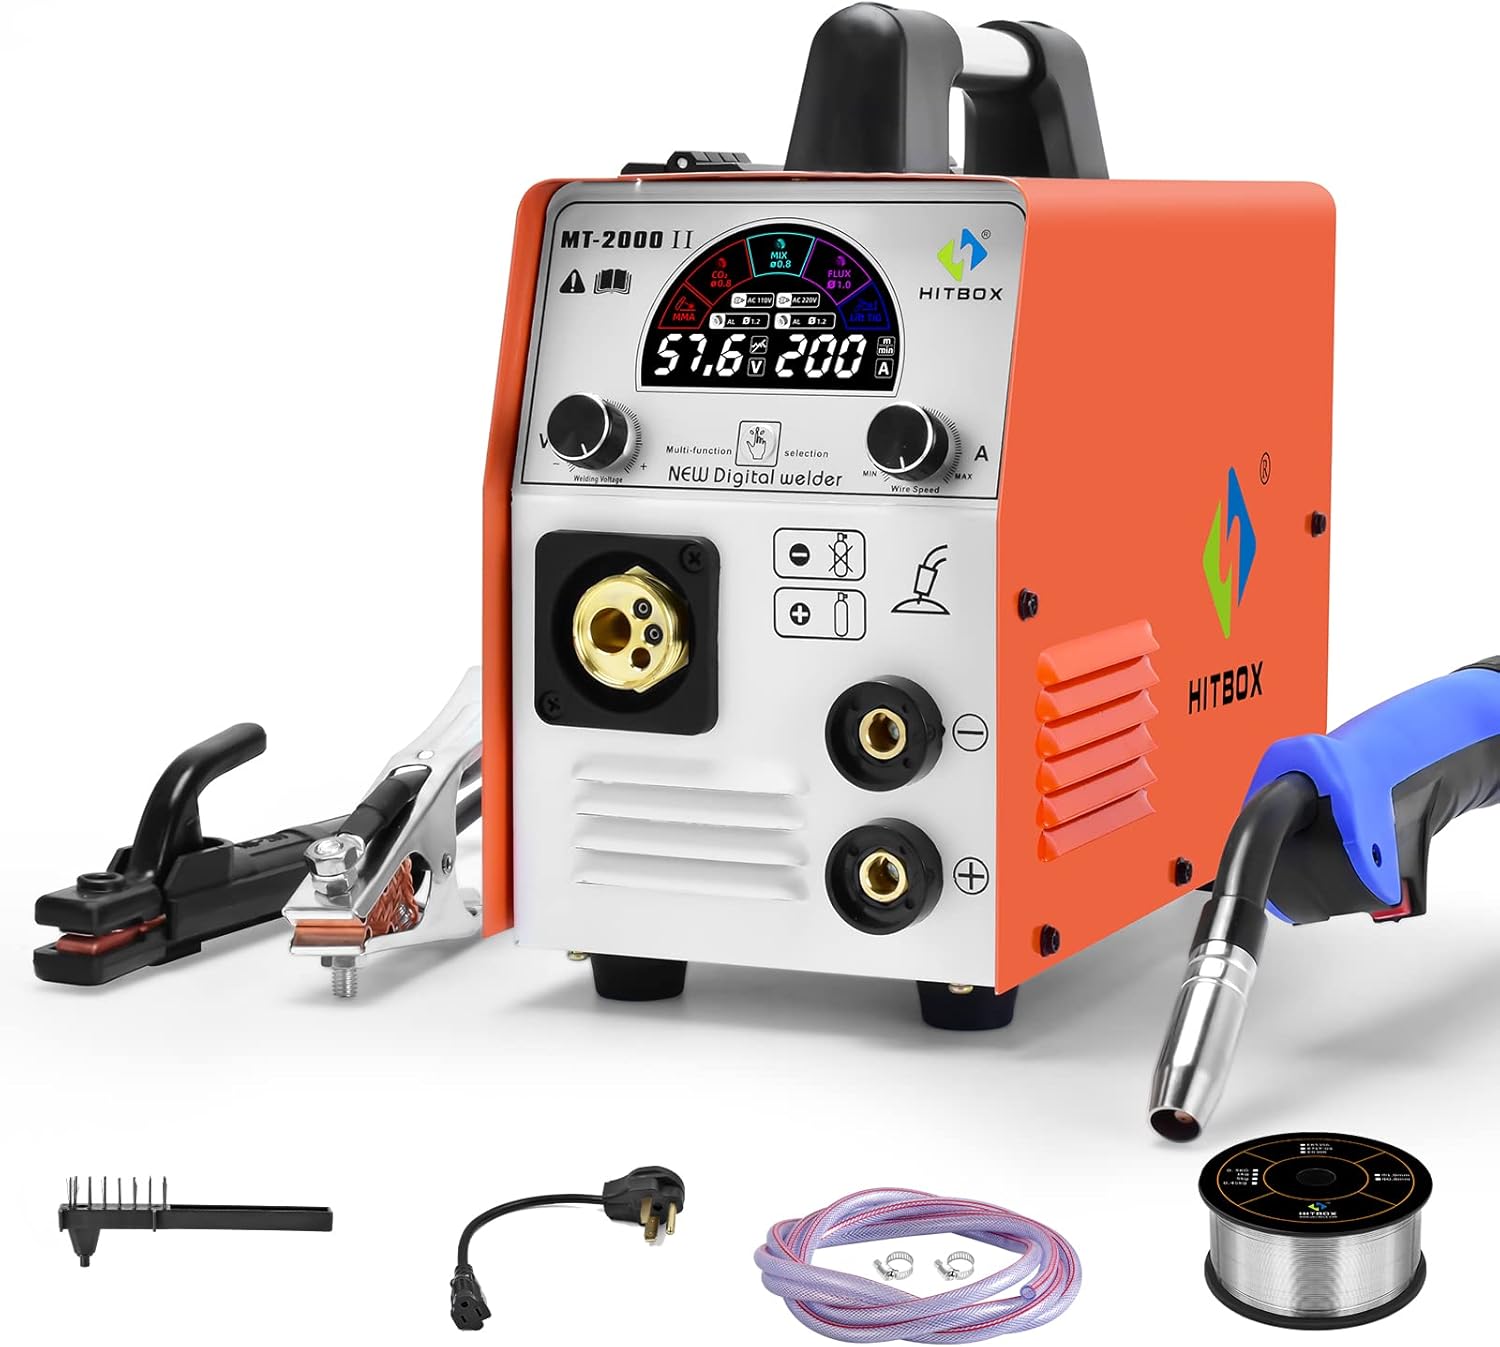
Figure 2.1: HITBOX 200A MIG Welder and standard accessories including ground clamp, MIG torch, power cable, and welding wire.
2.1 Panell frontal i posterior

Figure 2.2: Front panel showing welding connections and control knobs. Rear panel showing power switch, AC36V output, and gas inlet.
- Panell frontal: Features the colorful LCD display, welding voltage and wire speed adjustment knobs, multi-function/selection button, MIG torch connection, and positive/negative output terminals.
- Panell posterior: Includes the main power switch, AC 110V/220V input, gas inlet, and cooling fan.
3. Configuració
3.1 Desembalatge i inspecció
Traieu amb cura la soldadora i tots els accessoris de l'embalatge. Inspeccioneu-ho per detectar qualsevol dany durant l'enviament. Informeu immediatament al proveïdor de qualsevol dany.
Verify that all components listed in the packing list are present:
- HITBOX 200A MIG Welder Unit
- Torxa de soldadura MIG
- Terra Clamp
- Electrode Holder (for Stick/MMA welding)
- Mànega de gas
- Extra MIG Tips
- Cable d'alimentació
3.2 Connexió d'alimentació
Ensure the power switch on the rear panel is in the "OFF" position before connecting to power. This welder supports dual voltage (110V/220V) and automatically detects the input voltage.
- Connect the power cable to the appropriate power outlet (110V or 220V). Ensure the outlet has sufficient amperage capacity (e.g., 40A breaker for full output).
- Press the power switch on the rear panel to the "ON" position. The LCD display will illuminate.
Video 3.1: This video demonstrates the power connection process and initial display functionality of the HITBOX 200A MIG Welder, showing how to turn it on and navigate basic settings.
3.3 Accessory Connection
Proper connection of welding accessories is crucial for safe and effective operation. Refer to the connection diagrams below for different welding modes.

Figure 3.1: Connection modes for MIG (Gas/Gasless), MMA, and Lift TIG welding. Note the polarity changes for different processes.
- MIG Welding (Gasless Flux Core): Connecteu la terra clamp al terminal positiu (+) i la torxa MIG al terminal negatiu (-).
- MIG Welding (Gas Shielded): Connecteu la terra clamp to the negative (-) terminal and the MIG torch to the positive (+) terminal. Connect the gas hose from your gas cylinder to the gas inlet on the rear panel.
- Soldadura amb electrodomèstic (MMA): Connecteu el portaelèctrode al terminal positiu (+) i al connector de terra.amp al terminal negatiu (-).
- Soldadura TIG per elevació: Connect the TIG torch to the negative (-) terminal and the ground clamp to the positive (+) terminal. (Note: TIG torch is sold separately).
4. Instruccions de funcionament
4.1 Tauler de control acabatview
The HITBOX 200A features an intuitive colorful LCD display and control knobs for precise adjustments.

Figure 4.1: The control panel features a digital display for current and voltage, a multi-function/selection button, and adjustment knobs for welding voltage i velocitat del cable.
- Pantalla digital: Shows current (Amps) i voltage (Volts) settings.
- Multi-function/Selection Button: Press to cycle through welding modes (MIG, MMA, LIFT TIG, Flux Core, Mixed Gas).
- Soldadura VoltagManeta electrònica: Ajusta el volum de soldaduratage.
- Wire Speed Knob: Adjusts the wire feed speed (for MIG modes) or current (for MMA/TIG).
4.2 Selecció del mode de soldadura
Use the multi-function/selection button to choose your desired welding process. The selected mode will be highlighted on the colorful LCD screen.

Figure 4.2: The upgraded colorful panel clearly displays the active welding mode and parameters, making selection straightforward.
- MIG (CO2/MIX): For gas-shielded MIG welding with CO2 or mixed gas.
- FLUX: For gasless flux-cored welding.
- MMA: For Stick welding.
- ASCENSOR TIG: For Lift TIG welding (requires separate TIG torch).
4.3 Ajust de paràmetres
Ajustar el volum de soldaduratage and wire speed (or current for MMA/TIG) using the respective knobs. The display will show real-time values.
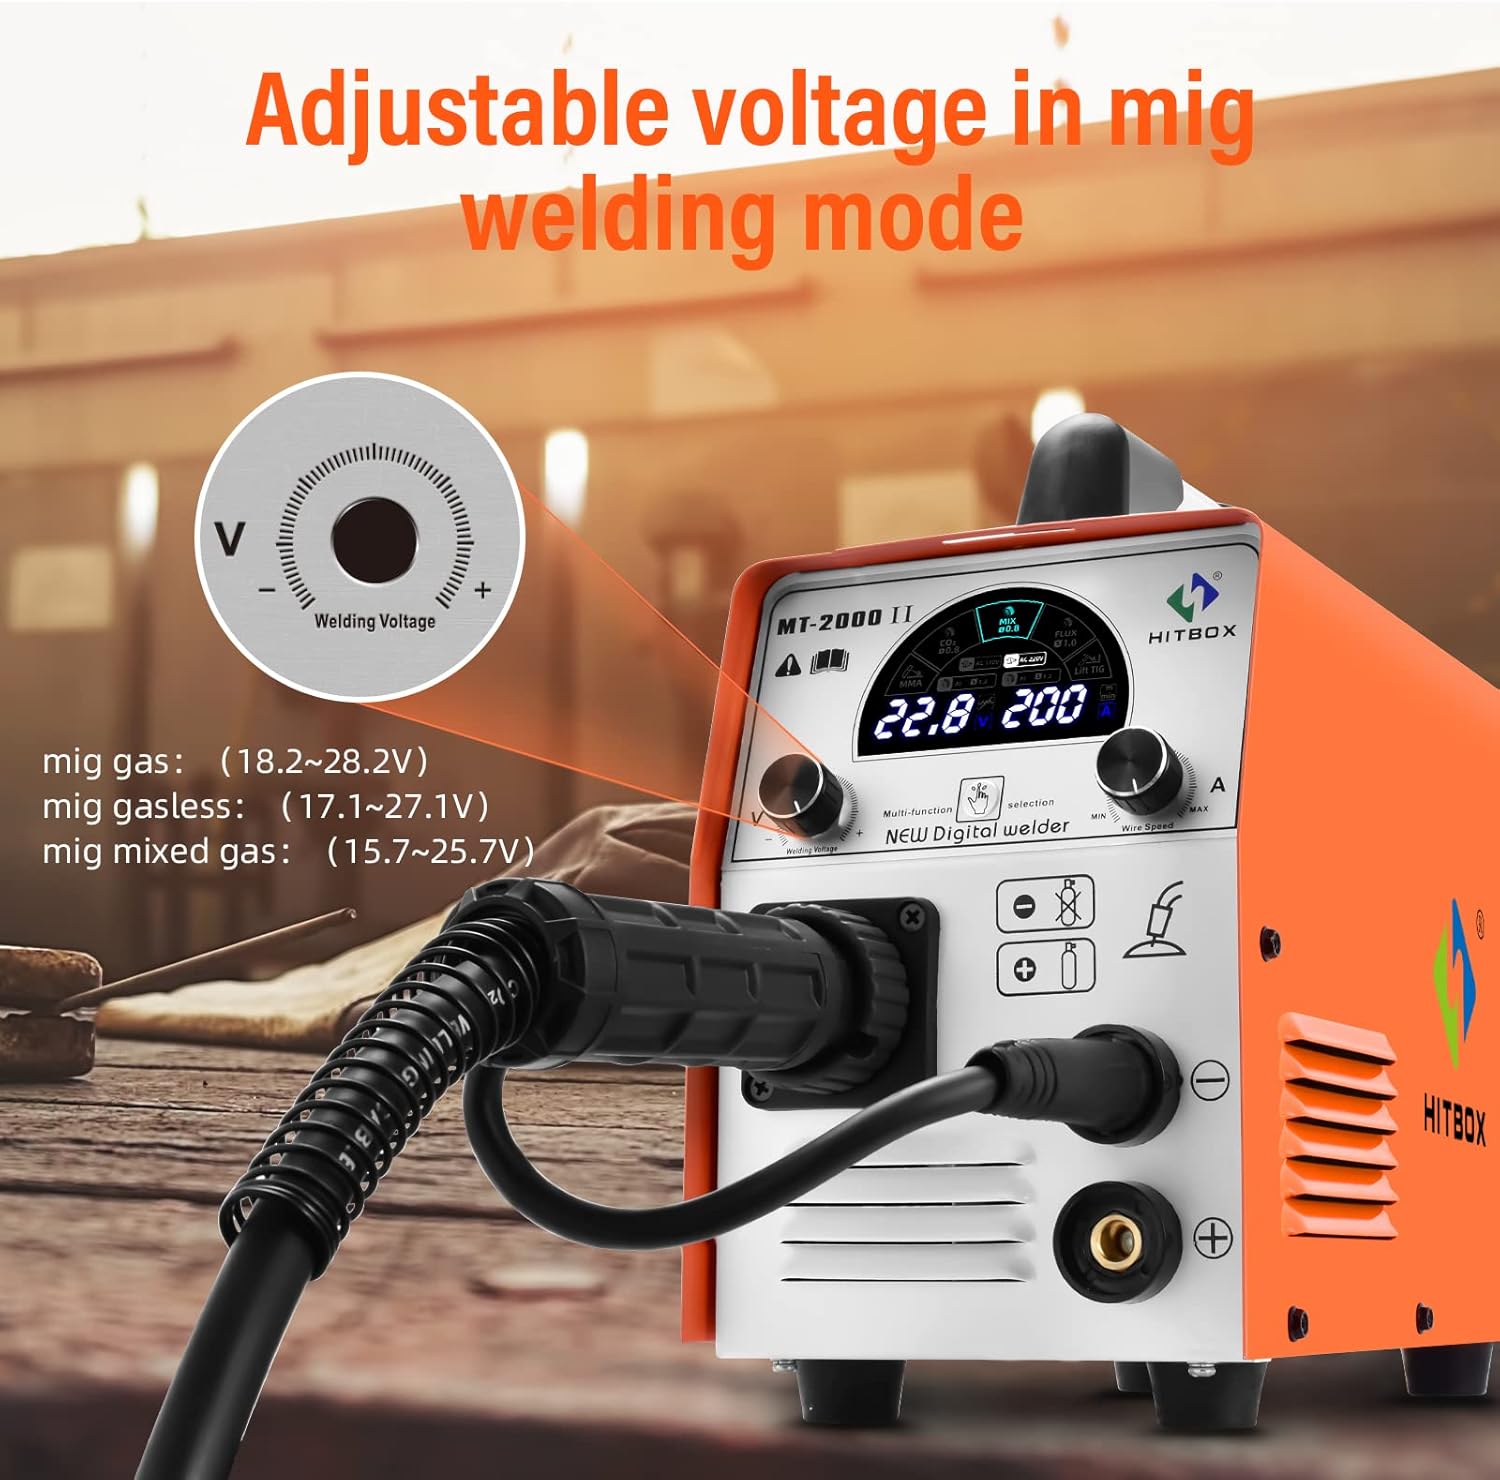
Figure 4.3: Adjusting the welding voltage knob to fine-tune the output for MIG welding. Recommended voltage ranges for MIG gas, gasless, and mixed gas are displayed.
Refer to the welding thickness chart for recommended settings:

Figure 4.4: This chart provides general guidelines for welding thickness across different modes: MIG (1-8mm), LIFT TIG (1-6mm), and MMA (2-12mm).
4.4 Welding Wire Compatibility
The machine is compatible with 0.8mm-1.0mm rolls of solid core wire and flux core wire.

Figure 4.5: Illustration of compatible welding wire types and sizes (0.8mm-1.0mm) for both flux core and solid core applications.
Ensure the correct drive roller is installed for the wire size and type being used. The machine features automatic wire feeding.

Figure 4.6: The internal mechanism for automatic wire feeding, ensuring smooth and consistent wire delivery during welding operations.
4.5 Multi-Process Welding Capabilities
The HITBOX 200A supports various welding processes, making it suitable for a wide range of applications on materials like carbon steel, iron, and stainless steel.

Figure 4.7: Visual representation of the welder's multi-process capabilities, including ARC/MMA (20-200A), MIG Gas (40-200A), LIFT TIG (16-200A), and MIG Gasless (60-200A).
5. Manteniment
5.1 Manteniment general
- Neteja: Regularly clean the machine's exterior with a soft, dry cloth. Ensure ventilation openings are free from dust and debris.
- Ventilador: Check the cooling fan for obstructions and ensure it operates freely.
- Cables i connexions: Inspect all welding cables, power cords, and connections for damage, fraying, or loose contacts before each use. Replace damaged components immediately.
- Alimentador de filferro: Keep the wire feeder mechanism clean and free of dust or metal shavings to ensure smooth wire feeding.
5.2 Emmagatzematge
When not in use, store the welder in a dry, clean environment, away from direct sunlight, moisture, and extreme temperatures. Disconnect all cables and store them neatly.
6. Solució De Problemes
This section provides solutions for common issues. For more detailed troubleshooting, refer to the full user guide PDF.
| Problema | Causa possible | Solució |
|---|---|---|
| El soldador no s'encén. | No power supply; Power switch off; Internal fuse blown. | Check power outlet and cable; Ensure power switch is ON; Contact service for fuse replacement. |
| No welding output. | Loose connections; Incorrect mode selection; Overheat protection activated. | Check all cable connections; Verify welding mode; Allow machine to cool down. |
| Wire feeding issues. | Incorrect wire tension; Clogged liner; Wrong drive roller. | Adjust wire tension; Clean or replace liner; Install correct drive roller. |
| Mala qualitat de soldadura. | Paràmetres incorrectes (vol.tage/wire speed); Improper gas flow (MIG); Contaminated workpiece. | Adjust settings according to chart; Check gas cylinder and flow rate; Clean workpiece thoroughly. |
7. Especificacions
Key technical specifications for the HITBOX 200A MIG Welder.
| Característica | Detall |
|---|---|
| Número de model | UW-MIG185JP |
| Entrada Voltage | 110V/220V (Doble Volum)tage) |
| Processos de soldadura | MIG, MAG, LIFT TIG, Stick (MMA) |
| Corrent de sortida màx | 200A |
| Pes de l'article | 15.43 lliures |
| Dimensions del producte | 11.02 x 5.31 x 8.66 polzades |
| Cicle de treball | 60% (at max output) |
| Tecnologia | Inversor IGBT |
8. Garantia i Suport
8.1 Informació de la garantia
HITBOX products are manufactured to high-quality standards. For specific warranty terms and conditions, please refer to the warranty card included with your product or visit the official HITBOX weblloc.
8.2 Atenció al client
If you encounter any issues or have questions regarding your HITBOX 200A MIG Welder, please contact HITBOX customer support. You can find contact information on the official HITBOX weblloc web o a través de la vostra plataforma de compra.
For a comprehensive guide, download the official User Guide (PDF) from aquí.