
Plozoe Micro USB Hardwire Kit
Plozoe Micro USB Dash Cam Hardwire Kit Instruction Manual
1. Introducció
This manual provides detailed instructions for the installation and operation of your Plozoe Micro USB Dash Cam Hardwire Kit. This kit is designed to provide continuous power to your dash camera, enabling 24-hour surveillance and freeing up your vehicle's cigarette lighter port.
Contingut del paquet
- 1 x Micro USB Hardwire Kit (11.5ft cable)
- 1 x Installation Crowbar
- 4 x Fuse Tap Cables (various types: ACU/ATO, ACS/MINI, ACN/LP MINI, ACZ/MICRO2)

Image 1.1: Complete Plozoe Micro USB Hardwire Kit components.

Imatge 1.2: Ex.ample of a dash cam hardwire kit installed in a vehicle.
2. Especificacions tècniques
| Característica | Especificació |
|---|---|
| Entrada Voltage | DC 12V-24V |
| Vol. De sortidatage | DC 5V |
| Corrent de sortida | 2 A màx |
| Tipus de connector | Micro USB |
| Longitud del cable | 11.5 peus (aprox. 3.5 metres) |
| Volum baixtage Protecció | 11.6V (for 12V systems) / 23.5V (for 24V systems) |
| Característiques de seguretat | Overcurrent, overheating protection |
| Compatibilitat | Most car models (12V-24V), Micro USB dash cams, mirror cams, GPS navigators |

Image 2.1: Internal components for stable power output and protection.

Image 2.2: Compact size of the power adapter and cable length.

Image 2.3: Wide compatibility with Micro USB devices.

Image 2.4: Compatible with both 12V and 24V vehicle electrical systems.
3. Guia d'instal·lació
Precaucions de seguretat
- Always disconnect the vehicle's battery before working on electrical systems to prevent short circuits or electrical shock.
- If you are unsure about any step, consult a professional automotive electrician.
- Ensure all connections are secure and insulated to prevent accidental contact.
Eines necessàries
- Plozoe Installation Crowbar (included)
- Multimeter (recommended for identifying fuse types and power sources)
- Wire strippers/crimpers (if modifying wires, though fuse taps are provided)
Passos d'instal·lació
- Localitza la caixa de fusibles: Refer to your vehicle's owner's manual to find the fuse box location. Common locations include under the dashboard, in the glove compartment, or in the engine bay.
- Identify Fuse Types and Power Sources:
- Using your vehicle's fuse diagram or a multimeter, identify two fuse slots: one that provides constant power (always on, for 24-hour surveillance) and one that provides Accessory (ACC) power (on when the ignition is on, off when the ignition is off).
- Select the appropriate fuse tap cable from the four included types that matches your vehicle's fuse size.
- Connect the Fuse Tap:
- Insert the original fuse from the chosen slot into the lower slot of the fuse tap.
- Insert the new fuse (provided with the kit, typically 5A) into the upper slot of the fuse tap. This fuse protects the hardwire kit.
- Plug the fuse tap into the identified constant power fuse slot in your vehicle's fuse box.
- Connect the Ground Wire: The black wire from the hardwire kit is the ground wire. Connect it to any unpainted metal bolt or screw on the vehicle's chassis. Ensure a secure connection for proper grounding.
- Encamina el cable: Use the included crowbar to neatly tuck the hardwire cable along the vehicle's A-pillar, headliner, and dashboard edges to the desired location of your dash cam. This creates a clean, hidden installation.
- Connecteu-vos a la Dash Cam: Plug the Micro USB connector into your dash camera's power input port.

Image 3.1: Identifying the fuse box location and cable routing path.

Image 3.2: An open fuse box.

Image 3.3: Various fuse tap types for broad compatibility.

Image 3.4: Use the provided fuse puller for safe fuse removal.

Image 3.5: Correct fuse tap configuration.

Image 3.6: Fuse tap correctly installed in the fuse box.

Image 3.7: Securely connect the ground wire to a metal chassis point.
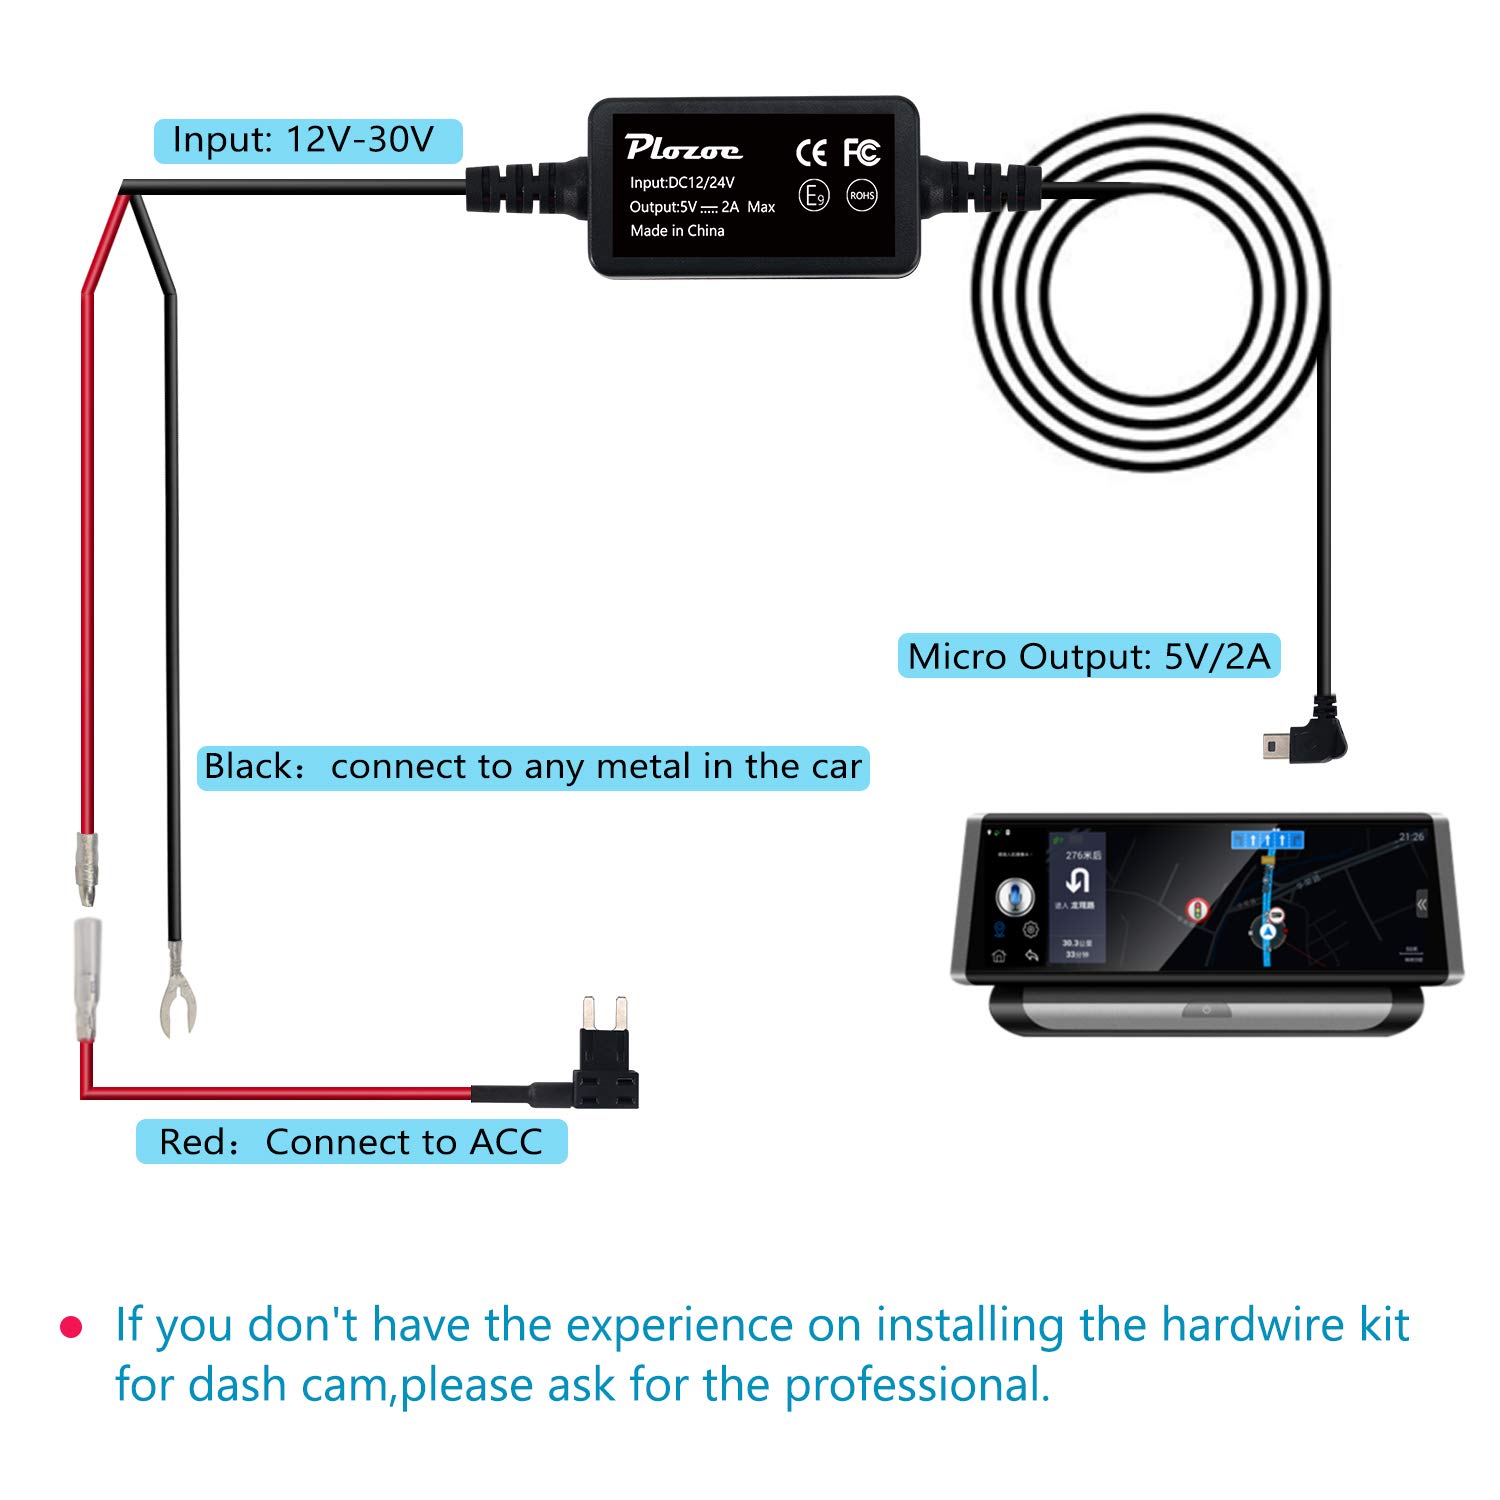
Image 3.8: Wiring diagram for the Plozoe Micro USB Hardwire Kit.
4. Funcionament i característiques
24-Hour Surveillance (Parking Mode)
When connected to a constant power source in your vehicle's fuse box, the hardwire kit allows your dash camera to operate continuously, even when the vehicle's ignition is off. This feature is essential for parking mode functionality, enabling your dash cam to record events such as impacts or motion detection while parked.

Image 4.1: Dash cam powered for 24-hour surveillance.

Image 4.2: Visual representation of 24-hour monitoring.

Image 4.3: Parking mode records incidents while your vehicle is stationary.
Volum baixtage Protecció
The hardwire kit features a built-in low voltage protection mechanism. If your vehicle's battery voltage drops below a safe threshold (11.6V for 12V systems or 23.5V for 24V systems), the kit will automatically cut off power to the dash camera. This prevents excessive battery drain, ensuring you have enough power to start your vehicle.

Image 4.4: Low voltage protection safeguards your vehicle's battery.
5. Cura i Manteniment
- Comproveu periòdicament totes les connexions per assegurar-vos que es mantenen segures.
- Inspect the fuse tap and fuses for any signs of wear or damage. Replace fuses with the correct amperage if necessary.
- Keep the hardwire kit and dash cam free from excessive dust or moisture.
6. Solució De Problemes
La càmera del salpicader no s'encén
- Comproveu les connexions: Ensure all wires (power, ground, Micro USB) are securely connected.
- Verificar els fusibles: Check both the original vehicle fuse and the fuse in the fuse tap. Replace any blown fuses.
- Correct Fuse Slot: Confirm that the fuse tap is inserted into a constant power fuse slot for 24-hour operation, or an ACC slot for ignition-switched power.
- Bateria del vehicle Voltage: If the vehicle battery is low, the hardwire kit's low voltage protection may have activated. Start your car to recharge the battery.
Dash Cam Powers Off Intermittently
- Connexions soltes: Re-check all wiring connections for tightness.
- Sobreescalfament: Ensure the hardwire kit's power module is not covered or in an area with poor ventilation, which could lead to overheating and temporary shutdown.
- Voltage Fluctuacions: Verify the vehicle's electrical system is stable.
Vehicle Battery Drains Quickly
- Volum baixtage Configuració de protecció: Ensure the hardwire kit's low voltage cutoff is functioning correctly. If your dash cam has its own low voltage protection, ensure it is set appropriately.
- Dash Cam Power Consumption: Some dash cams consume more power in parking mode. Consider reducing parking mode sensitivity or duration if battery drain is a persistent issue.
- Vehicle Battery Health: A weak or old vehicle battery may struggle with continuous power draw. Have your battery tested by a professional.
7. Garantia i atenció al client
For warranty information or technical support regarding your Plozoe Micro USB Dash Cam Hardwire Kit, please contact Plozoe customer service through the retailer where the product was purchased or refer to the official Plozoe weblloc per obtenir dades de contacte.
Ask a question about this manual
Ask about setup, troubleshooting, compatibility, parts, safety, or missing instructions. Manuals+ will review the question and use this page’s manual context to help answer it.