
1. Introducció
This manual provides detailed instructions for the installation, operation, and maintenance of the EPEVER MPPT Solar Charge Controller, model XTRA4215N-G3. This advanced Maximum Power Point Tracking (MPPT) controller is designed to maximize the energy harvest from your solar panels and efficiently charge various battery types in off-grid photovoltaic systems. It features high tracking efficiency, multiple battery type selections, and comprehensive electronic protections to ensure reliable and safe operation.
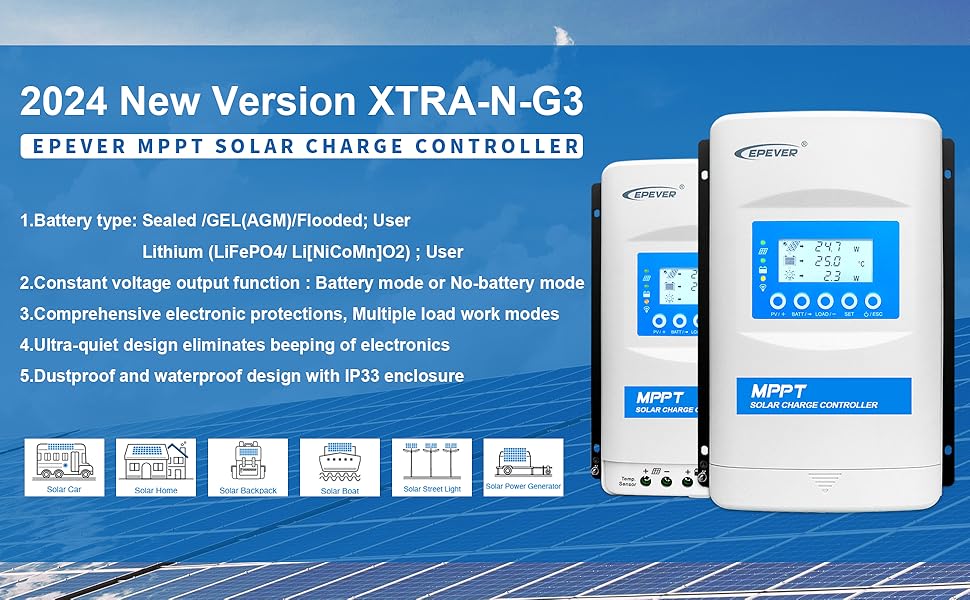
Image: EPEVER MPPT Solar Charge Controller XTRA-N-G3 Series overview, highlighting its application in solar systems.
2. Instruccions de seguretat
Please read all instructions and warnings in this manual carefully before installation and operation. Failure to follow these instructions may result in damage to the controller, batteries, or other components, and may cause personal injury.
- Ensure all wiring is correctly sized and properly terminated.
- Always connect the system in the following order: 1. Battery → 2. Load → 3. PV Array.
- Disconnect the system in the reverse order: 3. PV Array → 2. Load → 1. Battery.
- The controller is designed for common negative grounding. Ensure proper grounding to prevent electrical hazards.
- Do not disassemble or attempt to repair the controller. Refer to qualified personnel for service.
- Instal·leu el controlador en una zona ben ventilada, allunyada de materials inflamables i de la llum solar directa.
3. Producte acabatview
The EPEVER XTRA4215N-G3 is a robust MPPT solar charge controller featuring an intuitive LCD display and five control buttons for easy parameter adjustment and system monitoring. Its design prioritizes efficiency and user-friendliness.
3.1 Característiques clau
- Advanced MPPT Technology with tracking efficiency up to 99.5% and peak conversion efficiency of 98%.
- Automatic 12V/24V system voltage detecció.
- Supports various battery types: Sealed (AGM), Gel, Flooded, LiFePO4, Li(NiCoMn)O2, and User-defined.
- Independent voltage regulation for direct load connection without a battery.
- Ultra-quiet design and low self-consumption.
- Comprehensive electronic protections: reverse polarity, overcharging, over-discharging, overload, short-circuiting, and reverse current.
- Funció d'estadístiques d'energia en temps real.
3.2 Components del controlador

Imatge: Frontal view of the EPEVER MPPT Solar Charge Controller, showing the LCD display and control buttons.
The controller features a clear LCD display that shows various system parameters such as PV voltage, bateria voltage, load current, and charging status. Five buttons below the display allow for navigation and parameter settings.

Imatge: De dalt a baix view of the EPEVER MPPT Solar Charge Controller, illustrating its physical dimensions (255mm length, 189mm width, 83.2mm height).
4. Configuració i instal·lació
Proper installation is crucial for the safe and efficient operation of your solar system. Follow these steps carefully.
4.1 Wiring Connection Order
Always connect the system components in the specified order to prevent damage to the controller or other equipment.
- Connecteu la bateria: First, connect the battery to the controller's battery terminals. Ensure correct polarity.
- Connect the DC Load: Next, connect your DC loads to the controller's load terminals.
- Connect the PV Array: Finally, connect the solar panel array to the controller's PV terminals.
To disconnect the system, follow the reverse order: PV array first, then load, then battery.

Image: Step-by-step connection diagram for the EPEVER solar charge controller, illustrating the sequence for battery, load, and solar panel connections.
4.2 Modes de connexió
The XTRA-N-G3 controller supports both Battery Mode and No-battery Mode connections.
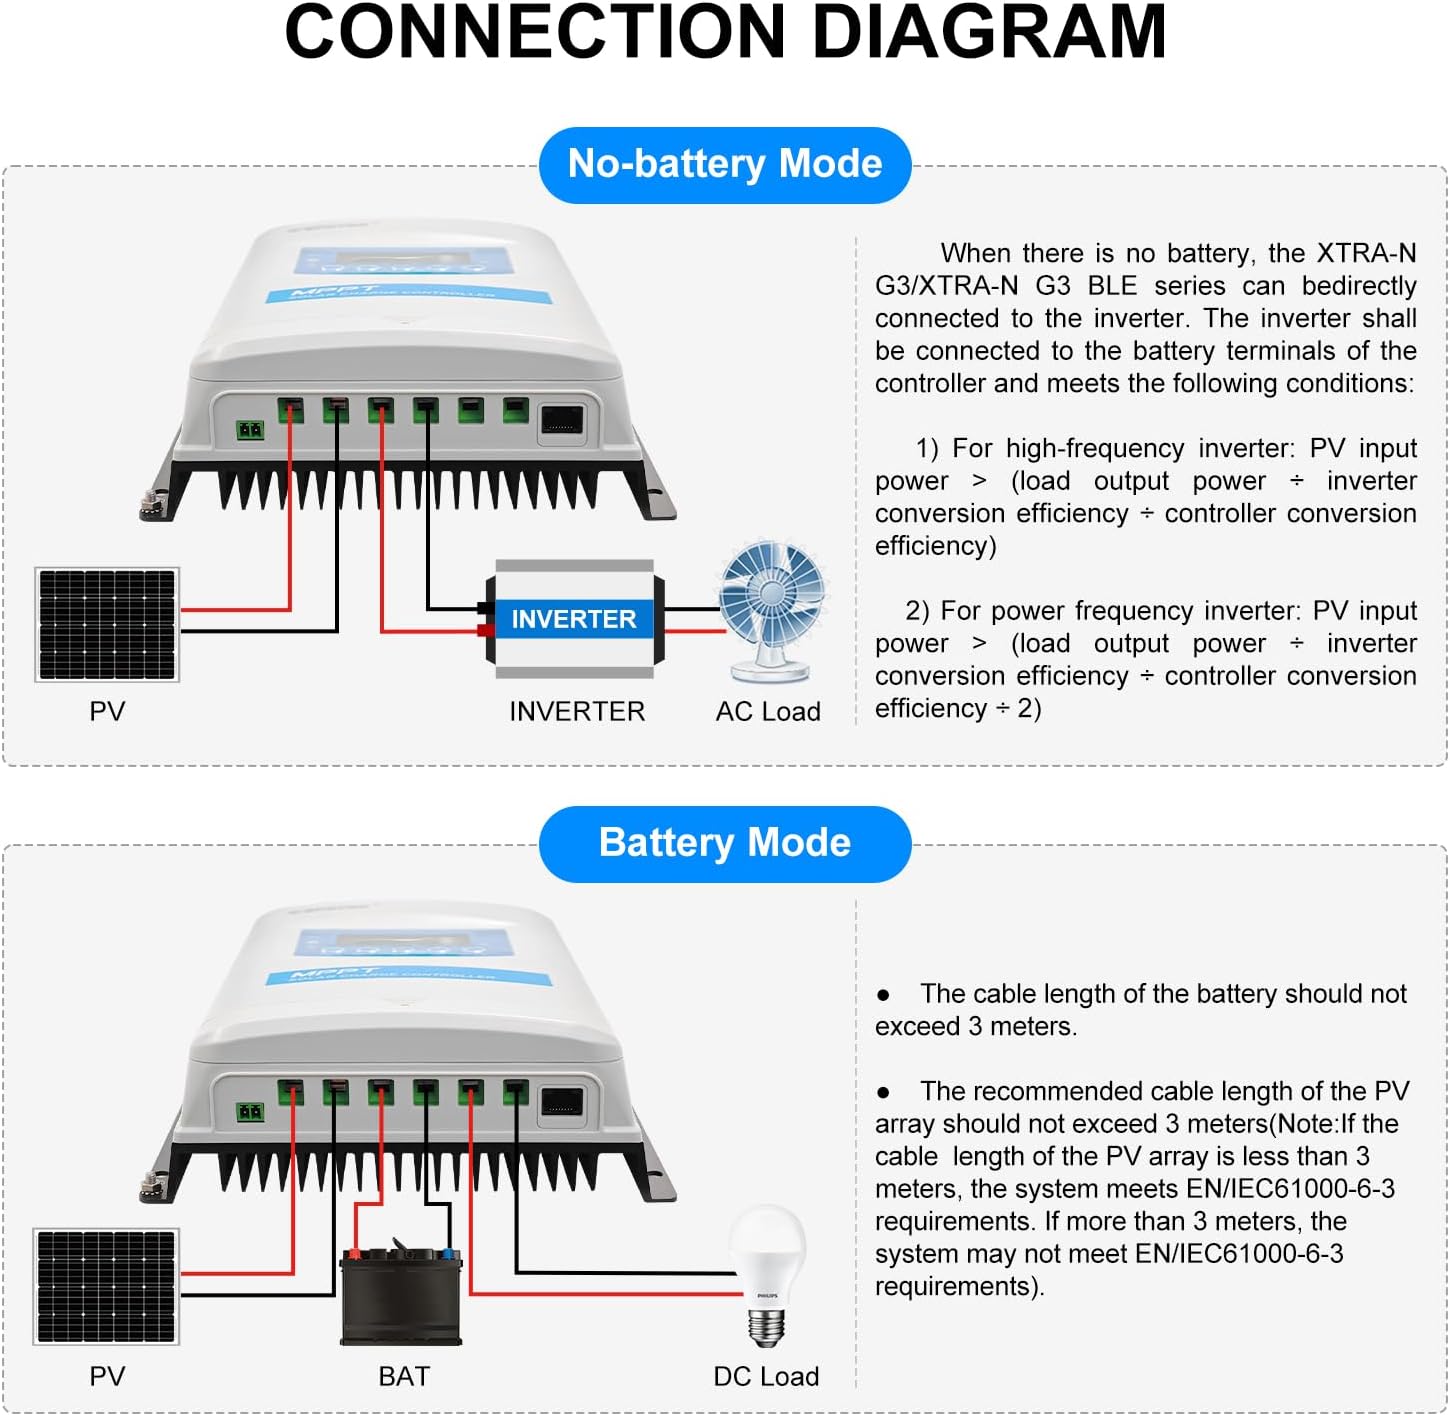
Image: Detailed connection diagrams for the controller in both No-battery Mode (connecting directly to an inverter) and Battery Mode (connecting to a battery and DC load).
Mode sense bateria
When no battery is present, the XTRA-N-G3 can be directly connected to an inverter. This mode requires the PV input power to be greater than the sum of the load output power and inverter/controller conversion efficiency losses.
Mode de bateria
In Battery Mode, the controller manages charging a battery bank from the PV array and supplying power to DC loads. Ensure the battery cable length does not exceed 3 meters. For the PV array, the recommended cable length should not exceed 3 meters to meet EN/IEC61000-6-3 requirements.
5. Instruccions de funcionament
This section details how to operate your EPEVER MPPT Solar Charge Controller, including navigating the display and setting battery parameters.
5.1 Browsing the Interface
The LCD display provides real-time information about your solar system. Use the buttons to navigate through different screens and view parameters such as PV voltage, bateria voltage, charging current, load status, and energy statistics.

Imatge: Examples of the controller's LCD display screens, illustrating how to browse different system parameters and set battery types.
5.2 Configuració del tipus de bateria
The controller supports various battery types. It is crucial to select the correct battery type for optimal charging and battery longevity. The default battery type is Sealed. For Lithium batteries or custom settings, you may need EPEVER accessories like the MT50 remote meter, WiFi/BLE adapter (for phone APP), or PC software via RS485 interface.

Image: Table detailing the supported battery types (Sealed, Gel, Flooded, LiFePO4, Li(NiCoMn)O2, User) and a note on setting Lithium battery parameters.

Image: Comprehensive table of battery voltage parameters for various battery types, including Over Voltage Disconnect, Charging Limit, Boost, Float, and Low Voltage Disconnect settings.
5.3 Indicadors LED
The controller features LED indicators that provide quick visual feedback on the system's status.

Image: Table detailing the color, status (On Solid, Flashing, OFF), and instruction for the PV, Battery, and Load LED indicators.
6. Manteniment
Regular maintenance ensures the longevity and optimal performance of your EPEVER solar charge controller.
- Periodically inspect all wiring connections for tightness and corrosion.
- Mantingueu el controlador net i lliure de pols i brutícia. Feu servir un drap sec per netejar-lo.
- Assegureu-vos que hi hagi una ventilació adequada al voltant del controlador per evitar el sobreescalfament.
- Check the battery terminals for any signs of corrosion and clean if necessary.
- Monitor the LCD display and LED indicators regularly for any abnormal readings or statuses.
7. Solució De Problemes
This section provides guidance on common issues and their potential solutions. Refer to the LED Indicator table in Section 5.3 for basic diagnostics.
- Sense pantalla/Sense alimentació: Comproveu les connexions de la bateria i assegureu-vos que el volum de la bateriatage is within the controller's operating range. Verify fuses are intact.
- PV Not Charging: Check PV array connections and ensure solar panels are receiving sufficient sunlight. Verify PV voltage is above the battery voltage. Refer to the PV LED indicator status.
- La càrrega no funciona: Check load connections and ensure the load is not exceeding the controller's rated current. Verify the load output is enabled. Refer to the Load LED indicator status.
- Battery Over-discharged: The battery LED may show red or slowly flashing red. This indicates the battery voltage is too low. Disconnect the load and charge the battery.
- Controller Overheating: The controller may reduce output or shut down. Ensure proper ventilation and ambient temperature is within specifications.
- Volum del sistematage Error: If the PV&BATTLED flashes rapidly, there might be a system voltage identification error. Recheck connections and battery type settings.
For persistent issues or complex problems, contact EPEVER technical support or an authorized service center.
8. Especificacions
Technical data for the EPEVER MPPT Solar Charge Controller XTRA4215N-G3.
| Paràmetre | Valor |
|---|---|
| Model | XTRA4215N-G3 |
| Rated Charge and Discharge Current | 40Amp |
| Eficiència de seguiment MPPT | ≥99.5% |
| Màx. Eficiència de conversió | 98% |
| Sistema nominal Voltage | 12V/24V DC Auto Work |
| Màx. Potència d'entrada fotovoltaica | 520W (12V system) / 1040W (24V system) |
| Màx. Circuit obert PV Voltage | 150V (at min. operating temp) / 138V (at 25℃) |
| Tipus de bateries compatibles | Sealed (default), Gel (AGM), Flooded, User; LiFePO4 (4s/12V; 8s/24V); Li(NiCoMn)O2 (3s/12V; 6s-7s/24V); User |
| Voltage Rang | 8~32V |
| MPP Voltage Rang | V(BAT+2V)~108V |
| Posada a terra | Common Negative Grounding |
| Interfície RS485 | 5VDC/200mA (RJ45) |
| Temperatura de l'entorn de treball | -25 ℃ ~ + 45 ℃ |
| Interval de temperatura d'emmagatzematge | -20℃ -- +70℃ / -4℉ -- 158℉ |
| Temps de retroil·luminació LCD | 60S (per defecte) |
| Terminals del controlador | #6AWG (16mm²) |
| Recommended Wire Cable | #8AWG (10mm²) |
| Mida del forat de muntatge | Φ5 mm |
| Dimensió | 255 x 187 x 75.7mm (10.04 x 7.36 x 2.98 polzades) |
| Pes | 2.07 KG (4.56 lliures) |
| Certificacions | CE (LVD EN/IEC62109, EMC EN61000-6-1/3) |
Nota: les especificacions estan subjectes a canvis sense previ avís.

Image: Electrical parameters table comparing different EPEVER XTRA series models, including rated current, PV input voltage, i dimensions.
9. Garantia i Suport
The EPEVER MPPT Solar Charge Controller XTRA4215N-G3 is manufactured to high-quality standards and comes with relevant certifications, including CE. For warranty information, please refer to the documentation provided with your purchase.
As an officially authorized vendor for the EPEVER brand, GolandCentury provides free technical support. If you have any questions or require assistance with your controller, please contact GolandCentury's service centers located in Chicago (USA), Munich (Germany), Toronto (Canada), and Melbourne (Australia).
For further information or to purchase accessories like the MT50 remote meter, WiFi/BLE adapters, or PC communication cables, please visit the official EPEVER or GolandCentury webllocs.