
1. Introducció
The Vividia HT-A2 / T-200 Thermal Inspection Camera is a compact, cost-effective, and user-friendly tool designed for various diagnostic and inspection purposes. It is suitable for applications in building, electrical, mechanical, and automotive fields. This manual provides detailed instructions to help users effectively operate and maintain their thermal inspection camera.
The HT-A2 / T-200 features a thermal resolution of 256x192 pixels, enabling clear visualization of temperature differences. Its lightweight design and 3.2-inch screen enhance portability and ease of use, allowing for detailed inspections and temperature measurements.
2. Producte acabatview
Familiarize yourself with the components and controls of your Vividia HT-A2 / T-200 Thermal Inspection Camera.

Figura 2.1: Davant i posterior View of the HT-A2 / T-200 Thermal Inspection Camera with labeled components.
Components clau:
- 3.2" Full Angle TFT Camera Screen: Displays thermal images, temperature readings, and menu options.
- Port micro USB: Used for charging the device and transferring data to a computer.
- Botó Desa: Captures and saves thermal images or video recordings.
- Botons de navegació (amunt, avall, esquerra, dreta): S'utilitza per navegar pels menús i ajustar la configuració.
- Botó On/Off: Encén o apaga el dispositiu.
- Botó de menú: Accedeix al menú principal per a la configuració i les opcions.
- Selection/Entry Button: Confirma les seleccions o accedeix a submenús.
- Digital Camera Lens: Captures visible light images for image fusion.
- Lent infraroja: Detects infrared radiation to create thermal images.
- Càmera Lamp: Provides illumination for the digital camera in low-light conditions.
- Punt d'adhesió: For securing a wrist strap or lanyard.
3. Característiques clau
- High thermal resolution of 256x192 pixels for detailed thermal imaging.
- Compact and lightweight design for enhanced portability and easy storage.
- Ample view angles for comprehensive area coverage.
- Ability to capture still images and record videos.
- Large 3.2-inch touchscreen display for intuitive viewing i funcionament.
- Built-in Wi-Fi connectivity for seamless data transfer to PCs, iPhones, iPads, and Android devices.
- Accurate temperature measurement capabilities.
4. Què hi ha a la caixa
The standard package for the Vividia HT-A2 / T-200 Thermal Inspection Camera includes:
- Vividia HT-A2 / T-200 Thermal Inspection Camera Body
- Cable USB (per a la càrrega i la transferència de dades)
- Manual d'usuari
5. Configuració
5.1 Càrrega inicial
Before first use, fully charge the camera's internal battery. Connect the provided USB cable to the Micro USB port on the camera and the other end to a compatible USB power adapter or a computer's USB port. The charging indicator will show the charging status.

Figura 5.1: Port micro USB per a càrrega i transferència de dades.
5.2 Engegada/apagada
- Per encendre: Manteniu premut el botó On/Off botó fins que la pantalla s'il·lumini.
- Per apagar: Manteniu premut el botó On/Off button until the shutdown prompt appears, then confirm.
6. Instruccions de funcionament
6.1 Navegació bàsica
Utilitza el Botons de navegació (Up, Down, Left, Right) to move the cursor or selection on the screen. Press the Selection/Entry Button to confirm an action or enter a menu option. The Botó de menú provides access to various settings.

Figura 6.1: Adjusting measurement points using navigation keys.
6.2 Captura d'imatges i vídeos
- To Capture an Image: Frame the desired area on the screen and press the Botó Desa. The image will be stored internally.
- To Record Video: Navigate to the video recording mode in the menu and press the Botó Desa per iniciar / aturar la gravació.
6.3 Viewing Saved Media
Access the gallery or playback option through the main menu to review imatges i vídeos capturats.
6.4 Paletes de colors
The camera offers multiple color palettes to visualize temperature differences. These can be selected from the menu to best suit the inspection environment and highlight specific thermal patterns.

Figura 6.2: Examples of thermal imaging applications.
6.5 Data Transfer (Wi-Fi and USB)
- Connexió USB: Connect the camera to a computer using the USB cable. The camera will appear as a removable storage device, allowing you to transfer images and videos.
- Connexió Wi-Fi: Enable Wi-Fi in the camera's settings. Follow the instructions to connect to a PC, iPhone, iPad, or Android device for wireless data transfer and remote viewing (if supported by companion app).
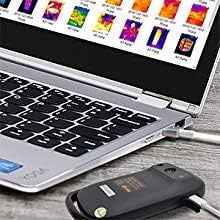
Figura 6.3: Connecting the camera to a laptop for data transfer.
6.6 Aplicacions
The Vividia HT-A2 / T-200 is a versatile tool for various inspection tasks:
- Inspeccions d'automòbils: Detect parasitic draws, inspect HVAC systems, identify exhaust system blockages, check for misfires in engine manifolds, and verify correct flow in cooling systems.
- Inspeccions de la llar: Locate insulation deficiencies, identify moisture intrusion, detect electrical hot spots, and assess HVAC performance.
- HVAC Repair: Diagnose issues in heating, ventilation, and air conditioning systems by visualizing temperature distribution.
- Fontaneria: Identify leaks or blockages in pipes by observing temperature anomalies.
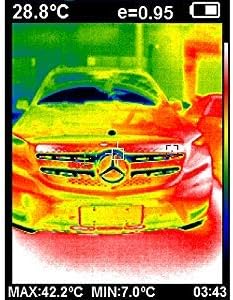
Figura 6.4: Thermal inspection of a vehicle.

Figura 6.5: The compact design allows for easy handling during inspections.
Vídeo 6.1: This video demonstrates the Vividia HT-A2 Thermal Imaging Camera in various applications, including automotive diagnostics, HVAC inspection, and home inspection, showcasing its thermal resolution and ease of use.
7. Manteniment
7.1 Neteja
- Gently wipe the camera body with a soft, dry cloth.
- For the lenses and screen, use a lens cleaning cloth and a specialized lens cleaning solution to avoid scratches. Do not use abrasive cleaners.
7.2 Emmagatzematge
Store the camera in a cool, dry place away from direct sunlight and extreme temperatures. Use the original packaging or a protective case to prevent damage.
7.3 Cura de la bateria
To prolong battery life, avoid fully discharging the battery frequently. If storing the camera for an extended period, ensure the battery is charged to approximately 50-70%.
8. Solució De Problemes
| Problema | Causa possible | Solució |
|---|---|---|
| La càmera no s'encén. | Bateria baixa. | Carregueu la càmera mitjançant el cable USB proporcionat. |
| La imatge és borrosa o poc clara. | Dirty lens; incorrect focus. | Clean the infrared and digital lenses. Ensure the camera is within the optimal focal range. |
| No es pot transferir files a l'ordinador. | Loose USB connection; driver issue; Wi-Fi not enabled. | Ensure USB cable is securely connected. Try a different USB port or cable. Check Wi-Fi settings on the camera and connecting device. |
| Les lectures de temperatura semblen inexactes. | Incorrect emissivity setting; object too far or too close. | Adjust the emissivity setting in the menu to match the material being inspected. Ensure proper distance to the target. |
9. Especificacions

Figura 9.1: Visual comparison of different infrared image resolutions.
| Característica | Detall |
|---|---|
| Nom del model | HT-A2 / T-200 |
| Resolució tèrmica | 256 x 192 píxels |
| Mida de la pantalla | 3.2 polzades |
| Tecnologia del sensor fotogràfic | CMOS |
| Admet File Format | RAW, MP4 (Video) |
| Zoom òptic | 1x |
| Tipus de control d'exposició | Automàtic |
| Factor de forma | Compacte |
| Característica especial | Lightweight, Wi-Fi |
| Modes de tir | Automatic, Movie |
| Dispositius compatibles | Ordinadors, telèfons intel·ligents, tauletes |
| Tipus de bateria | Lithium Ion (internal) |
| Nivell de resistència a l'aigua | No resistent a l'aigua |
| Tecnologia d'enfocament automàtic | Detecció de contrast |
| Configuració del balanç de blancs | Automàtic |
10. Garantia i Suport
10.1 Política de devolució
This product is subject to a 30-day return policy. Please refer to your purchase documentation for specific terms and conditions.
10.2 Suport tècnic
For technical assistance, questions regarding operation, or warranty inquiries, please contact Oasis Scientific Inc., the manufacturer and seller of this product. Contact information can typically be found on the product packaging or their official weblloc.