
1. Introducció
Thank you for choosing the EPEVER 10A Solar Charge Controller. This device is a PWM charge controller designed for solar power systems, featuring an integrated LCD display and dual USB outputs. It is suitable for various applications, including solar home systems, traffic signals, and solar lighting. This manual provides essential information for the safe and efficient operation of your solar charge controller.

Image 1: The EPEVER Solar Charge Controller integrated into different solar power applications, demonstrating its versatility in residential and outdoor settings.
2. Característiques del producte
The EPEVER 10A Solar Charge Controller incorporates advanced technology and robust design for reliable performance:
- High Quality & Safety: Constructed with high-quality components from ST, IR, and Infineon, ensuring product longevity and safety. Terminals are UL and VDE certified.
- Pantalla LCD: A clear LCD shows real-time solar panel and battery performance data, including an energy statistics counter. User-friendly buttons facilitate comfortable and convenient operation.
- Sortida USB dual: Features two USB charging ports (5V/2.4A total) for fast and efficient charging of compatible devices such as mobile phones, tablets, and MP3 players.
- 3-Stage PWM Charging: Supports three battery charging options: Sealed, Gel, and Flooded. Employs a 3-stage intelligent PWM charging process: Bulk, Boost/Equalize, and Float.
- Multiple Load Modes: Offers various load control modes including Light control, Light Time control, and Dual Time control.
- Múltiples funcions de protecció: Includes comprehensive protection against PV Reverse Polarity, Battery Reverse Polarity, Battery Over Voltage, Battery Over Discharge, Battery Overheating, Load Short Circuit, Load Overload, and Controller Overheating. The controller can operate continuously at full load within an environment temperature range of -25 to 55 ℃.
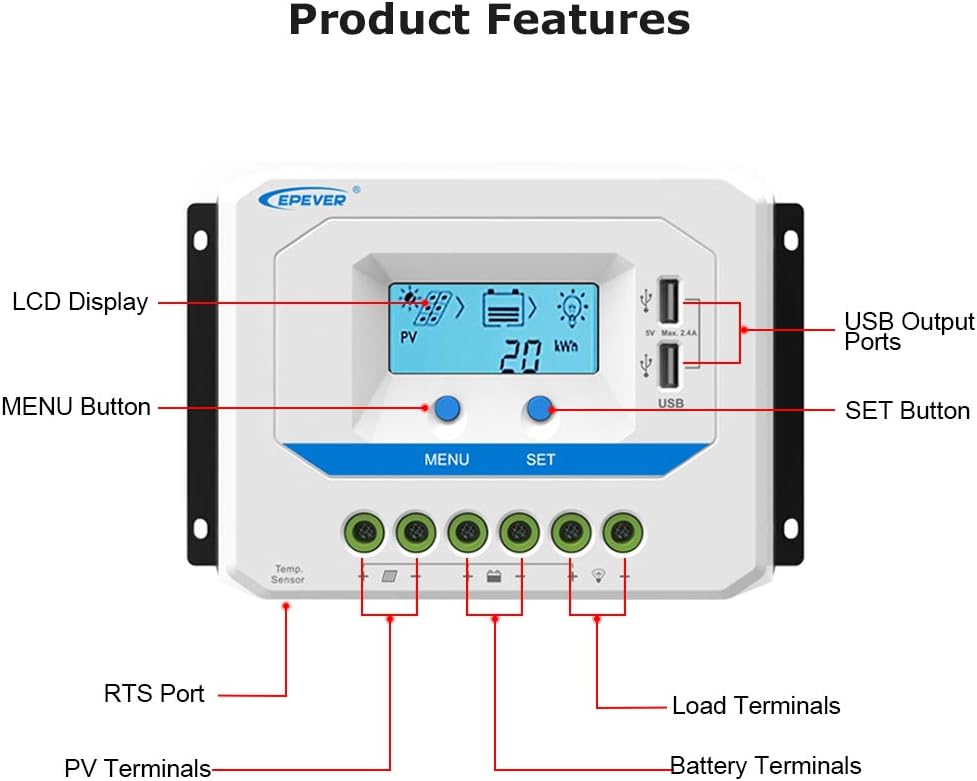
Imatge 2: Una imatge detallada view of the EPEVER Solar Charge Controller, highlighting its key components such as the LCD Display, MENU and SET buttons, USB Output Ports, RTS Port, PV Terminals, Battery Terminals, and Load Terminals.

Image 3: A close-up illustrating the dual USB charging ports and the heat dissipation aluminum alloy fins on the underside of the controller, emphasizing its charging capability and thermal management.
3. Configuració i instal·lació
Proper installation is crucial for the safe and efficient operation of your solar charge controller. Please follow the connection sequence carefully:
- Connecteu la bateria: First, connect the battery to the charge controller. Ensure correct polarity (+ to + and - to -). The controller will automatically detect the system voltage.
- Connecteu el panell solar: Next, connect the solar panel to the charge controller. Again, observe correct polarity.
- Connect the Load: Finally, connect your DC load to the charge controller.
Important: When disconnecting the system, reverse the order: Disconnect the Solar Panel, then the Load, and finally the Battery.
Ensure that the wire size is appropriate for your system. Refer to the table below for recommended terminal sizes based on controller model:
| Model de controlador | Terminals (mm²/AWG) |
|---|---|
| 1024AU | 4 mm²/12AWG |
| 2024AU | 10 mm²/8AWG |
| 3024/3048AU | 16 mm²/6AWG |
| 402/4048AU | 16 mm²/6AWG |
| 6024/6048AU | 25 mm²/4AWG |

Image 4: A clear wiring diagram illustrating the correct connection sequence for the battery, solar panel, and load to the EPEVER Solar Charge Controller. Note the numbered sequence for installation and the reverse order for removal.
Video 1: This video provides a step-by-step guide on the operation and installation of the EPEVER PWM Solar Charge Controller, demonstrating how to connect components and navigate the interface.
4. Instruccions de funcionament
The LCD display and buttons allow for easy monitoring and parameter setting:
- Navigating the Display: Use the 'MENU' button to cycle through different display interfaces, showing battery voltage, charging current, load status, and other system parameters.
- Configuració del tipus de bateria: To set the battery type (Sealed, Gel, or Flooded), press and hold the 'SET' button for 5 seconds. Use the 'MENU' button to select the desired type, then press 'SET' again to confirm or wait 5 seconds for automatic confirmation.
- Modes de control de càrrega: The controller supports various load modes. To enter the load mode setting interface, press and hold the 'SET' button until the number begins flashing. Use the 'MENU' button to adjust the parameter, then press 'SET' to confirm. Available modes include:
- Light ON/OFF: Load is on for 1 hour after sunset.
- Load is on for X hours after sunset (e.g., 2 hours, 3 hours).
- Load is on for X hours before sunrise (e.g., 13 hours, 14 hours).
- Test mode: Load is always on.
- Manual mode: Load can be manually turned ON/OFF by pressing the 'SET' button.
- Càrrega USB: The dual USB ports provide 5V/2.4A (total) output for charging mobile phones, tablets, and other USB-powered devices.

Image 5: The LCD display of the EPEVER Solar Charge Controller showing the battery type selection interface, cycling through Sealed, Gel, and Flooded options.
5. Manteniment
To ensure optimal performance and longevity of your EPEVER Solar Charge Controller, regular maintenance is recommended:
- Netegeu el controlador: Periodically wipe the controller's exterior with a dry cloth to remove dust and debris. Ensure the heat sink fins are clear of obstructions for proper cooling.
- Comproveu les connexions: Regularly inspect all wiring connections (battery, solar panel, load) to ensure they are tight and free from corrosion. Loose connections can lead to voltaggotes de líquids i sobreescalfament.
- Monitoritzar el rendiment: Utilize the LCD display to regularly check system parameters such as battery voltage, charging current, and load status. Any significant deviations may indicate an issue.
- Condicions ambientals: Ensure the controller is installed in a well-ventilated area, away from direct sunlight, moisture, and corrosive gases. Maintain the operating temperature within the specified range (-25 to 55 ℃).
6. Solució De Problemes
This section outlines common issues and their potential solutions:
| Problema | Causa possible | Solució |
|---|---|---|
| El controlador no s'encén | Bateria no connectada o polaritat invertida; Volum de la bateriatage massa baix | Comproveu les connexions i la polaritat de la bateria; carregueu la bateria si hi ha volum.tage està per sota del nivell mínim operatiu. |
| La bateria no es carrega | Solar panel not connected or reverse polarity; Insufficient sunlight; Faulty solar panel or wiring | Verify solar panel connections and polarity; Ensure adequate sunlight; Inspect solar panel and wiring for damage. |
| La càrrega no funciona | Load disconnected or short circuit; Battery voltage too low (LVD); Overload protection activated | Check load connections; Recharge battery; Reduce load or check for short circuits. |
| LCD display abnormal | Loose connection; Internal fault | Check all connections; If problem persists, contact customer support. |
7. Especificacions
Key technical specifications for the EPEVER 10A Solar Charge Controller:
| Especificació | Valor |
|---|---|
| Marca | SEMPRE |
| Model | 10A24V |
| Fabricant | EPEVER® |
| Tipus de port de càrrega | USB |
| Voltage | 24 Volts |
| Tipus de visualització | LCD |
| Pes de l'article | 1.19 lliures |
| Dimensions del paquet | 15.71 x 6.5 x 2.28 polzades |
| UPC | 732376582643 |
8. Garantia i Suport
EPEVER products are designed for reliability and performance. For specific warranty details and support, please refer to the official EPEVER documentation or visit the official EPEVER store.