
1. Introducció i finalview
The EPEVER Tracer3210AN is a 30A Maximum Power Point Tracking (MPPT) solar charge controller designed for 12V/24V automatic system voltage detection. It features a maximum PV input voltage of 100V and negative grounding. This controller is equipped with an MT50 remote meter, a temperature sensor (RTS), and an RS485 PC communication cable for comprehensive monitoring and control.
This manual provides detailed instructions for the safe and efficient installation, operation, and maintenance of your Tracer3210AN solar charge controller.
2. Característiques del producte
- Tecnologia MPPT avançada: Ensures high tracking efficiency (over 99.5%) for optimal solar energy harvesting.
- Automatic System Voltage: Detecta automàticament sistemes de bateries de 12V o 24V.
- High PV Input: Supports maximum PV input voltagi fins a 100V.
- Negative Grounding: Common negative grounding design for system compatibility.
- Compatibilitat versàtil de bateries: Supports Sealed, Gel, Flooded, Lithium, and user-defined battery types.
- Built-in LCD Display: Provides real-time display of key charging parameters.
- Múltiples opcions de comunicació: Includes RS-485 interface for PC software, mobile app connectivity (via optional accessories), and MT50 remote meter.
- Sortida USB: Dual USB ports (5V Max: 2.2A) for charging external devices.
- Current Limiting Function: Allows for future expansion of solar panels without overloading.
- Disseny robust: Features aluminum alloy material for efficient heat dissipation.
3. Components mésview
The EPEVER Tracer3210AN kit includes the following components:
- Tracer3210AN MPPT Solar Charge Controller
- Mesurador remot MT50
- Sensor de temperatura remot (RTS)
- PC Communication Cable (RS485 to USB)
- Cargols de muntatge i tacs de paret
- Manual d'usuari


4. Configuració i instal·lació
Proper installation is crucial for the safe and efficient operation of your solar charge controller. Please follow these steps carefully.
4.1 Instruccions de cablejat
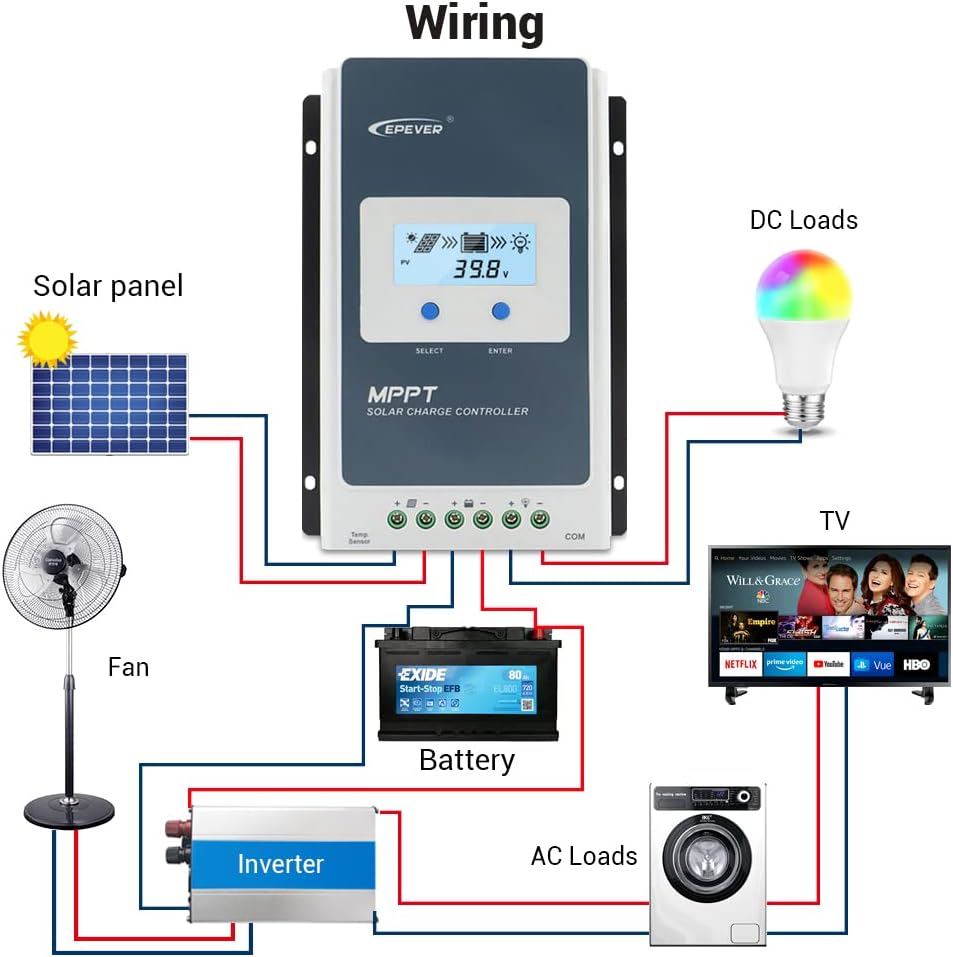
Ordre de connexió: Always connect the battery first, then the solar panel, and finally the load.
Ordre de desconnexió: Disconnect the solar panel first, then the load, and finally the battery.
- Connect the battery to the controller's battery terminals (BAT+ and BAT-).
- Connect the solar panel to the controller's PV terminals (PV+ and PV-).
- Connect the load to the controller's load terminals (LOAD+ and LOAD-).
- Connect the Remote Temperature Sensor (RTS) to the designated RTS port.
- Connect the MT50 Remote Meter or PC Communication Cable to the RS485 port as needed.

4.2 Instal·lació del mòdul (si escau)
The Tracer3210AN controller supports various interface modules for enhanced functionality. To change or install modules:
- Pry the cover of the controller off using a screwdriver.
- Insert the desired module (e.g., Display Standard 2 Modules (DS2), USB COM Slave (UCS)) into the designated slot.
- Substituïu la coberta.
5. Instruccions de funcionament
5.1 LCD Display and Button Functions
The controller features an LCD display and buttons for monitoring and setting parameters.
- PV Browsing Interface: Premeu el botó per view PV data. Hold for 5 seconds to set data.
- BATT Browsing Interface: Premeu el botó per view battery data. Hold for 5 seconds to set battery type, capacity, and temperature.
- Load Browsing Interface: Premeu el botó per view load data. Hold for 5 seconds to set load working mode.
- Configuració de la interfície: Press the button to enter settings. Hold for 5 seconds to set parameters.
5.2 Configuració del tipus de bateria
To ensure proper charging, set the correct battery type:
- Premeu el botó SET button for the setting interface.
- Premeu el botó BAT button and hold for 5 seconds to enter the battery type interface.
- Premeu el botó PV + or CÀRREGA- buttons to choose the battery type (e.g., Sealed, GEL, FLD, LiFePO4, Li(NiCoMn)O2, USE).
- Premeu el botó SET botó per confirmar el tipus de bateria.
PRECAUCIÓ: Quan se selecciona el tipus de bateria predeterminat, el volum de bateriatage control parameters will be set by default and cannot be changed. To change these parameters, select "User" battery type.
5.3 Setting Load Working Mode
The controller offers various load working modes:
- Manual Control Mode (default): Press the button to open/close the load.
- Llum ON/OFF: Load turns on/off based on light conditions.
- Light ON + Timer: Load turns on based on light and stays on for a set duration.
- Control de temps: Load operates according to a programmed schedule.
Refer to the MT50 remote meter or PC software for detailed configuration of load working modes.
6. Manteniment
To ensure optimal performance and longevity of your EPEVER Tracer3210AN solar charge controller, regular maintenance is recommended:
- Inspeccionar connexions: Comproveu periòdicament totes les connexions del cablejat per assegurar-vos que estiguin ben ajustades i que no estiguin corroses. Les connexions soltes poden causar sobreescalfament i danys.
- Controlador net: Keep the controller clean and free from dust and debris. Ensure the heat sink fins are not obstructed to maintain proper cooling.
- Monitoritzar el rendiment: Regularly check the LCD display or connected remote meter/app for normal operating parameters (PV voltage, bateria voltage, charging current).
- Inspecció de la bateria: Inspect battery terminals for corrosion and ensure the battery is in good condition. For flooded batteries, check electrolyte levels.
- Control ambiental: Ensure the installation environment is within the specified temperature and humidity ranges.
7. Solució De Problemes
If you encounter issues with your Tracer3210AN controller, consider the following common troubleshooting steps:
- Sense pantalla/alimentació: Comproveu les connexions de la bateria i assegureu-vos que el volum de la bateriatage is within the operating range. Verify fuses are intact.
- Sense càrrega: Confirm solar panel connections are secure and receiving adequate sunlight. Check PV voltage on the display. Ensure the battery type is correctly set.
- La càrrega no funciona: Verify load connections. Check the load working mode settings. Ensure the battery has sufficient charge.
- Codis d'error: Refer to the full user manual for specific error codes displayed on the LCD or MT50 remote meter.
For persistent issues, contact EPEVER customer support or consult a qualified technician.
8. Especificacions tècniques
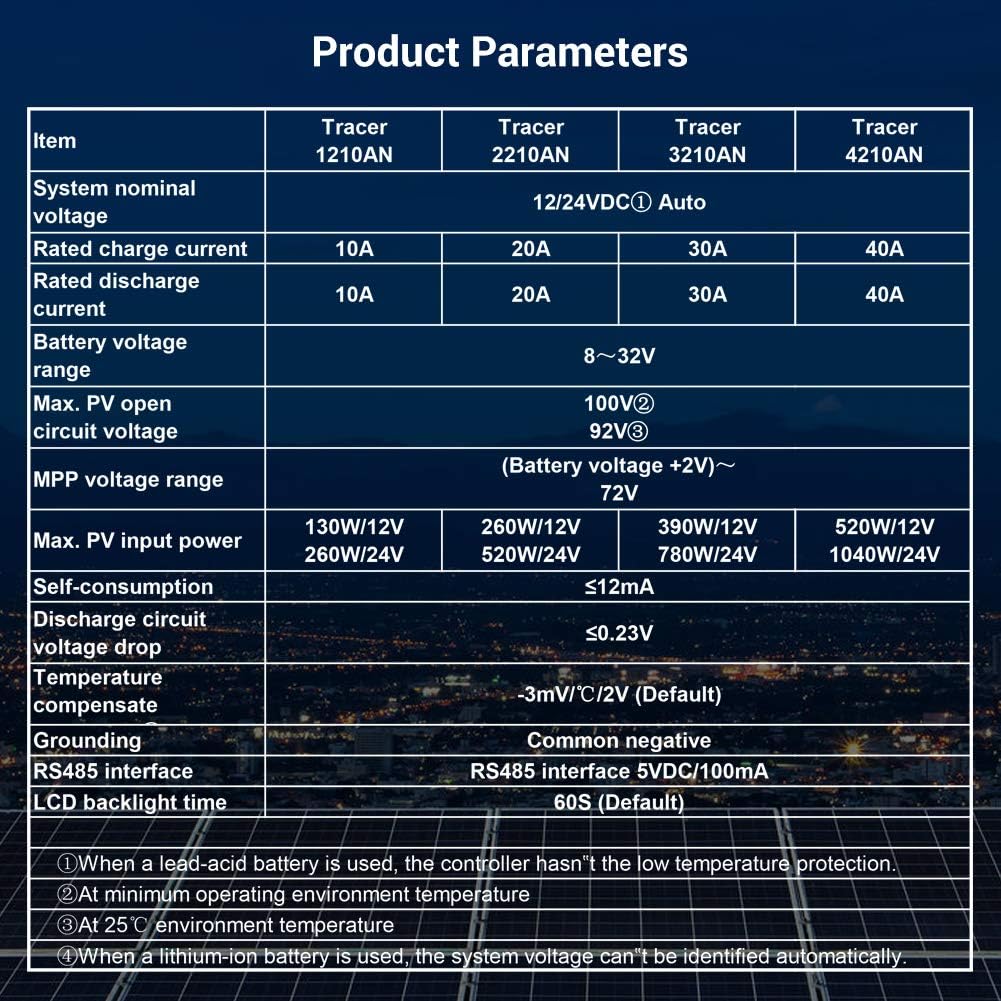
Below are the detailed specifications for the Tracer3210AN model:
| Item | Tracer 3210AN |
|---|---|
| Vol nominal del sistematage | 12 / 24VDC automàtic |
| Corrent de càrrega nominal | 30A |
| Corrent nominal de descàrrega | 30A |
| Bateria voltage gamma | 8~32V |
| Màx. Circuit obert fotovoltaic voltage | 100 V |
| MPP voltage gamma | (Bateria voltage +2V)~72V |
| Màx. Potència d'entrada fotovoltaica | 390W/12V, 780W/24V |
| Autoconsum | ≤12mA |
| Circuit de descàrrega voltage gota | ≤0.23V |
| Coeficient de compensació de temperatura | -3mV/°C/2V (per defecte) |
| Posada a terra | Negatiu comú |
| Interfície RS485 | 5VDC / 100mA |
| Temps de llum de fons LCD | 60S (per defecte) |
| Interval de temperatura d'emmagatzematge | -20 ℃ ~ +70 ℃ |
| Humitat relativa | ≤95%, NC |
| Tancament | IP30 |
| Mida del forat de muntatge | Φ5 mm |
Nota: When a lead-acid battery is used, the controller has no low temperature protection. Max PV open circuit voltage is at minimum operating environment temperature. At 25℃ environment temperature. When a lithium-ion battery is used, the system voltage no es poden identificar automàticament.
9. Opcions de connectivitat
The Tracer3210AN controller offers various connectivity options for monitoring and control:
- MT50 Remote Meter: Displays operating data and fault information. Easy to operate with a numeric display.
- Programari de PC: Connect via USB to RS485 cable (CC-USB-RS485-150U) for monitoring and parameter modification using Solar Station PC software.
- Aplicació mòbil: Connect via OTG cable (OTG-12CM) or optional WiFi/Bluetooth adapters (eBox-WiFi-01, eBox-BLE-01) for real-time monitoring and parameter modification via mobile app.
- Registrador: eLOG01 logger can record operating data of the controller for later review.
10. Garantia i Suport
For warranty information, technical support, or service inquiries, please refer to the warranty card included in your product packaging or visit the official EPEVER website. Ensure you have your product model and serial number available when contacting support.
For additional resources and FAQs, you may visit the EPEVER Store on Amazon.