
1. Introducció i finalview
This manual provides detailed instructions for the installation, operation, and maintenance of the EPEVER EPIPDB-COM-10 Dual Battery Solar Charge Controller. This controller is designed to efficiently manage solar charging for two independent battery banks in 12V/24V systems, commonly found in RVs, caravans, and boats. It ensures optimal charging and protection for both batteries.

Figure 1: EPEVER EPIPDB-COM-10 Dual Battery Solar Charge Controller.
Característiques principals:
- Protecció integrada contra curtcircuits, protecció contra circuits oberts, protecció inversa i protecció contra sobrecàrregues.
- Designed to charge and protect two batteries or battery banks independently.
- Adjustable charging priority between battery banks (e.g., 30%/70%).
- Automatic calculation of data from the local temperature sensor when a Remote Temperature Sensor (RTS) is not connected. The controller will automatically switch to RTS data when connected.
- Adjustable controlling parameters for system customization.
- Supports various battery types: sealed, gel, and flooded.
- Suitable for motorhomes, caravans, boats, or any system utilizing two 12V / 24V batteries or battery banks.
2. Product Components and Identification
Familiarize yourself with the various components and connection points of the EPIPDB-COM-10 controller for proper installation and operation.

Figura 2: Frontal i inferior view of the controller with labeled components.
- Local Temp Sensor: Integrated temperature sensor for ambient temperature compensation.
- For Battery 1 / For Battery 2 LEDs: Indicators for the charging status of each battery.
- Configuració de la pantalla: Digital display for viewing and adjusting parameters.
- Remote Temp Sensor Connection: Port for connecting an optional external remote temperature sensor.
- Battery 1 Terminals: Positive (+) and Negative (-) terminals for connecting the first battery bank.
- PV Terminals: Positive (+) and Negative (-) terminals for connecting the solar panel array.
- Battery 2 Terminals: Positive (+) and Negative (-) terminals for connecting the second battery bank.
- Remote Meter Connection: RJ45 port for connecting an optional remote meter (e.g., MT-1) for advanced monitoring and control.

Figure 3: Optional accessories including Remote Temperature Sensor and MT-1 Remote Meter.
The controller can be enhanced with optional accessories such as a Remote Temperature Sensor (for more accurate temperature compensation at the battery location) and an MT-1 Remote Meter (for convenient monitoring and parameter adjustment from a distance). These accessories are not included with the controller and must be purchased separately.
3. Especificacions
The following table outlines the technical specifications of the EPEVER EPIPDB-COM-10 Dual Battery Solar Charge Controller.
| Especificació | Valor |
|---|---|
| Model | EPIPDB-COM-10 |
| Corrent nominal | 10A |
| Volum del sistematage | 12V/24V Auto Work |
| Tipus de visualització | LED |
| Tipus de bateries compatibles | Sealed, Gel, Flooded |
| Dimensions del paquet | 6.42 x 3.66 x 1.73 polzades |
| Pes de l'article | 8.8 unces (250 grams) |
| Fabricant | SEMPRE |
| UPC | 732376583534 |
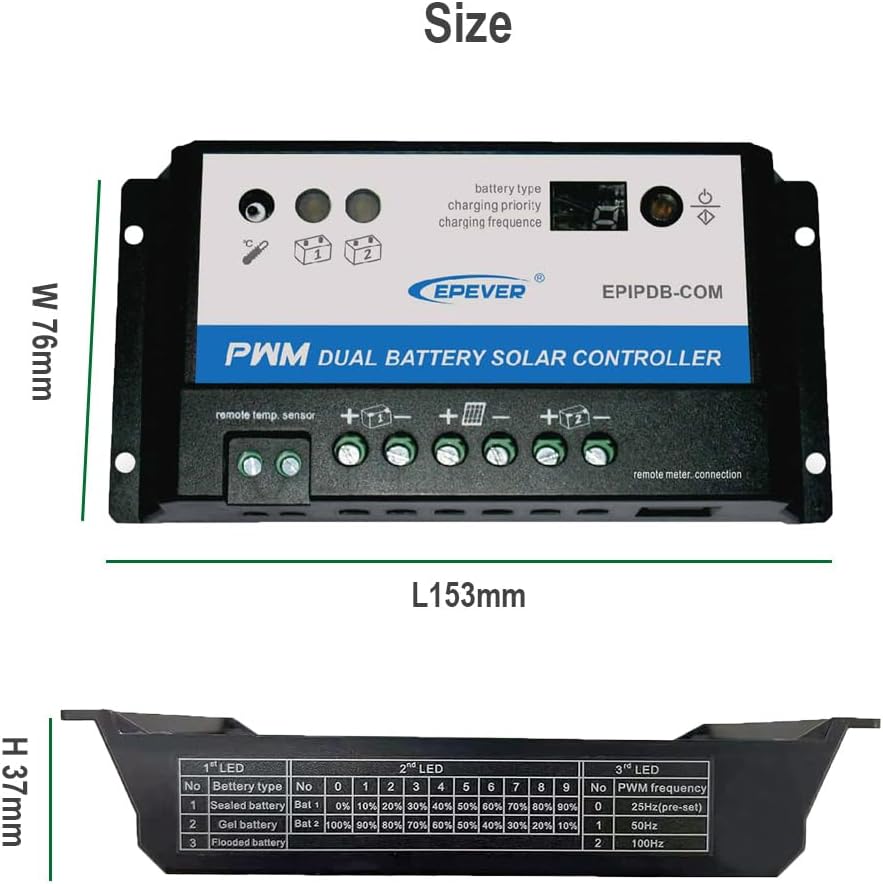
Figure 4: Physical dimensions of the controller and a table detailing LED indicators for battery type and PWM frequency.
4. Configuració i instal·lació
Una instal·lació correcta és crucial per al funcionament segur i eficient del vostre sistema de càrrega solar. Seguiu aquests passos amb atenció.
Diagrama de cablejat:

Figure 5: Standard wiring diagram connecting solar panel, controller, and two battery banks.
- Prepareu els cables: Ensure all wires are of appropriate gauge for the current and length, and that they are properly stripped.
- Connecteu les bateries: Connect the first battery bank to the "Battery 1" terminals (+ and -) on the controller. Then, connect the second battery bank to the "Battery 2" terminals (+ and -). Ensure correct polarity.
- Connecteu el panell solar: Connect the solar panel array to the "PV" terminals (+ and -) on the controller. Ensure correct polarity.
- Optional Remote Connections: If using, connect the Remote Temperature Sensor to its dedicated port and the MT-1 Remote Meter to the RJ45 "Remote Meter Connection" port.
- Connexions segures: Double-check all connections to ensure they are tight and secure. Loose connections can lead to poor performance or damage.
Important: Always connect the batteries to the controller first, before connecting the solar panels. Disconnect in the reverse order: solar panels first, then batteries. This sequence prevents damage to the controller.
5. Instruccions de funcionament
The EPIPDB-COM-10 controller operates automatically once connected. However, you can adjust certain parameters to optimize performance for your specific battery types and charging needs.
Indicadors LED:
The controller features LED indicators to show the status of each battery and the overall charging process. Refer to Figure 4 for a detailed table on LED meanings.
Setting Battery Type and Charging Priority:
The controller allows you to select the battery type (Sealed, Gel, Flooded) and set the charging priority between Battery 1 and Battery 2. This is done via the "Setting" display and buttons on the controller, or through the optional MT-1 remote meter.
- Selecció del tipus de bateria: Choose the battery type that matches your installed batteries for optimal charging algorithms. Incorrect settings can reduce battery lifespan.
- Charging Priority: The controller can divide the charging current between Battery 1 and Battery 2 based on a set ratio (e.g., 30%/70%). When one battery is fully charged, more current will be diverted to the other. If only one battery is detected, all charging current will automatically go to that battery.
Consult the detailed table in Figure 4 for specific LED patterns corresponding to battery types and PWM frequencies.
6. Manteniment
Regular maintenance helps ensure the longevity and optimal performance of your EPEVER EPIPDB-COM-10 controller and solar charging system.
- Neteja: Keep the controller clean and free from dust, dirt, and moisture. Use a dry cloth for cleaning.
- Comprovacions de connexió: Periodically inspect all wiring connections (solar panel, battery 1, battery 2) to ensure they are tight and free from corrosion.
- Ventilació: Ensure the controller has adequate ventilation to prevent overheating. Do not block ventilation holes.
- Condicions ambientals: Operate the controller within its specified temperature and humidity ranges.
- Salut de la bateria: Monitor the health of your batteries. The controller protects them, but regular checks of battery terminals and electrolyte levels (for flooded batteries) are recommended.
7. Solució De Problemes
This section provides guidance for common issues you might encounter with your EPEVER EPIPDB-COM-10 controller.
| Symptom (LED Indicator) | Causa possible | Solució |
|---|---|---|
| LED parpellejant | Curtcircuit detectat. | Check PV (solar panel) and battery connections. Ensure correct polarity and no short circuits. |
| El LED parpelleja lentament | La bateria està completament carregada. | This is normal operation. No action required. |
| LED ON (solid) | Controller is actively charging. | This is normal operation. No action required. |
| LED frequent flashing (with battery connected) | No charging occurring. | Check solar panel connection, ensure sufficient sunlight, and verify solar panel voltage. |
| LED apagat | No battery connected or battery over voltage. | Verify battery connections. Check battery voltage to ensure it's within the controller's operating range (12V/24V). |
If the issue persists after attempting the suggested solutions, please contact EPEVER customer support for further assistance.
8. Garantia i Suport
For information regarding product warranty, please refer to the warranty card included with your purchase or visit the official EPEVER weblloc.
For technical support, troubleshooting beyond this manual, or inquiries about replacement parts, please contact EPEVER customer service.
You can find more information and contact details on the official EPEVER store page: EPEVER Store on Amazon.