
1. Introducció
The ANENG V01B is a battery-powered, true-RMS, auto-ranging digital multimeter designed for accurate electrical measurements. It features a 4000-count LCD display with backlight and a built-in flashlight for enhanced visibility in various working conditions.
This manual provides essential information for the safe and effective use of your ANENG V01B multimeter, including setup, operation, maintenance, and troubleshooting.

Figura 1: ANENG V01B Digital Multimeter with display dimensions (44.5mm / 1.75in width, 27mm / 1.06in height) and test leads (790mm / 31.1in length).
2. Informació de seguretat
ADVERTIMENT: To avoid electric shock or personal injury, read and understand all safety information before using this product.
- No introduïu voltage when the multimeter is set to Current Mode, Resistance Mode, Diode Mode, Continuity Mode, or Temperature Mode.
- No introduïu voltage exceeding 36V DC or 25V AC when measuring current.
- Always ensure the test leads are properly connected and the function dial is set to the correct measurement range before testing.
- Inspect test leads for damage before each use. Do not use if insulation is damaged or bare metal is exposed.
- No feu funcionar el mesurador si sembla que està danyat o si no funciona correctament.
- Complir els codis de seguretat locals i nacionals.
3. Configuració
3.1 Instal·lació de la bateria
The ANENG V01B multimeter requires batteries for operation. Follow these steps to install or replace the batteries:
- Assegureu-vos que el multímetre estigui APAGAT.
- Locate the battery slot on the back of the product.
- Obriu la tapa de la bateria.
- Introduïu les piles necessàries, respectant la polaritat correcta (+ i -).
- Tanqueu la tapa de la bateria amb seguretat.

Figura 2: Battery slot and product back shell with retractable bracket and flashlight.
3.2 Connexió dels cables de prova
Proper connection of test leads is crucial for accurate and safe measurements.
- Inseriu el cable de prova negre a la presa d'entrada "COM" (comú).
- Per a la majoria de volumstage, resistance, capacitance, frequency, and diode measurements, insert the red test lead into the "VΩHz" input jack.
- For current measurements up to 400mA, insert the red test lead into the "mA" input jack.
- For current measurements up to 10A, insert the red test lead into the "10A" input jack.

Figura 3: Test lead input interfaces: COM, VΩHz, mA, and 10A.
4. Instruccions de funcionament
4.1 Introducció a la funció del panell
Familiarize yourself with the multimeter's controls and display elements:

Figura 4: Multimeter panel with labeled functions.
- Marcador rotatiu: Selects the primary measurement function (e.g., V for voltage, Ω for resistance, A for current).
- Botó SEL: Used for function conversion (e.g., switching between AC/DC voltage, or different sub-functions within a dial setting).
- APAGAT AUTOMÀTIC: Indicates automatic power-off feature.
- HOLD/* Button: Data retention (freezes the current reading on the display) and activates/deactivates the backlight.
- NCV: Vol. Sense contactetage detecció.
- Pantalla LCD: Shows measurement readings, units, and various indicators.
- Encès/apagat: Integrated into the rotary dial (OFF position).
4.2 Basic Measurement Functions
The ANENG V01B offers various measurement capabilities:
- DC Voltage Mesura: Turn the rotary dial to the 'V' position. Connect the red test lead to the positive terminal and the black test lead to the negative terminal of the circuit or component. The display will show the DC voltage lectura.

Figura 5: Example of measuring DC voltage d'una pila de 9V.
- Vol. ACtage Mesura: Turn the rotary dial to the 'V' position. Press the 'SEL' button to switch to AC voltage mode if necessary. Connect the test leads across the AC voltage font.
- Resistance Measurement (Ω): Turn the rotary dial to the 'Ω' position. Ensure the circuit is de-energized before measuring resistance. Connect the test leads across the component.
- Mesura de la capacitat: Turn the rotary dial to the capacitance symbol. Ensure the capacitor is discharged before measurement.
- Current Measurement (A/mA): Select the appropriate 'A' or 'mA' range on the rotary dial. Connect the multimeter in series with the circuit. Observe safety warnings regarding maximum input voltage.
- Frequency (Hz) and Duty Cycle: Select the 'Hz' position.
- Diode Test and Continuity: Select the diode/continuity position. Use 'SEL' to switch between modes.
- Vol. Sense contactetage (NCV): Select the 'NCV' position. Bring the top of the multimeter near an AC voltagla font per detectar la seva presència sense contacte directe.
4.3 Característiques especials
- Retroiluminació/Llanterna: Press and hold the 'HOLD/*' button to activate the backlight. The flashlight is located on the back of the unit and can be used in low-light conditions.

Figura 6: Back of the product showing the high brightness flashlight and NCV sensing point.
- Classificació automàtica: The multimeter automatically selects the appropriate measurement range, simplifying operation.
- Conservació de dades: Press the 'HOLD/*' button briefly to freeze the current reading on the display. Press again to release.
5. Manteniment
5.1 Neteja
Netegeu el cas amb l'anunciamp drap i detergent suau. No utilitzeu abrasius ni dissolvents. Mantingueu els terminals d'entrada lliures de brutícia i humitat.
5.2 Substitució de la bateria
When the battery indicator appears on the display, replace the batteries as described in Section 3.1. Always use the specified battery type.
5.3 Canvi de fusibles
Si la funció de mesura de corrent deixa de funcionar, és possible que calgui substituir el fusible. Consulteu les especificacions per conèixer el tipus i la classificació correctes del fusible. La substitució del fusible només l'ha de realitzar personal qualificat.
6. Solució De Problemes
6.1 Millivolt Value Jump
It is a normal phenomenon for the millivolt (mV) range of the multimeter to show a non-zero reading when the test leads are not connected to a circuit. This can be caused by:
- Excessive changes in ambient temperature and humidity.
- Strong electric or magnetic field interference.
To verify if the meter returns to zero, dial the multimeter to the mV range, insert the corresponding input hole into the red and black pen line, and short-circuit the red and black test leads. The display should then show zero or a very small, stable value.
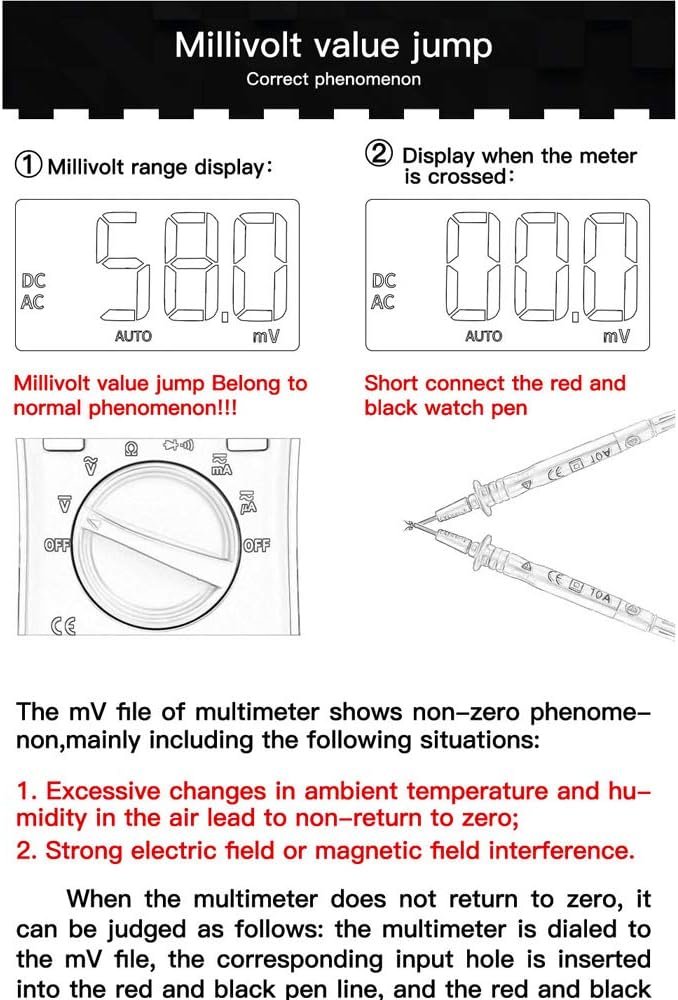
Figura 7: Millivolt range display and method to check for zero return by shorting test leads.
6.2 Problemes generals
- Sense pantalla: Comproveu la instal·lació de la bateria i el nivell de càrrega. Canvieu les bateries si cal.
- Lectures incorrectes: Ensure test leads are correctly connected to the appropriate input jacks. Verify the rotary dial is set to the correct measurement function and range.
- Sense resposta: Turn the multimeter off and then on again. If the issue persists, replace batteries.
7. Especificacions
| Característica | Especificació |
|---|---|
| Model | ANENG V01B |
| Mostra | LCD de 4000 recomptes |
| Tipus de mesura | Digital Multimeter (True-RMS, Auto-Ranging) |
| DC Voltage | Sí |
| Vol. ACtage | Sí |
| Corrent DC | Sí |
| Corrent alterna | Sí |
| Resistència | Sí |
| Capacitat | Sí |
| Freqüència | Sí |
| Prova de díode | Sí |
| Prova de continuïtat | Sí |
| NCV (vol sense contacte).tage) | Sí |
| Llum de fons | Sí |
| Llanterna | Sí |
| Font d'alimentació | Funciona amb piles |
| Color | Blau |
| UPC | 630282728851 |
| ASIN | B0831BWKWL |
8. Garantia i Suport
Specific warranty information and customer support details are not provided in the available product data. Please refer to the product packaging, the manufacturer's official website, or contact your retailer for warranty terms and technical support inquiries.