1. Introducció
This manual provides comprehensive instructions for the safe and efficient operation of your Nedis Ultra HD 4K Dashcam (Model DCAM44BK). This device is designed to record your car journeys in high definition, offering advanced features for enhanced road safety and evidence collection. Please read this manual thoroughly before using the product and retain it for future reference.
2. Contingut del paquet
Assegureu-vos que tots els elements que s'enumeren a continuació estiguin presents al vostre paquet:
- Nedis Ultra HD 4K Dashcam (DCAM44BK)
- Muntatge magnètic
- Car Charger (Micro USB)
- Cable de dades USB
- Manual d'usuari (aquest document)

Figura 2.1: Dashcam and included accessories.
3. Característiques del producte
The Nedis Ultra HD 4K Dashcam offers a range of features to enhance your driving experience and security:
- Ultra HD 4K Recording: Captures video at 4K resolution (24 frames per second) for clear and detailed footage.
- Pantalla LCD de 2.4 polzades: Integrated screen for instant video playback and menu navigation.
- 140° d'ample Viewangle: Provides a broad perspective of the road, capturing more details.
- Micro USB Connectivity: For power supply and connection to a PC/notebook.
- Suport de targeta Micro SD: Supports Micro SD cards up to 128 GB for ample storage (card not included).
- Enregistrament en bucle: Sobreescriu automàticament el menjar més antictage quan la targeta de memòria està plena, garantint un enregistrament contínuu.
- Micròfon i altaveu integrats: For recording and playing back audio with video.
- Sensor G: Detecta impactes o col·lisions sobtades i bloqueja automàticament el vídeo actual file per evitar que es sobreescrigui.
- Mode d'aparcament: Activates recording when vibrations are detected while the vehicle is parked, providing surveillance.
- Visió nocturna: Garanteix enregistraments clars fins i tot en condicions de poca llum.
- Muntatge magnètic: Allows for easy attachment and removal of the dashcam.
Vídeo 3.1: Un acabatview of the Nedis Dashcam's key features and benefits.
4. Configuració
4.1 Inserció d'una targeta Micro SD
- Assegureu-vos que la càmera del salpicader estigui apagada.
- Locate the Micro SD card slot on the side of the dashcam.
- Insert a compatible Micro SD card (Class 10 or higher, up to 128 GB) into the slot until it clicks into place.
- Per treure-la, premeu suaument la targeta fins que surti.

Figura 4.1: Micro SD card slot location.
4.2 Muntatge de la càmera del salpicader
- Clean the desired area on your windshield where you intend to mount the dashcam. Ensure it does not obstruct your view.
- Attach the magnetic mount to the windshield using its adhesive pad. Press firmly for several seconds.
- Align the dashcam with the magnetic mount. The strong magnets will securely hold the dashcam in place.
- Ajusta l'angle de la càmera per assegurar-te que capturi clarament la carretera que tens al davant.

Figura 4.2: Dashcam with magnetic mount.

Figura 4.3: Magnetic contact points on the dashcam.
4.3 Powering the Dashcam
- Connect the Micro USB end of the car charger to the dashcam's Micro USB port.
- Connecteu l'altre extrem del carregador de cotxe a la presa de corrent de 12 V del vostre vehicle (endoll de l'encenedor de cigarrets).
- The dashcam will typically power on automatically when the vehicle's ignition is turned on and begin recording.
5. Instruccions de funcionament
5.1 Funcionament bàsic
- Encès/apagat: The dashcam powers on automatically with vehicle ignition. To manually power on/off, press and hold the Power button (refer to Figure 5.1 for button layout).
- Gravació: Once powered on, the dashcam will automatically start recording. A flashing red indicator or icon on the screen usually indicates active recording.
- Atura/inicia la gravació: During recording, press the OK button to stop recording. Press it again to resume.
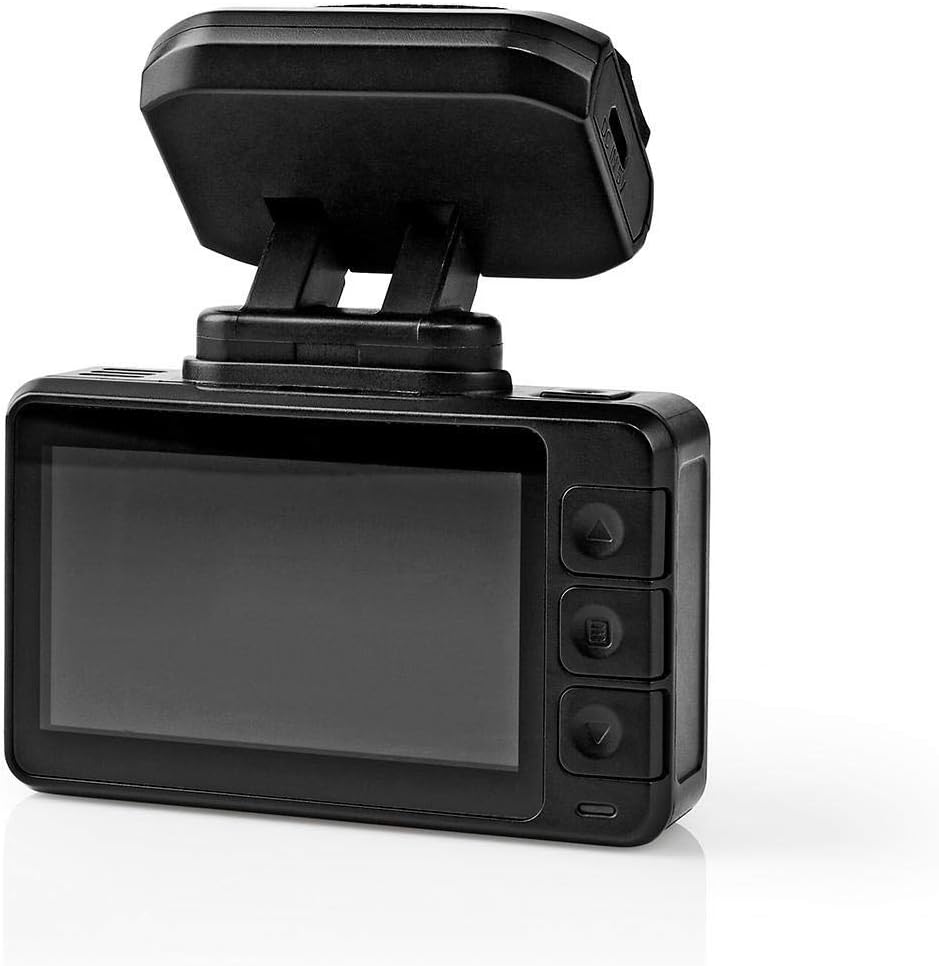
Figura 5.1: Dashcam rear view with LCD and control buttons.
5.2 Navegació de menús
Use the buttons on the side of the dashcam (Up, Down, Menu/Mode, OK) to navigate through settings and options on the LCD screen.
- Botó de menú: Press to enter the settings menu. Press again to cycle through different menu pages (e.g., video settings, system settings).
- Botons amunt / avall: Use to scroll through menu options.
- Botó D'acord: Press to confirm a selection or enter a sub-menu.
5.3 Reproducció de vídeo
- Stop recording if currently active.
- Press the Mode button (often combined with Menu) to switch to playback mode.
- Use the Up/Down buttons to browse through recorded video files.
- Press the OK button to play the selected video.
- To exit playback mode, press the Mode button again.
5.4 Funció del sensor G
The built-in G-Sensor detects sudden acceleration, braking, or impacts. When triggered, it automatically locks the current video segment, preventing it from being overwritten by loop recording. The sensitivity of the G-Sensor can usually be adjusted in the settings menu.
5.5 Mode d'aparcament
When parking mode is enabled and the vehicle is stationary, the dashcam will automatically start recording if it detects vibrations or impacts. This feature provides surveillance for your parked vehicle. Ensure the dashcam has a continuous power supply (e.g., hardwired kit, not included) for extended parking mode operation.
5.6 Visió nocturna
The dashcam is equipped with night vision capabilities, allowing it to capture clear video footage even in low-light conditions or at night. This feature typically activates automatically.
6. Manteniment
- Neteja: Use a soft, dry cloth to clean the dashcam lens and screen. Do not use abrasive cleaners or solvents.
- Emmagatzematge: If storing the dashcam for an extended period, remove the Micro SD card and store the device in a cool, dry place away from direct sunlight.
- Targeta micro SD: Periodically format the Micro SD card (at least once a month) to maintain optimal performance and prevent data corruption. Back up any important files abans de formatar.
7. Solució De Problemes
| Problema | Causa possible | Solució |
|---|---|---|
| La càmera del salpicader no s'encén. | Sense font d'alimentació; carregador de cotxe defectuós; connexió fluixa. | Check car charger connection; ensure vehicle's 12V outlet is working; try a different USB cable/charger. |
| L'enregistrament s'atura inesperadament. | Full Micro SD card; slow Micro SD card; card error. | Format the Micro SD card; use a Class 10 or higher card; replace the card if faulty. |
| Vídeo footage és borrós o poc clar. | Lent bruta; pel·lícula protectora encara a la lent; enfocament incorrecte. | Clean the lens with a soft cloth; remove any protective film; ensure the camera is securely mounted. |
| El sensor G és massa sensible/no prou sensible. | La configuració de sensibilitat del sensor G és massa alta/baixa. | Adjust G-Sensor sensitivity in the dashcam's settings menu. |
8. Especificacions
| Característica | Detall |
|---|---|
| Número de model | DCAM44BK |
| Marca | Nedis |
| Resolució de gravació de vídeo | 4K |
| Fotogrames per segon (FPS) | 24 |
| Tipus de visualització | LCD |
| Mida de la pantalla | 2.4 polzades |
| Viewangle ing | 140 graus |
| Tecnologia de connectivitat | USB |
| Tipus de muntatge | Muntatge magnètic |
| Mètode de control | Toca |
| Tecnologia de sensors òptics | CMOS |
| Característiques especials | Night Vision, G-Sensor, Parking Mode, Loop Recording |
| Dimensions del producte | 5.7 x 73 x 38 cm |
| Pes de l'article | 85 grams |
9. Informació de seguretat
- Do not operate the dashcam in extreme temperatures or humidity.
- Ensure the dashcam is securely mounted and does not obstruct the driver's view o interferir amb les funcions de seguretat del vehicle.
- No intenteu desmuntar ni reparar el dispositiu vosaltres mateixos. Poseu-vos en contacte amb personal de servei qualificat.
- Feu servir només els accessoris proporcionats o recomanats.
- Mantingueu el dispositiu lluny dels nens.
- Adhere to all local laws and regulations regarding the use of dashcams.
10. Garantia i Suport
Nedis products are manufactured to high quality standards. In the unlikely event of a defect during the warranty period, please contact your retailer for support. The warranty terms and conditions are typically provided by your retailer at the time of purchase. For further assistance or product information, please visit the official Nedis weblloc o poseu-vos en contacte amb el seu servei d'atenció al client.