Introducció
The Redragon Wheeljack GC-606WH is an ATX mid-tower PC case designed to house your computer components with a focus on airflow and aesthetic appeal. This manual provides essential information for the proper setup, operation, and maintenance of your PC case.
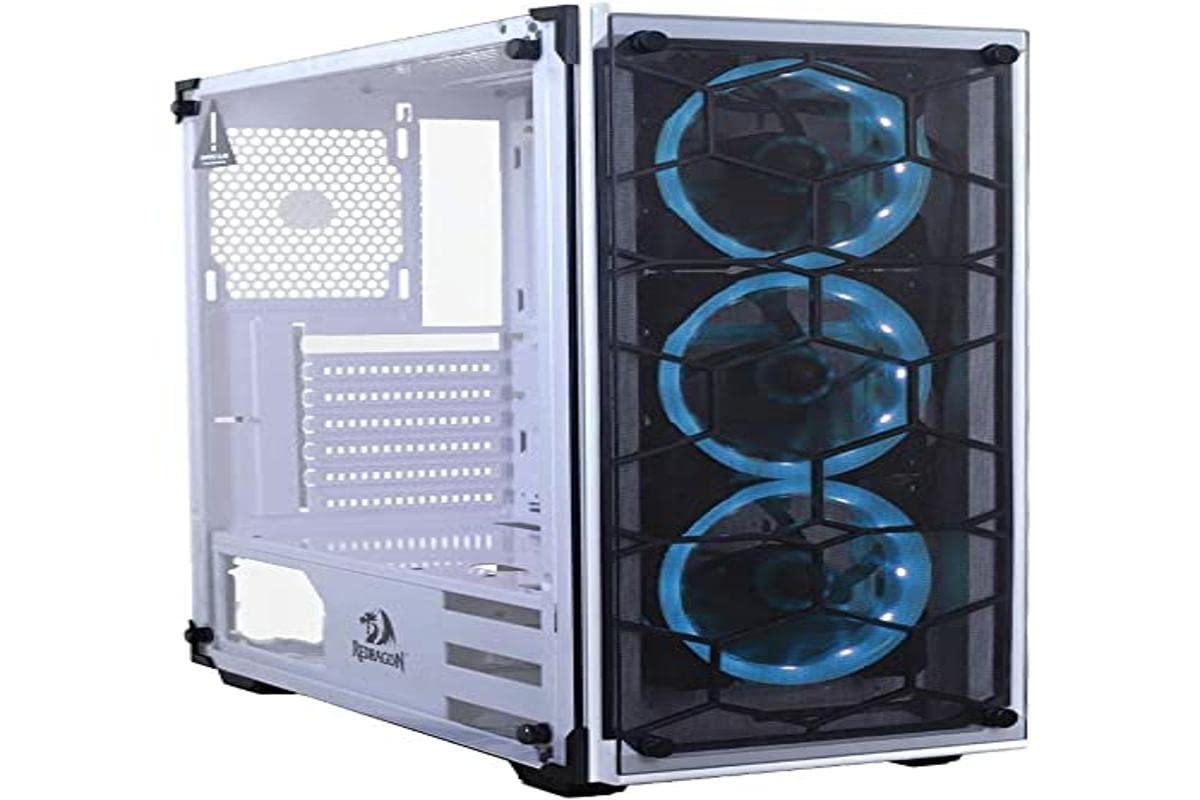
Image: Redragon Wheeljack GC-606WH ATX Mid Tower PC Case. This image shows the white case with its tempered glass side panel and a front panel designed for airflow.
Key features of the Redragon Wheeljack GC-606WH include:
- Spaced Front Panel Design: Engineered for improved airflow to internal components.
- Finestra lateral de vidre temperat: Proporciona un clar view of your internal PC build.
- Integrated Dust Filters: Located on the front, top, and bottom to prevent dust accumulation.
- Coberta de la PSU: Facilitates clean cable management and a tidy interior.
Configuració i instal·lació de components
Follow these steps for proper installation of your computer components into the Redragon Wheeljack GC-606WH case.
1. Desembalatge i preparació
- Traieu amb cura la carcassa de l'ordinador del seu embalatge.
- Col·loqueu la caixa sobre una superfície plana i estable.
- Remove the tempered glass side panel by unscrewing the thumb screws (if present) or releasing the latch mechanism. Set the panel aside on a soft, non-abrasive surface to prevent scratches.
2. Instal·lació de la placa base
The GC-606WH supports Mini-ITX, Micro-ATX, and ATX motherboards.
- Install the I/O shield that came with your motherboard into the designated opening at the rear of the case.
- Align your motherboard with the standoffs inside the case. Ensure all screw holes on the motherboard match the standoffs.
- Fixeu la placa base amb els cargols proporcionats. No els estrenyeu massa.
3. Instal·lació de la unitat d'emmagatzematge
The case supports 2x 2.5" drives and 2x 3.5" drives.
- 2.5" Drives (SSDs): Locate the 2.5" drive mounts, typically on the back of the motherboard tray or dedicated brackets. Secure your SSDs with screws.
- 3.5" Drives (HDDs): Locate the 3.5" drive cage, usually near the PSU shroud. Slide your HDDs into the trays/slots and secure them, often with tool-less clips or screws.
4. Instal·lació de la font d'alimentació (PSU)
The PSU mounts at the bottom of the case, under the PSU cover.
- Slide your power supply into the designated compartment from the rear of the case.
- Align the PSU with the screw holes at the back of the case.
- Fixeu la font d'alimentació amb cargols.
5. PCI Expansion Card Installation
The case features 7 horizontal PCI expansion slots.
- Traieu les cobertes de les ranures necessàries de la part posterior de la carcassa.
- Inseriu la targeta gràfica o altres targetes d'expansió a les ranures PCI-E corresponents de la placa base.
- Fixeu les targetes amb cargols.
6. Instal·lació del sistema de refrigeració
The case supports various fan and radiator configurations:
- Suport dels fans:
- Top: 2x 120mm fans
- Front: 3x 120mm fans
- Part posterior: 1 ventilador de 120 mm
Note: This product does not include pre-installed fans. Fans must be purchased separately.
- Watercooler (Radiator) Support:
- Front: Up to 240mm radiator
- Darrere: radiador de 120 mm
- Top: Not supported for radiators.
- Maximum CPU Air Cooler Height: 160 mm
Install fans and radiators according to your cooling needs, ensuring proper airflow direction (intake/exhaust).
7. Connexions del panell frontal
Connect the front panel cables to your motherboard. Refer to your motherboard manual for specific pin layouts.
- 1x USB 3.0
- 2x USB 2.0
- 1 presa d'àudio de 3.5 mm
- 1x presa de micròfon de 3.5 mm
- Power Button, Reset Button, Power LED, HDD LED (standard motherboard headers)
8. Gestió de cables
Utilize the space behind the motherboard tray and the PSU cover to route and secure cables. This improves airflow and the aesthetic of your build.
Funcionament
Once all components are installed and connected, replace the tempered glass side panel and secure it. Your Redragon Wheeljack GC-606WH case is now ready for operation.
- Botó d'encesa: Premeu per encendre o apagar l'ordinador.
- Botó de restabliment: Premeu per reiniciar l'ordinador.
- Ports USB: Use the front panel USB 3.0 and USB 2.0 ports for connecting peripherals and external storage devices.
- Preses d'àudio: Connect headphones, speakers, or a microphone to the front panel 3.5mm audio and microphone jacks.
Manteniment
Un manteniment regular ajuda a garantir un rendiment òptim i una llarga vida útil dels components del teu PC.
- Filtres de pols: The case includes dust filters on the front, top, and bottom. Periodically remove and clean these filters to maintain good airflow and prevent dust buildup inside the case. They can typically be cleaned with compressed air or by rinsing with water (ensure they are completely dry before reinstallation).
- Panells de vidre temperat: Clean the tempered glass side panel and front panel (if applicable) with a soft, lint-free cloth and a glass cleaner designed for electronics. Avoid abrasive materials that could scratch the glass.
- Neteja interior: Use compressed air to remove dust from internal components and fan blades. Ensure the system is powered off and unplugged before cleaning.
Resolució de problemes
Si teniu problemes, tingueu en compte els passos habituals següents per resoldre'ls:
- L'ordinador no s'encén:
- Assegureu-vos que la font d'alimentació estigui engegada i connectada correctament a la presa de corrent.
- Verify all power cables (24-pin ATX, 8-pin CPU, GPU power) are securely connected to the motherboard and components.
- Comproveu que el cable del botó d'engegada del panell frontal estigui connectat correctament al capçal del panell frontal de la placa base.
- Poor Airflow or Overheating:
- Clean all dust filters and internal fans.
- Ensure fans are installed with the correct airflow direction (intake for front/bottom, exhaust for rear/top).
- Verify that no cables are obstructing airflow paths.
- L'USB/àudio del panell frontal no funciona:
- Check that the USB and audio cables from the front panel are securely connected to the correct headers on your motherboard.
- Ensure motherboard drivers are installed correctly.
Especificacions
| Característica | Detall |
|---|---|
| Nom del model | Redragon Wheeljack GC-606WH |
| Tipus de cas | Torre mitja |
| Materials | Steel, ABS Plastic, Tempered Glass |
| Color | Blanc |
| Suport de la placa base | Mini-ITX, Micro-ATX, ATX |
| Ranures d’expansió PCI | 7 horitzontal |
| Drive Bays | 2x 2.5", 2x 3.5" |
| E / S del tauler frontal | 1x USB 3.0, 2x USB 2.0, 1x 3.5mm Audio, 1x 3.5mm Microphone |
| Suport del ventilador (superior) | 2x 120 mm |
| Suport del ventilador (frontal) | 3x 120 mm |
| Suport del ventilador (posterior) | 1x 120 mm |
| Watercooler Support (Front) | Radiador de fins a 240 mm |
| Watercooler Support (Rear) | Radiador de 120 mm |
| Max CPU Air Cooler Height | 160 mm |
| Dimensions del producte (L x A x A) | 31.5 x 23.62 x 7.87 polzades |
| Pes de l'article | 14.99 lliures (aprox. 6.8 kg) |
Garantia i Suport
For detailed warranty information, please refer to the warranty card included with your purchase or visit the official Redragon website. Redragon provides customer support for product inquiries and technical assistance.
Official Redragon Weblloc: www.redragonusa.com
Conserveu el vostre comprovant de compra per a reclamacions de garantia.