1. Introducció
Gràcies per la compraasing the Nedis RDIN2500WT Internet Radio. This manual provides essential information for the safe and efficient operation of your device. Please read these instructions carefully before use and retain them for future reference.
2. Instruccions de seguretat
- No exposeu el dispositiu a la pluja, la humitat ni a temperatures extremes.
- Assegureu-vos que hi hagi una ventilació adequada al voltant de la unitat. No bloquegeu cap obertura de ventilació.
- Use only the provided power adapter. Using an unauthorized adapter may damage the device and void the warranty.
- No intenteu desmuntar ni modificar el dispositiu. Encarregueu tot el manteniment a personal qualificat.
- Mantingueu el dispositiu allunyat de camps magnètics forts.
- Clean the device only with a soft, dry cloth. Do not use liquid cleaners or aerosols.
3. Contingut del paquet
Verifiqueu que tots els elements siguin presents al paquet:
- Nedis RDIN2500WT Internet Radio Unit
- Control remot
- Adaptador d'alimentació (DC 12V)
- Cable d'àudio de 3.5 mm
- Manual d'usuari (aquest document)

Figure 3.1: Nedis RDIN2500WT Internet Radio with included accessories: radio unit, remote control, power adapter, and 3.5mm audio cable.
4. Producte acabatview
4.1 Front and Top Panel Controls

Figura 4.1: Frontal view of the radio with display.
The front of the radio features a 2.4-inch color LCD display and two speaker grilles. The top panel includes the main control buttons and knobs.
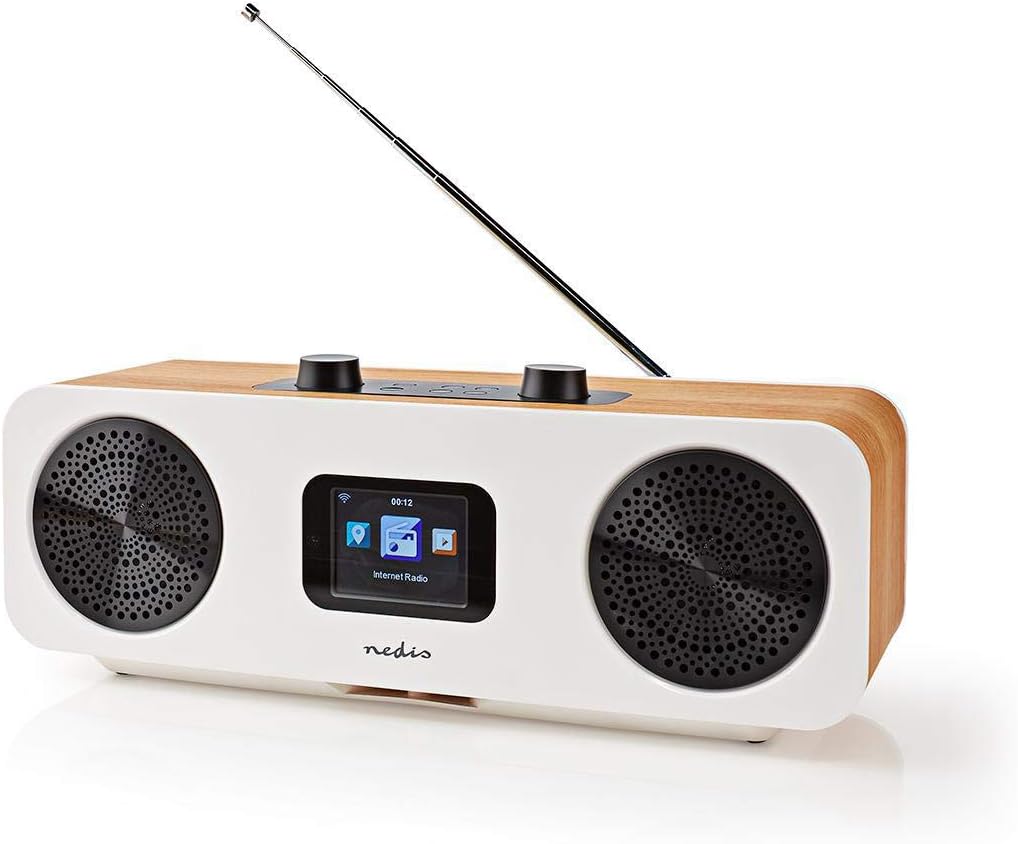
Figure 4.2: Top control panel.
- Volume - / +: Ajusta el volum d'àudio.
- Silenciar: Silencia o activa l'àudio.
- Standby (Power button): Turns the radio on or off, or puts it into standby mode.
- Menú: Accesses the main menu or goes back to the previous screen.
- Mode: Switches between different operating modes (Internet Radio, DAB+, FM, Bluetooth, AUX).
- Preestablert: Accesses or saves preset stations.
- Left / Right (Navigation buttons): Navigates through menus or tunes stations.
- Introduïu: Confirma les seleccions.
- Skip (Forward / Backward): Skips tracks in Bluetooth mode or navigates through lists.
4.2 Connexions del panell posterior

Figura 4.3: Connexions del panell posterior.
- Antena telescòpica: For DAB+ and FM reception. Extend fully for best signal.
- Entrada DC 12V: Connecteu aquí l'adaptador de corrent proporcionat.
- Port USB: For firmware updates or charging external devices (check manual for specific functionality).
- Entrada AUX: Connect external audio devices using the 3.5mm audio cable.
4.3 Control remot

Figura 4.4: Disposició del comandament a distància.
The remote control provides convenient access to all radio functions. Ensure batteries are inserted correctly (not included, typically 2x AAA).
5. Configuració
5.1 Connexió d'alimentació
- Connect the provided power adapter to the DC 12V input on the rear of the radio.
- Connecteu l'adaptador de corrent a una presa de corrent adequada.
5.2 Configuració de l'antena
For optimal DAB+ and FM reception, fully extend the telescopic antenna located on the rear of the unit.
5.3 Configuració inicial i connexió Wi-Fi
Upon first power-on, the radio will guide you through an initial setup wizard:
- Selecció d'idioma: Use the navigation buttons to select your preferred language and press Entra.
- Hora/Data: Set the current time and date. The radio can synchronize this automatically via network or DAB+ signal.
- Configuració de la xarxa: La ràdio cercarà les xarxes Wi-Fi disponibles.
- Seleccioneu la vostra xarxa Wi-Fi de la llista.
- Enter your Wi-Fi password using the navigation buttons and Entra to confirm each character. Press Entra again to connect.
- Once connected, the radio will confirm the network status.
6. Funcionament de la ràdio
6.1 Canvi de modes
Premeu el botó Mode button on the radio or remote control to cycle through the available modes:
- Ràdio per Internet
- Ràdio DAB+
- Ràdio FM
- Bluetooth
- Entrada AUX
6.2 Ràdio per Internet
In Internet Radio mode, you can access thousands of stations worldwide.
- Select "Internet Radio" from the mode menu.
- Navigate through categories (e.g., Location, Genre, Popular Stations) using the Esquerra/Dreta botons i confirmeu amb Entra.
- Seleccioneu una emissora per iniciar la reproducció.
Ràdio DAB+ 6.3
In DAB+ mode, the radio will automatically scan for available digital stations.
- Select "DAB+ Radio" from the mode menu.
- The radio will perform a scan and list available stations.
- Ús Esquerra/Dreta to select a station and Entra escoltar.
6.4 Ràdio FM
In FM mode, you can tune into analog radio stations.
- Select "FM Radio" from the mode menu.
- Ús Esquerra/Dreta to manually tune the frequency, or press and hold Esquerra/Dreta per buscar automàticament la següent estació disponible.
6.5 Vinculació Bluetooth
Connect your smartphone or tablet via Bluetooth to stream audio.
- Select "Bluetooth" from the mode menu. The radio will enter pairing mode.
- On your mobile device, enable Bluetooth and search for "RDIN2500WT".
- Select the radio from the list to pair. Once connected, you can play audio from your device.
6.6 Entrada AUX
Connect external audio sources like MP3 players using the 3.5mm audio cable.
- Connect one end of the 3.5mm audio cable to the AUX input on the radio's rear panel.
- Connecteu l'altre extrem a la presa d'auriculars o a la sortida d'àudio del dispositiu extern.
- Select "AUX Input" from the mode menu.
6.7 presets
Desa les teves emissores preferides per accedir-hi ràpidament.
- Sintonitza l'emissora desitjada.
- Manteniu premut el botó Preestablert button until the "Save to Preset" menu appears.
- Ús Esquerra/Dreta to select a preset number (1-10) and press Entra per salvar.
- Per recuperar una predefinició, premeu la tecla Preestablert botó breument i, a continuació, utilitzeu Esquerra/Dreta to select the desired preset and press Entra.
6.8 Funcions d'alarma i de repòs
The radio includes an integrated alarm clock and sleep timer.
- Alarma: Premeu el botó Alarma button on the remote control or navigate through the main menu to set up alarms (time, source, volume).
- Dormir: Premeu el botó Dormir button on the remote control or navigate through the main menu to set a sleep timer, which will turn off the radio after a set duration.
6.9 App Control (AirMusic)
Control your radio using the AirMusic app on your smartphone or tablet.
- Download the "AirMusic" app from your device's app store.
- Assegureu-vos que el vostre telèfon intel·ligent/tauleta i la ràdio estiguin connectats a la mateixa xarxa Wi-Fi.
- Open the AirMusic app; it should automatically detect your radio.
- You can now control the radio, browse stations, and manage presets from the app.
7. Manteniment
7.1 Neteja
To clean the radio, gently wipe the surfaces with a soft, dry, lint-free cloth. Do not use abrasive cleaners, waxes, or solvents as they may damage the finish.
7.2 Emmagatzematge
If storing the radio for an extended period, disconnect it from the power outlet and store it in a cool, dry place, away from direct sunlight and extreme temperatures.
8. Solució De Problemes
If you encounter issues with your radio, refer to the following table for common problems and solutions.
| Problema | Causa possible | Solució |
|---|---|---|
| Sense poder | L'adaptador de corrent no està connectat o la presa de corrent està defectuosa. | Ensure the power adapter is securely connected to the radio and a working power outlet. |
| Sense so | Volume too low, muted, or incorrect input mode. | Increase volume, check if muted, ensure correct mode (e.g., Internet Radio, DAB+). |
| La ràdio per Internet no es connecta | Incorrect Wi-Fi password, weak signal, or network issue. | Re-enter Wi-Fi password, move radio closer to router, restart router, check network settings. |
| Mala recepció DAB+/FM | Antena no estesa, senyal feble o interferències. | Esteneu completament l'antena telescòpica. Intenteu reposicionar la ràdio. |
| L'aparellament de Bluetooth falla | Radio not in pairing mode, device too far, or already paired with another device. | Ensure radio is in Bluetooth mode. Place devices closer. Disconnect from other Bluetooth devices. |
| El comandament a distància no funciona | Piles gastades o obstrucció. | Replace batteries. Ensure no obstruction between remote and radio. |
9. Especificacions
| Característica | Especificació |
|---|---|
| Marca | NEDIS |
| Número de model | RDIN2500WT |
| Color | Wood / White |
| Tecnologia de connectivitat | Bluetooth, WiFi |
| Tecnologia d'afinació | DAB+ |
| Bandes de ràdio compatibles | FM, DAB+, ràdio per Internet |
| Característiques especials | Integrated Clock, Alarm Clock |
| Dimensions del producte (L x A x A) | 15.1 x 16 x 42.1 cm |
| Font d'alimentació | AC Power Adapter (DC 12V) |
| Tipus de visualització | LCD (2.4" Color Screen) |
| Max FM Frequency | 108 MHz |
10. Garantia i Suport
This product is covered by the standard manufacturer's warranty. For detailed warranty terms and conditions, please refer to the warranty card included with your purchase or visit the official Nedis weblloc.
For technical support, troubleshooting assistance, or service inquiries, please contact Nedis customer support through their official channels. Contact information can typically be found on the Nedis weblloc o a l'embalatge del producte.