
1. Introducció
This manual provides detailed instructions for the installation, operation, and maintenance of the Fafeicy TM626 DIN Rail Mount AC220V Power Timer Switch. This digital timer is designed for precise time control of electrical appliances and systems, offering programmable on/off cycles for various applications.
The TM626 is suitable for controlling street lights, factory equipment, advertising signs, production machinery, radio and television equipment, stage lighting, and other power equipment that requires regular automated switching.
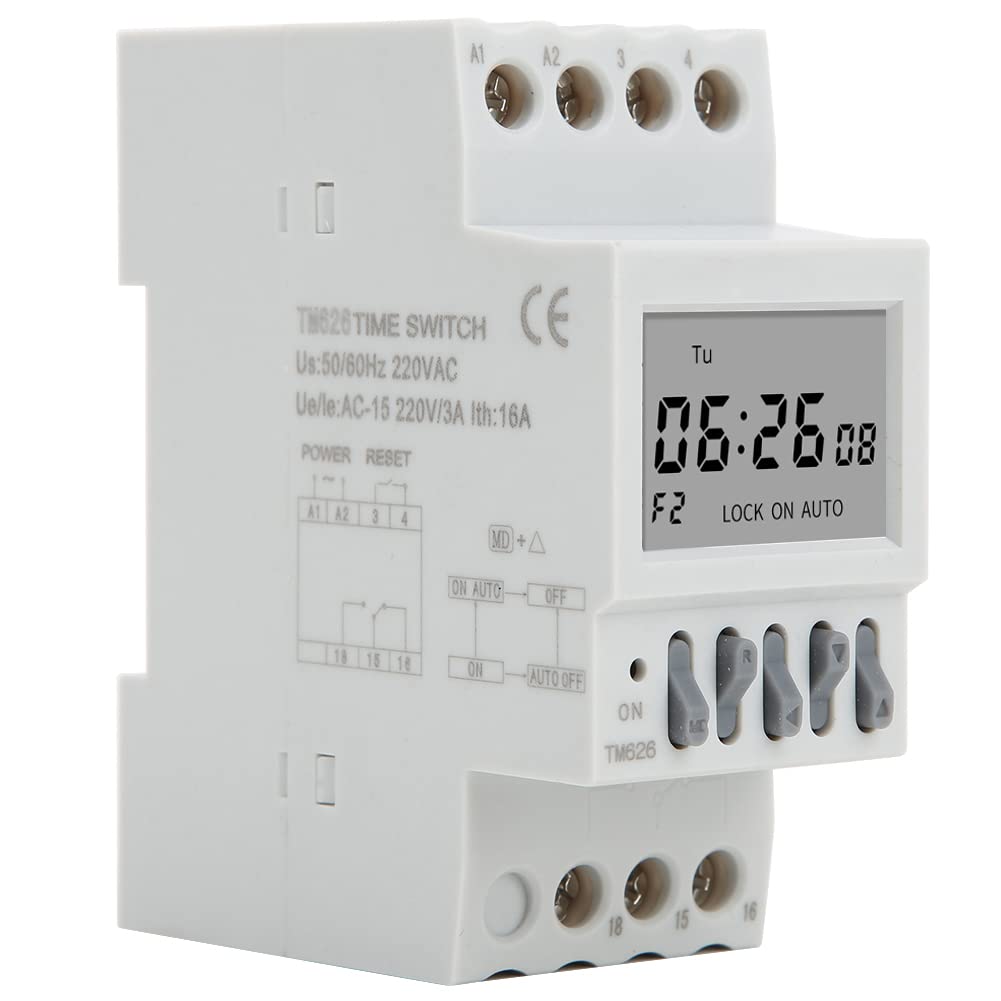
Imatge 1.1: Anglesa view of the Fafeicy TM626 Power Timer Switch, showing the display and terminal connections.

Image 1.2: The TM626 timer switch is ideal for automating various applications, including street lighting, industrial equipment, and advertising displays.
2. Informació de seguretat
Si us plau, llegiu i comprengui totes les instruccions de seguretat abans d'instal·lar o utilitzar aquest dispositiu. Si no segueix aquestes instruccions, es poden produir descàrregues elèctriques, incendis o lesions greus.
- Assegureu-vos que el subministrament elèctric estigui desconnectat abans de qualsevol treball d'instal·lació o manteniment.
- La instal·lació només l'ha de dur a terme un electricista qualificat.
- No excedeixi el vol especificattage (AC220V) and current (16A) ratings.
- Mantingueu el dispositiu allunyat de l'aigua i d'ambients amb molta humitat.
- No intenteu obrir ni reparar el dispositiu vosaltres mateixos. Poseu-vos en contacte amb personal qualificat per al servei tècnic.
3. Producte acabatview
The Fafeicy TM626 is a compact digital timer switch designed for DIN rail mounting. It features a clear LCD display for time and program settings, along with intuitive control buttons.
3.1 Components
- Pantalla LCD: Shows current time, day, and programming status.
- Botons de control: Used for setting time, programming, and manual override.
- Blocs de terminals: For connecting power input and load output.
- DIN Rail Clips: For secure mounting on a standard DIN rail.

Imatge 3.1: Frontal view of the TM626 timer switch, highlighting the LCD display and control buttons.

Imatge 3.2: Lateral view of the TM626, illustrating the integrated DIN rail mounting clips.
4. Especificacions
| Característica | Especificació |
|---|---|
| Marca | Fafeicy |
| Número de model | TM626 (Fafeicy txusog0m3i) |
| Vol. Operatiutage | CA 220V (50/60Hz) |
| Corrent nominal | 16A |
| Mida de la pantalla | 1.6 polzades |
| Vida mecànica | ≥ 30,000 vegades |
| Vida elèctrica | ≥ 10,000 vegades |
| Dimensions (aprox.) | Amplada: 35 mm (1.4 polzades), Alçada: 82 mm (3.2 polzades), Profunditat: 68 mm (2.7 polzades) |
| Muntatge | Carril DIN |
| País d'origen | Xina |

Image 4.1: Dimensional drawing of the TM626 timer switch, showing key measurements.

Image 4.2: The TM626 timer switch, illustrating its robust design for long mechanical and electrical life.
5. Configuració i instal·lació
Follow these steps for proper installation and initial setup of your TM626 timer switch.
5.1 Muntatge
- Ensure the main power supply is OFF before mounting.
- Locate a standard 35mm DIN rail within your electrical panel.
- Align the DIN rail clips on the back of the TM626 with the DIN rail.
- Press the timer firmly onto the rail until it clicks into place.
5.2 Cablejat
Refer to the wiring diagram on the device and below for correct connections. Incorrect wiring can damage the device or cause electrical hazards.

Imatge 5.1: Lateral view of the TM626 showing the wiring terminals and a simplified internal diagram. Terminals A1 and A2 are for power input (AC220V). Terminals 15, 16, 18 are for load output (15: Common, 16: Normally Closed, 18: Normally Open).
- Connect the AC220V power supply to terminals A1 i A2.
- Connect the common wire of your load to terminal 15.
- For normally open operation (load turns ON when timer activates), connect the load's live wire to terminal 18.
- For normally closed operation (load turns OFF when timer activates), connect the load's live wire to terminal 16.
- Assegureu-vos que totes les connexions estiguin segures i aïllades.
5.3 Engegada inicial
After wiring, restore power. The display should light up. If the display is blank, check power connections. The timer may require an initial charge if it has been stored for a long time; allow it to be powered for a few minutes.
6. Instruccions de funcionament
The TM626 timer switch allows you to set the current time and program multiple on/off cycles.
6.1 Configuració de l'hora i el dia actuals
- Premeu el botó RELOJ button (if available, or a similar button for time setting).
- Utilitza el D+ (Day), H+ (Hour), and M+ (Minute) buttons to adjust the current day, hour, and minute.
- Premeu RELOJ de nou per guardar i sortir.
6.2 Programming On/Off Cycles
The TM626 typically supports multiple ON/OFF programs. The exact number may vary, but common models support 8-16 programs.
- Premeu el botó PROG botó. La pantalla mostrarà "1 ON".
- Ús D+ to select the day(s) for this ON event (e.g., Mon-Fri, Sat-Sun, every day, specific days).
- Ús H+ i M+ per configurar l'hora d'encesa desitjada.
- Premeu PROG de nou. La pantalla mostrarà "1 OFF".
- Ús D+, H+, i M+ to set the desired OFF time for the first program.
- Repeat steps 1-5 for additional ON/OFF programs (e.g., "2 ON", "2 OFF", etc.).
- Després de configurar tots els programes desitjats, premeu el botó RELOJ button to exit programming mode and save settings.
6.3 Anulació manual
El MANUAL or ON/AUTO/OFF button allows you to manually override the programmed settings.
- Pressing this button cycles through modes: ON (sempre encès), AUTO (segueix programes), OFF (sempre apagat).
- Seleccioneu AUTO for the timer to execute its programmed schedules.
6.4 Funció de reinici
To clear all settings and return the timer to its factory default state, locate the small RESET button (often recessed) and press it using a pointed object (e.g., a pen tip). This will erase all time and program settings.
7. Manteniment
The Fafeicy TM626 timer switch requires minimal maintenance to ensure long-term reliable operation.
- Neteja: Use a soft, dry cloth to wipe the exterior of the device. Do not use abrasive cleaners or solvents.
- Inspecció: Comproveu periòdicament les connexions del cablejat per comprovar si estan ben ajustades i si hi ha signes de desgast o danys.
- Còpia de seguretat de la bateria: The device typically includes an internal battery for retaining settings during power outages. This battery is usually non-replaceable by the user and recharges when the device is powered.
8. Solució De Problemes
If you encounter issues with your TM626 timer switch, refer to the following common problems and solutions:
| Problema | Causa possible | Solució |
|---|---|---|
| La pantalla està en blanc. | Sense subministrament d'alimentació; bateria interna descarregada. | Check power connections to A1/A2. Allow device to be powered for several minutes to charge the internal battery. |
| Load does not turn ON/OFF as programmed. | Incorrect programming; timer in manual ON/OFF mode; incorrect wiring; faulty load. | Verify program settings. Ensure the timer is in AUTO mode. Check wiring connections (15, 16, 18). Test the load independently. |
| L'hora és incorrecta. | Time not set correctly; power interruption (though internal battery should prevent this). | Reset and re-set the current time and day. Ensure the internal battery is charged. |
| Els botons no responen. | Device malfunction; temporary software glitch. | Perform a full reset using the recessed RESET button. If the issue persists, contact support. |
9. Garantia i Suport
For warranty information or technical support, please refer to the documentation provided with your purchase or contact Fafeicy customer service through their official channels. Keep your purchase receipt as proof of purchase.
Per a consultes generals, podeu visitar el Fafeicy Brand Store.