
AOPUTTRIVER UKHP-770D
AOPUTTRIVER HP-770D Digital Multimeter User Manual
Model: UKHP-770D
1. Introducció
The AOPUTTRIVER HP-770D is a professional high-precision digital multimeter designed for accurate measurement of various electrical parameters. It features a 40000-count display, auto/manual ranging, and a range of functions including NCV, True RMS, temperature measurement, and more. This manual provides essential information for the safe and effective operation of your HP-770D multimeter.

Figure 1: AOPUTTRIVER HP-770D Digital Multimeter and included accessories.
2. Contingut del paquet
Si us plau, comproveu el contingut del paquet en desembalar-lo per assegurar-vos que hi hagi tots els elements:
- 1 x HP-770D Digital Multimeter
- 1 x sonda de temperatura
- 1 x Operation Guide (this manual)
- 1 x funda protectora
- 2 cables de prova (vermell i negre)
- 1 x bateria de 9V
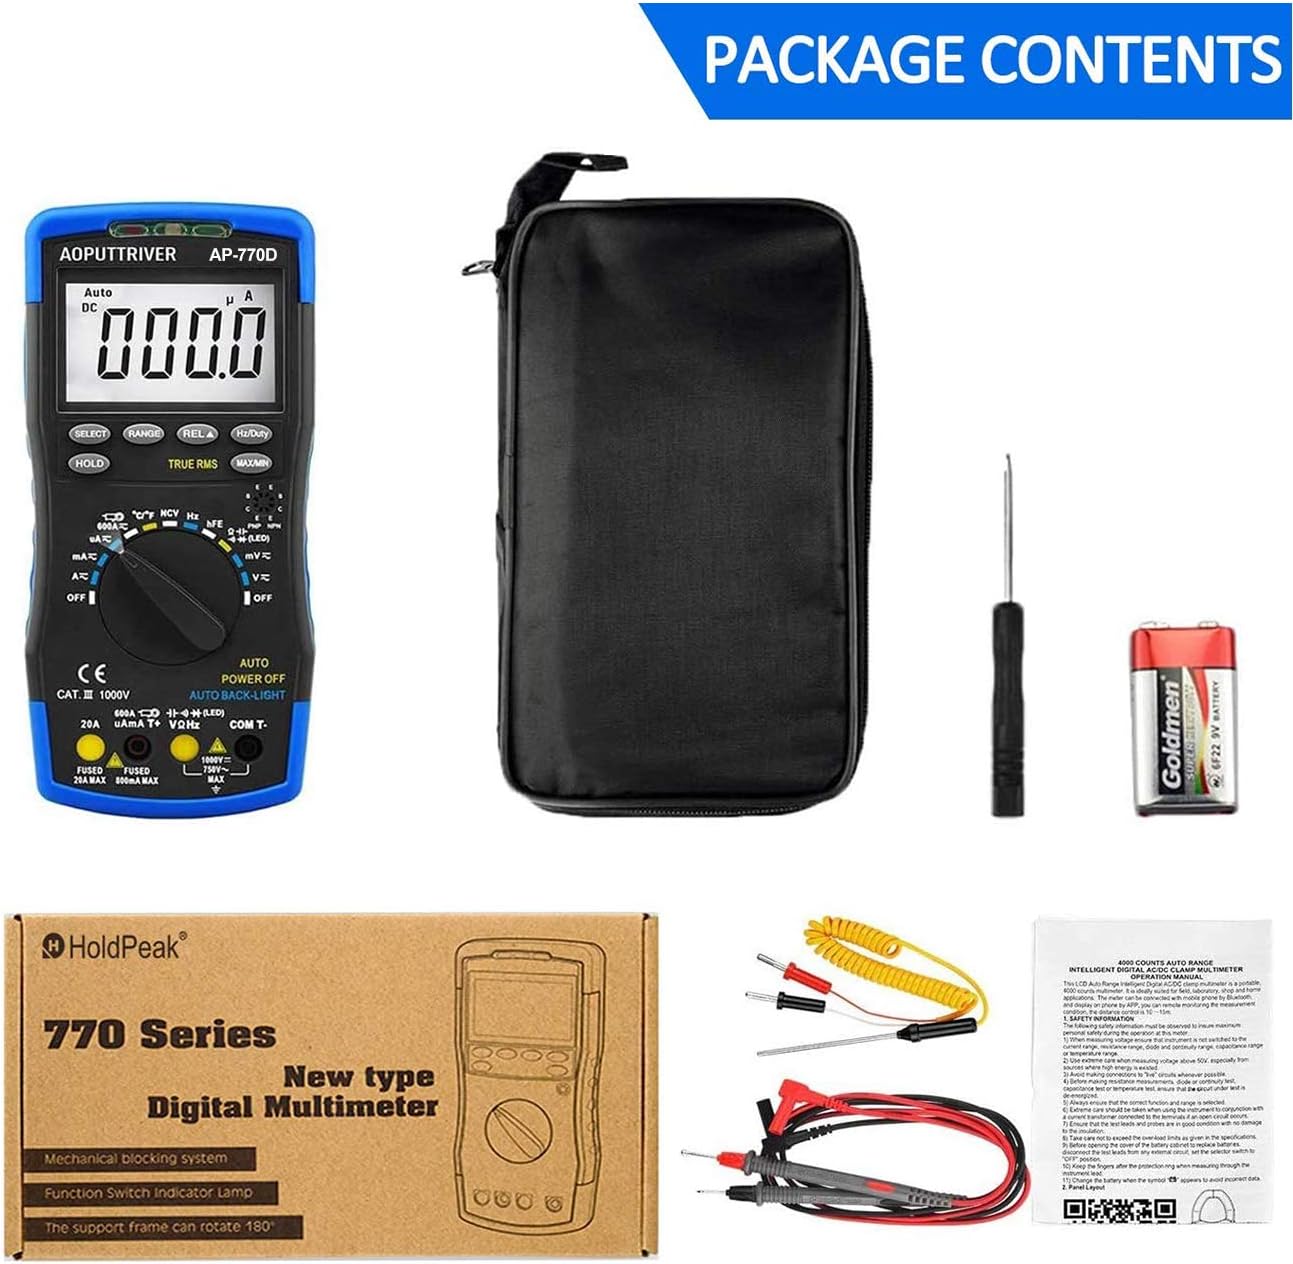
Figure 2: All items included in the HP-770D Multimeter package.
3. Producte acabatview i Funcions clau
The HP-770D multimeter is equipped with various features for comprehensive electrical testing.

Figure 3: Labeled diagram of the HP-770D Multimeter's key functions.
- NCV Red Light: Indicates non-contact voltage detecció.
- CDS Sensor: Light sensor for auto backlight function.
- NCV Green Light: Indicates non-contact voltage detecció.
- NCV Detection Area: Area for non-contact voltage detecció.
- Visualització: 40000-count digital display with bar graph.
- Tecla SELECT: Toggles between functions within a rotary switch position (e.g., AC/DC, Diode/Continuity).
- Tecla HOLD: Congela la lectura actual de la pantalla.
- RANGE Key: Switches between auto and manual ranging.
- REL Key: Activates relative measurement mode.
- Hz/Duty Key: Toggles between frequency and duty cycle measurements.
- MAX/MIN Key: Displays maximum and minimum measured values.
- Transistor hFE Test Input Jack: Sockets for transistor testing.
- Interruptor rotatiu: Selecciona la funció de mesura desitjada.
- VΩHz COM T- Input Jack: Common input for voltage, resistance, frequency, and temperature.
- COM T- Input Jack: Common input for all measurements.
- Entrada de 20A: Input for high current measurements (up to 20A).
- µAmA T+ Input Jack: Input for microampere and milliampmesures actuals.
4. Configuració
4.1 Instal·lació de la bateria
The HP-770D multimeter requires one 9V battery for operation. The battery compartment is located on the back of the device.
- Assegureu-vos que el multímetre estigui APAGAT.
- Localitzeu la tapa del compartiment de la bateria a la part posterior de la unitat.
- Use a small Phillips head screwdriver to loosen the screw securing the battery cover.
- Traieu la tapa de la bateria.
- Connect the 9V battery to the battery clip, observing correct polarity (+ to + and - to -).
- Col·loqueu la bateria al compartiment.
- Torneu a col·locar la tapa de la bateria i premeu el cargol.

Figura 4: posterior view of the HP-770D, showing the battery compartment and the 180° rotating kickstand.
4.2 Connexió del cable de prova
Always connect the test leads to the correct input jacks for the desired measurement. The HP-770D features a mechanical blocking system to prevent incorrect lead insertion.
- Per al voltage, Resistance, Frequency, Capacitance, Diode, Continuity, and Temperature measurements, insert the black test lead into the COM T- presa i el cable de prova vermell al VΩHz jack.
- For Current measurements (µA/mA), insert the black test lead into the COM T- presa i el cable de prova vermell al µAmA T+ jack.
- For high current measurements (up to 20A), insert the black test lead into the COM T- presa i el cable de prova vermell al 20A jack.
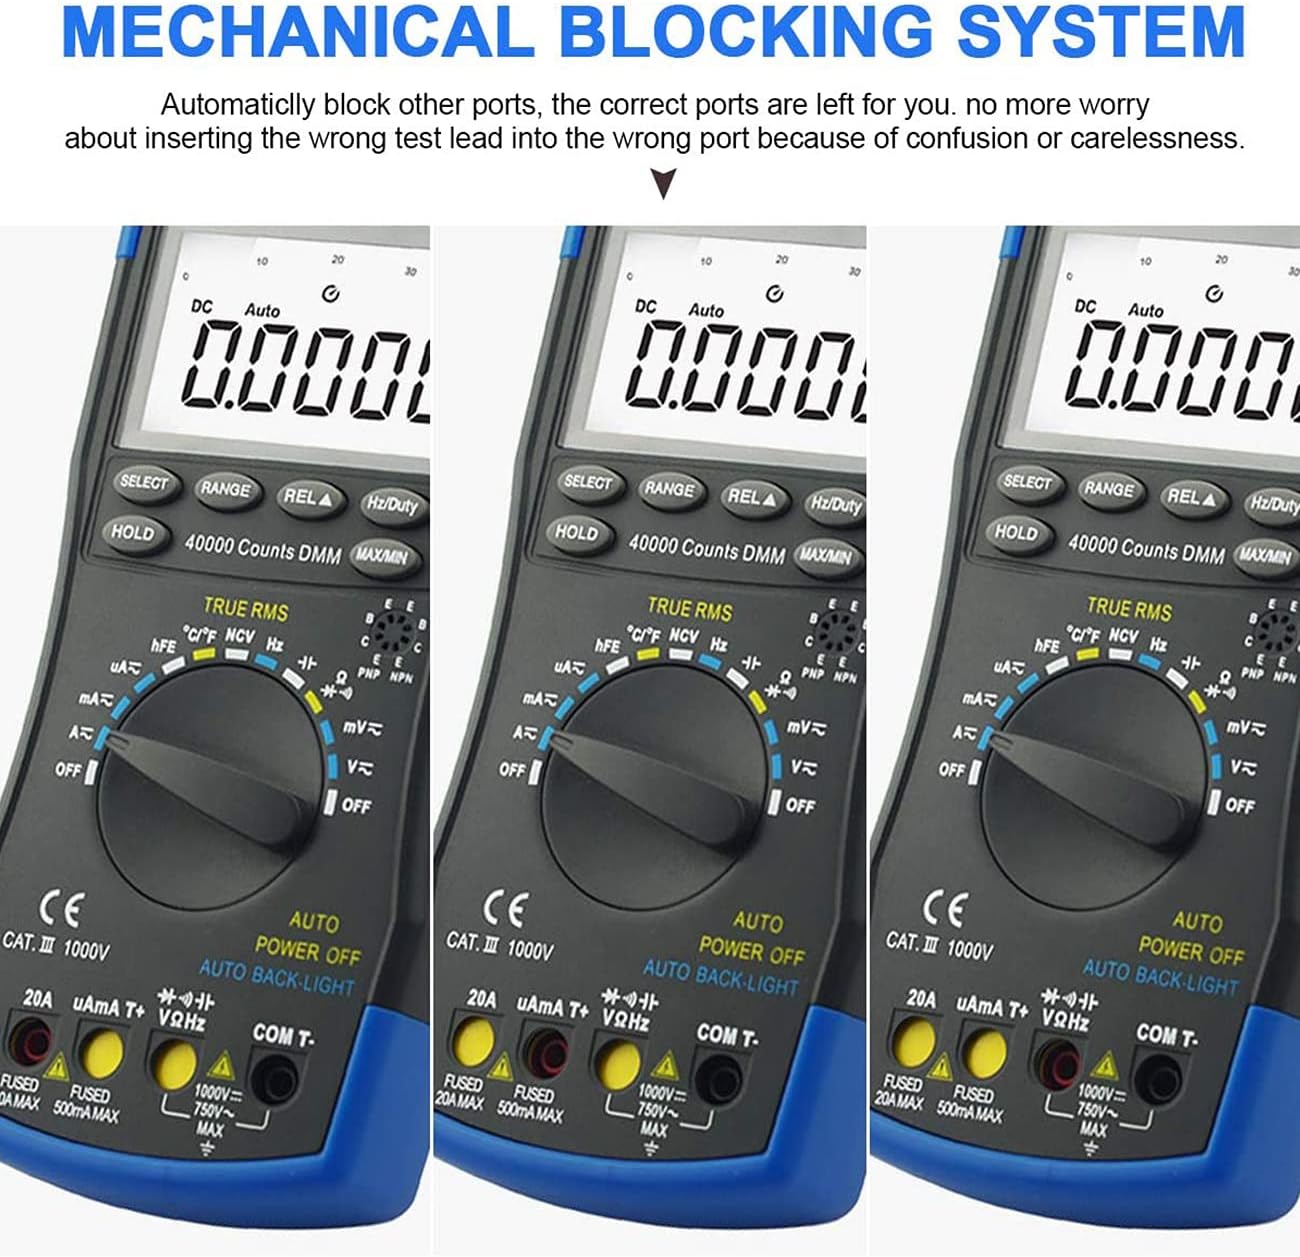
Figure 5: The mechanical blocking system automatically blocks incorrect input ports based on the selected function, enhancing safety.
5. Instruccions de funcionament
Before any measurement, ensure the multimeter is set to the correct function and range, and the test leads are properly connected.
5.1 DC/AC Voltage Mesura
- Gireu el commutador giratori cap a V~ (Volum AC)tage) o V- (DC Voltage) posició.
- Connect the test leads to the circuit in parallel.
- Llegeix el voltage value on the display. Use the SELECCIONA button to toggle between AC and DC if in a combined mode.
5.2 Mesura de corrent continu/alterna
- Gireu el commutador giratori cap a µA~, mA~, o A~ position (for AC or DC current).
- Connecteu els cables de prova en sèrie amb el circuit.
- Read the current value on the display. Use the SELECCIONA button to toggle between AC and DC if in a combined mode.
5.3 Mesura de la Resistència
- Gireu el commutador giratori cap a Ω posició.
- Assegureu-vos que el circuit estigui desenergitzat abans de mesurar la resistència.
- Connecteu els cables de prova al component que s'ha de mesurar.
- Llegiu el valor de resistència a la pantalla.
5.4 Mesura de la capacitat
- Gireu el commutador giratori cap a Capacitat posició.
- Assegureu-vos que el condensador estigui completament descarregat abans de connectar els cables de prova.
- Connecteu els cables de prova a través del condensador.
- Llegiu el valor de la capacitat a la pantalla.
5.5 Mesura de freqüència i cicle de treball
- Gireu el commutador giratori cap a Hz posició.
- Connecteu els cables de prova a la font de senyal.
- Premeu el botó Hz/Deure button to switch between frequency (Hz) and duty cycle (%).
- Llegeix el valor a la pantalla.
5.6 Diode Test and Continuity Buzzer
- Gireu el commutador giratori cap a Díode/Continuitat posició.
- Premeu el botó SELECCIONA button to toggle between Diode Test and Continuity.
- Prova de díode: Connecteu el cable vermell a l'ànode i el cable negre al càtode. La pantalla mostra el volum directe.tagcaiguda electrònica. Invertiu els cables per comprovar si hi ha un circuit obert.
- Continuïtat: Connecteu els cables de prova al circuit o component. Un so continu indica continuïtat (baixa resistència).
5.7 Mesura de la temperatura
- Gireu el commutador giratori cap a ° C / ° F posició.
- Insert the temperature probe into the VΩHz i COM T- preses.
- Place the probe tip on or in the object whose temperature is to be measured.
- Premeu el botó SELECCIONA botó per canviar entre Celsius (°C) i Fahrenheit (°F).
- Llegiu el valor de la temperatura a la pantalla.

Figure 6: The HP-770D can measure temperature using the included probe, suitable for liquids or surfaces.
5.8 Vol. sense contactetage (NCV) Detecció
- Gireu el commutador giratori cap a NCV posició.
- Move the NCV detection area (top of the meter) close to the wire or power outlet.
- The red and green NCV lights will illuminate, and the buzzer will sound, indicating the presence of AC voltage.

Figure 7: NCV function allows detection of live wires without direct contact, enhancing safety.
5.9 hFE Test (Transistor Test)
- Gireu el commutador giratori cap a hFE posició.
- Identify if the transistor is NPN or PNP.
- Insert the transistor leads (Emitter, Base, Collector) into the corresponding hFE test input jacks.
- The display will show the hFE (DC current gain) value.
5.10 Funcions especials
- Retenció de dades (HOLD): Premeu el botó MANTENIM per congelar la lectura actual a la pantalla. Premeu-la de nou per alliberar-la.
- MÀXIM / MÍN: Premeu el botó MAX/MIN button to display the maximum or minimum value recorded during a measurement session.
- Valor relatiu (REL): Premeu el botó REL button to set the current reading as a reference point, and subsequent measurements will be displayed as a deviation from this reference.
- Retroil·luminació automàtica: The display backlight automatically adjusts based on ambient light conditions.
- Apagat automàtic: El multímetre s'apagarà automàticament després d'un període d'inactivitat per estalviar bateria.
- RMS veritable: Proporciona mesures precises de CA per a formes d'ona no sinusoïdals.
6. Manteniment
6.1 Neteja
Per netejar el multímetre, netegeu la carcassa amb aiguaamp cloth and a mild detergent. Do not use abrasives or solvents. Ensure the device is turned off and disconnected from any circuits before cleaning.
6.2 Substitució de la bateria
When the battery low indicator appears on the display, replace the 9V battery as described in Section 4.1. Always use a fresh 9V battery.
6.3 Canvi de fusibles
If the current measurement function fails, the fuse may need replacement. Refer to the specifications for the correct fuse type. Fuse replacement should only be performed by qualified personnel.
- F1 Fuse: 500mA/250V (for µA/mA range)
- F2 Fuse: 20A/250V (for 20A range)
Warning: To avoid electric shock or damage to the meter, never attempt to replace the fuse with the test leads connected to a circuit.
7. Solució De Problemes
| Problema | Causa possible | Solució |
|---|---|---|
| Sense pantalla o pantalla tènue | Low battery; Power off; Faulty display. | Replace battery; Turn on the meter; Contact support. |
| Lectures incorrectes | Wrong function selected; Incorrect lead connection; Out of range. | Select correct function; Connect leads properly; Select appropriate range or auto-range. |
| La mesura de corrent no funciona | Blown fuse; Incorrect lead connection. | Check and replace fuse (see 6.3); Ensure leads are in current input jacks. |
| Continuity buzzer not sounding | High resistance; Not in continuity mode. | Check resistance; Ensure rotary switch is on continuity and SELECT button is pressed. |
8. Especificacions
| Paràmetre | Interval/Valor |
|---|---|
| Mostra | 40000 recomptes |
| Selecció de rang | Distància automàtica/manual |
| DC Voltage | 40mV/400mV/4V/40V/400V/1000V |
| Vol. ACtage | 40mV/400mV/4V/40V/400V/750V |
| Corrent DC | 400µA/4000µA/40mA/400mA/4A/20A |
| Corrent alterna | 400µA/4000µA/40mA/400mA/4A/20A |
| Resistència | 400Ω/4kΩ/40kΩ/400kΩ/4MΩ/40MΩ |
| Capacitat | 9.999nF/99.99nF/999.9nF/9.999µF/99.99µF/999.9µF/9.999mF/99.99mF |
| Freqüència | 9.999Hz/99.99Hz/999.9Hz/9.999KHz/99.99KHz/999.9KHz/9.999MHz |
| Temperatura | -20 ℃ ~ 1000 ℃ (-4 ℉ ~ 1832 ℉) |
| Cicle de treball | 0.1% ~ 99.9% |
| Dimensions | 195 x 88 x 40 mm (7.68 x 3.46 x 1.57 polzades) |
| Pes | 350 g (0.77 lliures) |
| Font d'alimentació | Bateria de 9 V |
| Normes de seguretat | IEC-1010, Double Insulation, CAT III Overvoltage |
9. Garantia i Suport
The AOPUTTRIVER HP-770D Digital Multimeter is covered by a garantia de dos anys des de la data de compra. Aquesta garantia cobreix els defectes de materials i de mà d'obra en ús normal.
For technical support, warranty claims, or any inquiries regarding your product, please contact AOPUTTRIVER customer service. Refer to the contact information provided with your product packaging or visit the official AOPUTTRIVER weblloc d'assistència.
Si us plau, conserveu el rebut de compra com a comprovant de compra a efectes de garantia.
Ask a question about this manual
Ask about setup, troubleshooting, compatibility, parts, safety, or missing instructions. Manuals+ will review the question and use this page’s manual context to help answer it.