
AZZA CSAZ-340F
AZZA CSAZ-340F CELESTA ATX Mid Tower Gaming Case
Manual d'usuari
1. Introducció
This manual provides comprehensive instructions for the installation, operation, and maintenance of your AZZA CSAZ-340F CELESTA ATX Mid Tower Gaming Case. Please read this manual thoroughly before beginning installation to ensure proper setup and to maximize the performance and longevity of your system components.

Figura 1: The AZZA CSAZ-340F CELESTA Mid Tower ATX Case, showcasinel seu disseny i factor de forma.
2. Informació de seguretat
- Always disconnect the power supply from the wall outlet before installing or removing any components inside the case.
- Manipuleu tots els components amb cura per evitar danys per descàrrega electrostàtica (ESD). Penseu en la possibilitat d'utilitzar una polsera antiestàtica.
- Keep the case and components away from liquids and excessive moisture.
- Assegureu-vos que hi hagi una ventilació adequada al voltant de la carcassa per evitar el sobreescalfament.
- Do not attempt to modify the case structure or components, as this may void your warranty and pose safety risks.
- Keep small parts and packaging materials out of reach of children.
3. Contingut del paquet
Verifiqueu que tots els elements que s'enumeren a continuació siguin presents al vostre paquet:
- AZZA CSAZ-340F CELESTA ATX Mid Tower Gaming Case
- Caixa d'accessoris (que conté cargols, separadors, brides per a cables, etc.)
- Manual d'usuari (aquest document)
4. Especificacions
The following table details the technical specifications of the AZZA CSAZ-340F CELESTA case:
| Característica | Especificació |
|---|---|
| Marca | AZZA |
| Nom del model | CSAZ-340F CELESTA |
| Tipus de cas | Torre mitja |
| Compatibilitat amb la placa base | ATX, Micro ATX, Mini ITX |
| Color | Negre |
| Material | Metall |
| Tipus de muntatge de la font d'alimentació | Muntatge inferior |
| Mètode de refrigeració | Aire |
| Fan Size (Included/Supported) | 120mm (Rear included), Supports 120mm/140mm |
| Longitud màxima de la GPU | 320 mm |
| Alçada màxima del refrigerador de la CPU | 165 mm |
| Longitud màxima de la PSU | 160 mm |
| 3.5" HDD Support | 2 |
| 2.5" SSD Support | 4/6 (depending on configuration) |
| Suport del ventilador frontal | 3 x 120 mm o 3 x 140 mm |
| Suport principal dels fans | 2 x 120 mm o 2 x 140 mm |
| Suport del ventilador posterior | 1 x 120 mm |
| Suport frontal del radiador | Up to 280mm/360mm |
| Suport superior del radiador | 2 x 120mm (from image) |
| Suport del radiador posterior | 1 x 120mm (from image) |
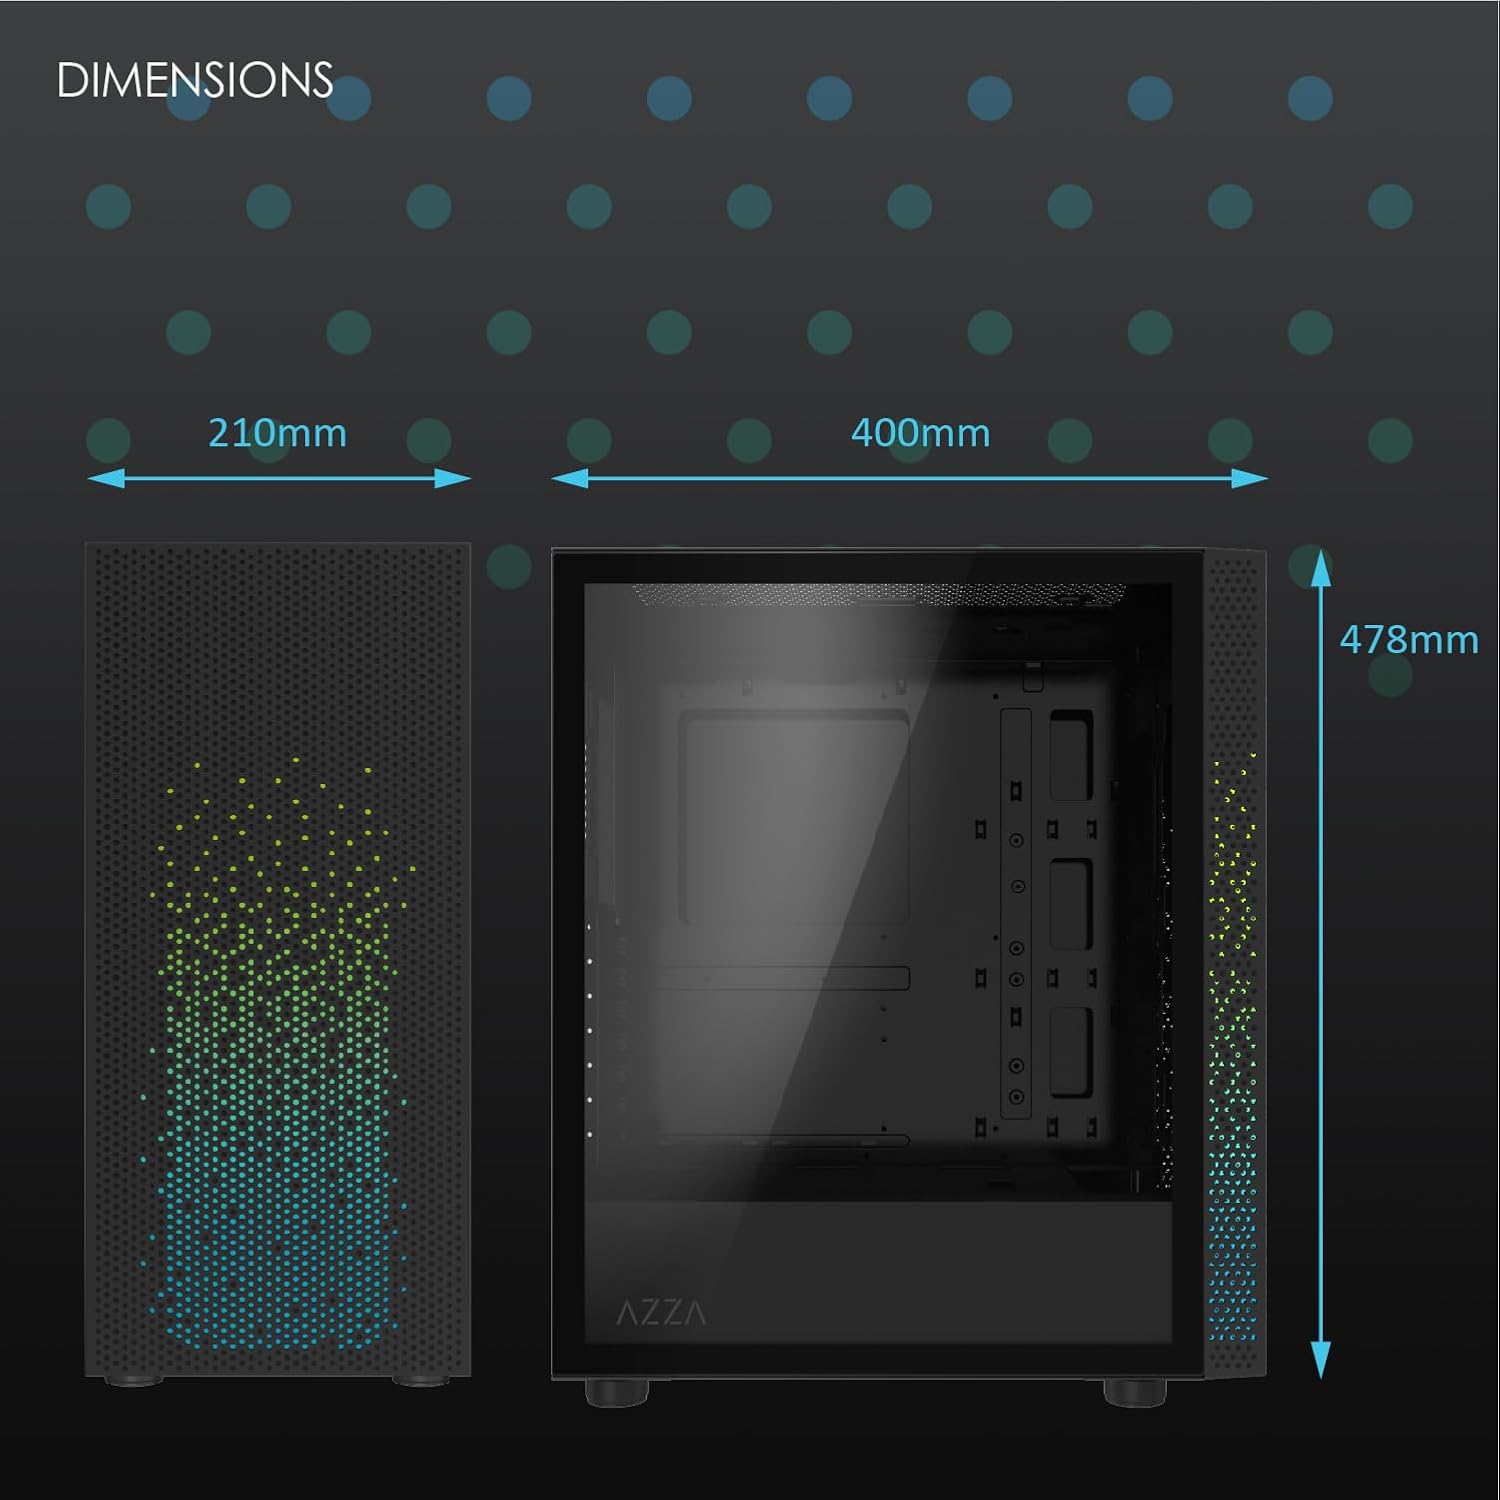
Figura 2: Physical dimensions of the AZZA CSAZ-340F CELESTA case: 210mm (width), 400mm (depth), 478mm (height).

Figura 3: Diagram illustrating fan and radiator mounting options for the AZZA CSAZ-340F CELESTA case, including front, top, and rear configurations.

Figura 4: Internal component support diagram for the AZZA CSAZ-340F CELESTA, showing maximum dimensions for CPU cooler, GPU, and PSU, along with drive bay locations.
5. Configuració i instal·lació
Follow these steps to install your components into the AZZA CSAZ-340F CELESTA case.
5.1 Preparació del cas
- Col·loqueu la caixa sobre una superfície plana i estable.
- Remove the side panels. Typically, these are secured with thumbscrews at the rear of the case.
5.2 Instal·lació de la placa base
- Install the I/O shield (if not pre-installed) into the rear opening of the case.
- Ensure the correct standoffs are installed for your ATX, Micro-ATX, or Mini-ITX motherboard. Adjust or add standoffs as needed using the provided tools.
- Col·loca amb cura la placa base sobre els separadors, alineant els forats dels cargols.
- Secure the motherboard with the appropriate screws from the accessory box. Do not overtighten.
5.3 Instal·lació de la unitat d'alimentació (PSU).
- Position the PSU in the bottom rear compartment of the case, ensuring the fan faces downwards (if there's a filtered vent) or upwards.
- Secure the PSU to the case with the provided screws from the rear.
- Route the necessary power cables through the cable management cutouts.
5.4 Instal·lació d'unitats d'emmagatzematge (HDD/SSD)
- Discs durs de 3.5 polzades: Locate the drive cage. Slide the 3.5" HDDs into the drive trays and secure them, often tool-less or with screws.
- SSD de 2.5 polzades: Mount 2.5" SSDs to the dedicated mounting points on the motherboard tray or drive cage using screws.
- Connect SATA data and power cables to the installed drives.
5.5 Instal·lació de la targeta gràfica (GPU)
- Traieu les cobertes de les ranures PCIe necessàries de la part posterior de la carcassa.
- Carefully insert your graphics card into the appropriate PCIe slot on the motherboard until it clicks into place.
- Fixeu la targeta gràfica a la carcassa amb cargols.
- Connect any required PCIe power cables from the PSU to the graphics card.
5.6 Instal·lació del refrigerador de CPU
Install your CPU cooler according to its specific manufacturer instructions. Ensure it does not exceed the maximum height of 165mm.
5.7 Instal·lació del ventilador i del radiador
The case supports various fan and radiator configurations:
- Davant: Up to 3 x 120mm or 3 x 140mm fans, or radiators up to 280mm/360mm.
- A dalt: Up to 2 x 120mm or 2 x 140mm fans, or 2 x 120mm radiators.
- posterior: 1 x 120mm fan (pre-installed) or 1 x 120mm radiator.
Mount fans and radiators using the appropriate screws and ensure proper airflow direction.
5.8 Gestió de cables
Utilize the cable management cutouts and tie-down points behind the motherboard tray to route and secure cables. This improves airflow and aesthetics.
5.9 Assemblea final
- Double-check all connections and ensure no cables are obstructing fans.
- Reattach the side panels.
- Connect external peripherals (monitor, keyboard, mouse, etc.) and the power cable.
6. Funcionament del sistema
Once all components are installed and connected, you can power on your system. The front panel features power and reset buttons, along with USB and audio ports for convenient access.

Figura 5: Close-up of the AZZA CSAZ-340F CELESTA's front panel, highlighting the integrated lighting effects.
7. Manteniment
- Filtres de pols: Regularly clean the dust filters (if present) to maintain optimal airflow and cooling performance.
- Neteja interior: Periodically open the case and use compressed air to remove dust from components and fans. Ensure the system is powered off and unplugged before cleaning.
- Neteja exterior: Netegeu les superfícies exteriors amb un damp tela. Eviteu els productes químics durs.
8. Solució De Problemes
Si teniu problemes, tingueu en compte els passos habituals següents per resoldre'ls:
- El sistema no s'encén:
- Assegureu-vos que el cable d'alimentació estigui connectat correctament tant a la font d'alimentació com a la presa de corrent.
- Check that the PSU switch is in the "ON" position.
- Verify all internal power connections (24-pin ATX, 8-pin CPU, PCIe power) are seated correctly.
- Confirmeu que els cables del botó d'engegada del panell frontal estiguin connectats correctament a la placa base.
- Sense sortida de pantalla:
- Assegureu-vos que el monitor estigui connectat a la targeta gràfica (no als ports gràfics integrats de la placa base, tret que utilitzeu gràfics integrats).
- Torneu a col·locar la targeta gràfica a la ranura PCIe.
- Check monitor input selection.
- Sobreescalfament:
- Verify all case fans are spinning and oriented correctly for airflow.
- Clean any dust filters and internal components.
- Assegureu-vos que el refrigerador de la CPU estigui correctament col·locat i que faci bon contacte amb la CPU.
9. Garantia i Suport
Per obtenir informació sobre la garantia i assistència tècnica, consulteu la pàgina oficial d'AZZA. weblloc web o contacteu directament amb el servei d'atenció al client d'AZZA. Conserveu el comprovant de compra per a reclamacions de garantia.
Oficial d'AZZA Weblloc: www.azza.com
Documents relacionatsCSAZ-340F


Ask a question about this manual
Ask about setup, troubleshooting, compatibility, parts, safety, or missing instructions. Manuals+ will review the question and use this page’s manual context to help answer it.