
1. Introducció
The Philips NeoPix Prime 2 is a True HD 720p projector designed for versatile home entertainment. It features a built-in media player, smart operating system with pre-loaded applications, and various connectivity options. This manual provides essential information for setting up, operating, and maintaining your projector.

Imatge 1.1: De dalt a baix view of the Philips NeoPix Prime 2 Projector.
Característiques principals:
- Vivid Display: Up to 80" display in True HD 720p (1280x720p resolution).
- Smart OS: Pre-loaded apps and a smooth Philips OS for direct content streaming.
- Image Corrections: Automatic rotation and keystone, 4 corners correction, digital zoom, and panel flip functions.
- Versatile Connectivity: HDMI, USB, Wi-Fi, Bluetooth.
- AirMote: Control the NeoPix Prime 2 with remote gesture.
- Long-lasting LED Light Source: Over 20,000 hours of operation.
2. Configuració
Follow these steps to set up your Philips NeoPix Prime 2 projector for the first time.
2.1 Desembalatge i contingut
Carefully remove all components from the packaging. The box should contain the Philips NeoPix Prime 2 projector, a Philips AirMote remote control, a power cord, and various plug adapters (US, UK, European).
Video 2.1: Unboxing the Philips NeoPix Prime 2 Projector. This video demonstrates the unboxing process, showcasing the projector's compact design, the included AirMote remote, and the power cord with various international plug adapters.
2.2 Connexió d'alimentació
- Select the appropriate plug adapter for your region and attach it to the power cord.
- Connecteu el cable d'alimentació a l'entrada d'alimentació del projector.
- Connecteu l'adaptador d'alimentació a una presa de corrent adequada.
2.3 Col·locació inicial
Place the projector on a stable, flat surface. Ensure there is adequate ventilation around the device. The projector can be placed in various positions (front, rear, ceiling) thanks to its automatic image correction features.

Image 2.2: The Philips NeoPix Prime 2 Projector set up for viewing.
3. Instruccions de funcionament
Learn how to navigate the Philips OS and control your projector.
3.1 Engegada/apagada
Press the power button on the projector or the remote control to turn the device on or off. The LED light source will illuminate, and the Philips OS interface will appear on your projection surface.
3.2 Navigating the Philips OS
The Philips OS provides a user-friendly interface for accessing features and applications. Use the AirMote remote control to navigate through menus and select options. The remote supports gesture control for intuitive interaction.
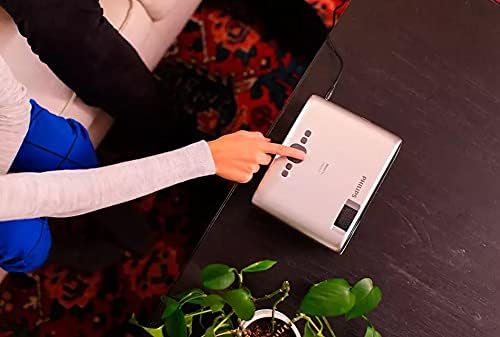
Image 3.1: A user operating the projector using its integrated top controls.
3.3 Image Adjustments
The NeoPix Prime 2 offers several image correction features:
- Automatic Keystone: The projector can automatically correct image distortions caused by angled projection. This feature ensures a rectangular image even if the projector is not perfectly aligned.
- Keystone manual: For fine-tuning, you can manually adjust the keystone correction via the settings menu.
- 4 Corners Correction: This advanced feature allows you to adjust each corner of the projected image independently, providing precise control over the image shape.
- Zoom digital: Adjust the size of the projected image without moving the projector.
- Panel Flip: Adjust the image orientation for different projection setups (e.g., ceiling mount, rear projection).
4. Connectivitat
The Philips NeoPix Prime 2 offers a wide range of connectivity options for various devices.
4.1 Physical Ports
The projector includes the following physical ports:
- HDMI: Connect to laptops, gaming consoles, Blu-ray players, and other HDMI-enabled devices.
- USB: Connect USB drives for media playback or external devices.
- VGA: Connect to older computers or devices with VGA output.
- Sortida d'àudio (connector de 3.5 mm): Connecteu altaveus externs o auriculars.
- Ranura per a targetes Micro SD: Insert a Micro SD card for additional storage and media playback.
4.2 Connectivitat sense fil
- Wi-Fi Screen Mirroring: Stream content directly from your smartphone, tablet, or laptop to the projector. This supports AirPlay for iOS devices and Android screen mirroring. Note: DRM-protected streaming platforms like Netflix and Amazon Prime may not be supported via Wi-Fi Screen Mirroring.
- Bluetooth: Connect Bluetooth-enabled audio devices for enhanced sound.
5. Media Playback and Storage
The NeoPix Prime 2 is equipped with internal storage and a media player for direct content access.
- Aplicacions preinstal·lades: Access popular streaming applications directly from the home menu.
- Emmagatzematge intern: The projector includes 16GB of internal storage for videos, photos, and music.
- Reproductor multimèdia: The integrated media player supports various file formats, allowing you to play content from internal storage, USB drives, or Micro SD cards.
6. Àudio
The projector provides integrated audio capabilities and options for external sound.
- Ponents interns: Two 5-watt internal speakers deliver clear audio.
- Configuració d'àudio: Within the Philips OS, you can select surround sound modes or adjust the equalization to customize your listening experience.
- Àudio extern: Connect external speakers or headphones via the 3.5mm audio out jack for a more immersive or private audio experience.
7. Manteniment
Un manteniment adequat garanteix la longevitat i el rendiment òptim del vostre projector.
- Neteja de lents: Gently clean the projector lens with a soft, lint-free cloth or lens cleaning wipes. Avoid abrasive materials.
- Ventilació: Ensure the projector's ventilation openings are clear and not obstructed to prevent overheating.
- Actualitzacions de programari: Regularly check for and install software updates via Wi-Fi to ensure you have the latest features and performance improvements.
- Emmagatzematge: When not in use, store the projector in a cool, dry place, away from direct sunlight and dust.
8. Solució De Problemes
If you encounter issues with your Philips NeoPix Prime 2, refer to the following common solutions.
- Sense imatge:
- Comproveu la connexió d'alimentació i assegureu-vos que el projector estigui encès.
- Verifiqueu que la font d'entrada estigui seleccionada correctament.
- Adjust focus and keystone settings.
- Sense so:
- Check volume levels on the projector and connected devices.
- Ensure external speakers/headphones are properly connected or Bluetooth is paired.
- Verify audio output settings in the Philips OS.
- Problemes de connectivitat:
- For Wi-Fi, ensure the projector is connected to a stable network.
- For screen mirroring, ensure your device is compatible and on the same network.
- For wired connections, check cables for damage and ensure they are securely plugged in.
- El control remot no respon:
- Comproveu les bateries del comandament a distància.
- Assegureu-vos que no hi hagi obstacles entre el comandament a distància i el projector.
9. Especificacions
Detailed technical specifications for the Philips NeoPix Prime 2 Projector.

Image 9.1: Dimensions of the Philips NeoPix Prime 2 Projector.
| Característica | Especificació |
|---|---|
| Nom de marca | Philips |
| Pes de l'article | 2.2 lliures |
| Dimensions del producte | 8.6 x 6.6 x 3.5 polzades |
| Número de model de l'article | NPX542 |
| Bateries | Requereix 1 pila C (incloses) |
| Nom del color | Negre |
| Característiques especials | Sense fil |
| Usos recomanats per al producte | Jocs |
| Tecnologia de connectivitat | USB, HDMI, Wi-Fi, Bluetooth |
| Resolució de pantalla màxima | 1920 x 1080 (Supports True HD 720p native) |
| Font de llum | LED (20,000+ hours lifespan) |
10. Garantia i Suport
For warranty information and technical support, please refer to the documentation included with your product or visit the official Philips support weblloc web. Conserveu el comprovant de compra per a reclamacions de garantia.